
Identify Your Mercedes Key, Swap the Battery, and Test It
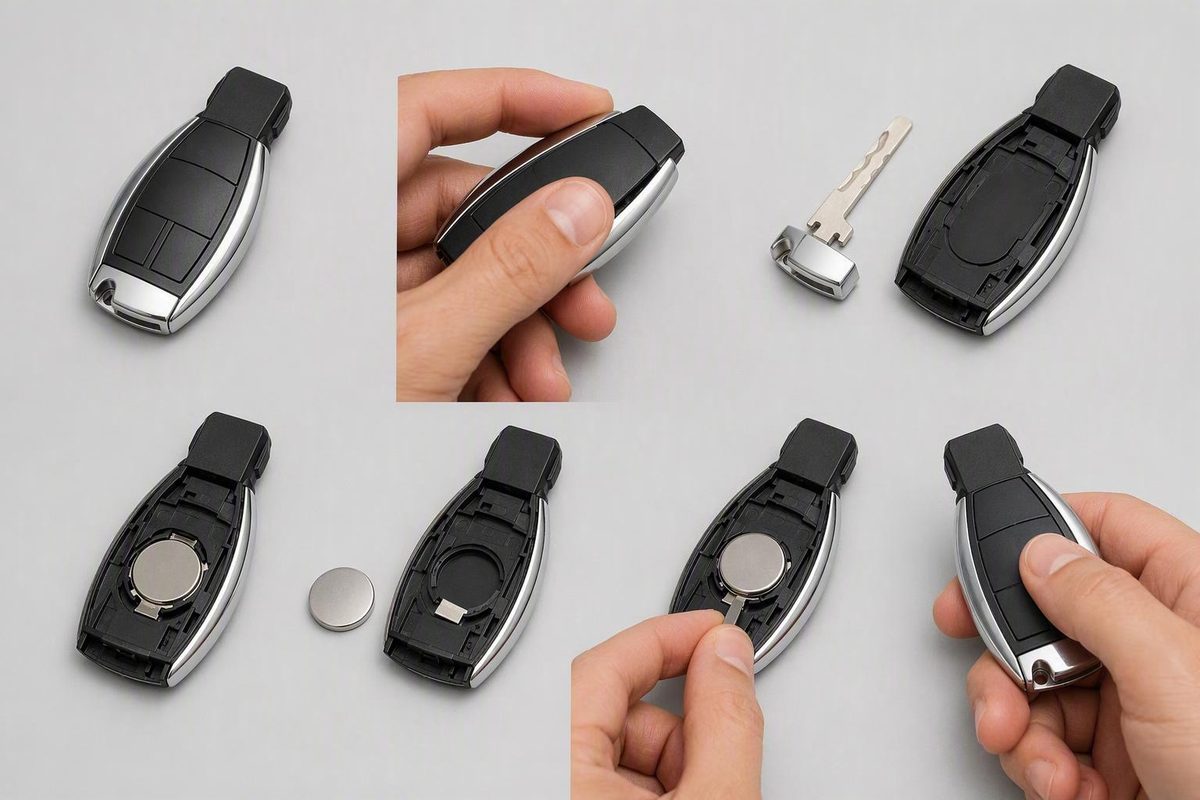
Match the fob’s release, remove the hidden key, verify battery code, quantity and polarity, then install, close and test without forcing the case.
To replace a Mercedes-Benz key battery, first identify the fob’s physical release mechanism. Remove the hidden mechanical key and use it only at the designated cover-release point. Before removing the battery, record its code, quantity, and polarity. Install the same specified battery in the original orientation, close the housing without force, reinsert the mechanical key, and test the remote near the vehicle. If the installed battery appears loose or conflicts with the exact vehicle documentation, follow the manual rather than copying a potentially incorrect previous installation.
The quick answer: identify the key before opening it
Mercedes-Benz has used materially different key designs, so there is no dependable opening method based on the brand name, vehicle age, chrome trim, or button shape alone. Dealership instructions commonly divide the fobs into an “older SmartKey” and a “Chrome SmartKey,” but those are broad physical-design labels rather than definitive model-year categories.
Use this sequence:
- Examine the fob and locate its mechanical-key release.
- Remove the hidden mechanical key.
- Find the designated cover-release slot inside or beside the key opening.
- Open the compartment without prying along an arbitrary case seam.
- Verify the installed battery before removing it.
- Install the specified replacement in the recorded orientation.
- Close the housing evenly and reinsert the mechanical key.
- Test lock, unlock, and another available remote button near the vehicle.
| Physical design | Mechanical-key release location | Cover-release method | Battery-verification step |
|---|---|---|---|
| Commonly described older SmartKey; often a squarer body, but appearance is not definitive | End latch or sliding release | Insert the removed mechanical key into the designated housing slot to release the backing or compartment | Record the installed code, number of cells, and polarity |
| Commonly described Chrome SmartKey; often rounded with silver, chrome, or gloss-black trim, but finish is not definitive | Tab or release at the bottom | Use the mechanical key at the narrow or flat release point inside the opening | Check for a removable carrier, then record the cell and orientation |
| Fob matching neither mechanism | Consult the exact manual | Do not probe or pry an arbitrary seam | Confirm the procedure and battery specification from model-specific documentation |
If you cannot locate the exact latch and opening point described for either design, stop and compare the key with model-specific documentation or verified guide images before opening it.
Confirm the battery before buying a replacement
Open the correct compartment before purchasing a CR2025 or CR2032. Take a clear photograph showing:
- The complete code printed on each battery
- The number of cells installed
- Which side faces outward or upward
- How the cell sits beneath or against the contacts
Do not rely on a listing that says a battery fits “Mercedes-Benz.” The available dealership guidance conflicts. Mercedes-Benz of Hampton assigns one CR2025 to the broadly described Chrome SmartKey and two CR2025 cells to the older SmartKey in its battery-replacement guide.
By contrast, Mercedes-Benz of Fresno says its post-2017 Chrome design uses one CR2032, while the older designs it discusses use one or two CR2025 cells depending on the stated year range. Its instructions also describe a Chrome-style key with a sliding battery carrier. These are broad dealership categories, not definitive compatibility rules for every key or model year, so use the exact documentation for your vehicle when available rather than treating those ranges as a parts lookup (Mercedes-Benz of Fresno guide).
Do not assume CR2025 and CR2032 are interchangeable simply because the labels are similar. In a user-generated discussion about a 2019 W213 key, one owner reported that the manual specified a CR2032 while a CR2025 previously installed in one fob felt loose. That anecdote is not universal compatibility evidence, but it illustrates why a battery that powers the fob may still be the wrong fit (MBWorld W213 discussion).
Before installation, confirm:
- [ ] The new battery code matches the exact specification or a correctly fitted removed cell.
- [ ] The number of replacement cells matches the documented requirement.
- [ ] You have a photograph or written record of the original polarity.
- [ ] The contacts look present, aligned, and undamaged.
- [ ] The new cell sits securely without bending a contact or requiring force.
If the old battery is loose, raised, or different from the owner’s manual specification, do not use it as your template. Follow the model-specific documentation instead.
How to replace the battery in the commonly described older SmartKey
Use this procedure only if the end release and housing slot match the older SmartKey construction:
- Hold the fob securely. Keep control of the backing as it releases.
- Operate the end latch or sliding release. Pull the hidden mechanical key completely out.
- Locate the designated housing slot. Insert the mechanical key into that slot rather than prying around the outer seam.
- Release the backing or battery compartment. Apply only enough controlled pressure to disengage it.
- Verify the battery. Use your photograph or notes to confirm the code, quantity, and polarity.
- Remove the old cell or cells. Observe how they engage with the contacts.
- Install the specified replacements. Follow the recorded orientation or the exact manual.
- Restore the compartment. Align the backing or holder and close it evenly.
- Reinsert the mechanical key. Check that the latch engages and the housing sits flush.
Do not assume every older SmartKey contains two CR2025 batteries. Dealership guides disagree about quantity, and their broad “older” label does not identify every fob variation.
If the compartment resists closure, reopen it. Check for a raised battery, misaligned backing, displaced contact, or incorrectly seated holder instead of compressing the case by force.
How to replace the battery in the commonly described Chrome SmartKey
Use these steps when the key has the matching bottom release and internal cover-release point:
- Operate the bottom release. Pull or press the tab while supporting the fob.
- Remove the mechanical key. Slide it completely out.
- Find the narrow or flat release point. Use the mechanical key there to disengage the rear cover. Do not lever against decorative trim or an unrelated edge.
- Inspect the internal construction. Some versions expose the battery beneath the cover; another described design uses a removable carrier.
- Remove the carrier only if one is present. Release it carefully and slide it straight out without bending its tabs.
- Verify and remove the old battery. Refer to the record made before removal.
- Install the specified replacement. Preserve the documented orientation.
- Return the carrier, if fitted. Make sure it is fully seated.
- Align and close the rear cover. Press it into place without forcing the tabs.
- Reinstall the mechanical key. Confirm that the bottom release locks.
The Fresno guide specifies a CR2032 installed positive-side up for the particular sliding-carrier construction it describes. That instruction is limited to that design; it is not a universal polarity rule for every Chrome SmartKey.
Test the key and troubleshoot a failed replacement
Stand near the vehicle and test:
- Lock
- Unlock
- Trunk release, panic, or another available remote button
If there is no response, reopen the fob and check the installation before assuming the key needs programming or replacement:
- Does the printed battery code match the specification?
- Is the polarity correct?
- Is the battery flat, secure, and fully seated?
- Does it make firm contact with the terminals?
- Are any contacts bent, displaced, or damaged?
- Is the carrier, if present, fully inserted?
- Is the cover completely latched?
- Is there moisture, residue, cracking, or impact damage inside the housing?
Test a spare key if one is available.
Keep remote-button failure separate from starting failure. Replacing a coin cell is not the same as replacing or programming the entire key, and a no-start should not automatically be blamed on the new fob battery. In one owner-reported case involving a 2004 S500, the key would not turn after the fob batteries were changed; the owner later reported a severely discharged vehicle battery and said operation returned after substituting another battery and charging the original. That is a W220-specific anecdote, not a rule for other Mercedes-Benz systems (BenzWorld discussion).
Do not assume programming is always required—or never required. If the battery is correct, properly oriented, securely seated, and the housing is intact, follow the exact owner’s-manual troubleshooting procedure for the vehicle before paying for a replacement key.
What to do about “Replace Key Battery” or “Key Not Detected”
Warning meanings and emergency procedures vary by model. For the March 2023 GLC SUV X254, the official Mercedes-Benz manual says “Replace Key Battery” means the key battery is discharged and should be replaced. The same manual does not treat “Key Not Detected” as proof that the coin cell is dead (Mercedes-Benz GLC SUV X254 SmartKey manual).
For that GLC, Mercedes-Benz directs the driver to:
- Change the key’s location inside the vehicle.
- Try to start the vehicle again.
- If the key remains undetected, place it in the vehicle’s marked starting space and use the emergency operating procedure.
- Seek a qualified specialist workshop if detection still fails.
That sequence is specific to the cited GLC. The location of the marked starting space and the emergency-start procedure can differ in another model, so consult the manual for your own vehicle rather than copying the GLC steps.
The hidden mechanical key may provide emergency door access when the remote is unresponsive, but key-cylinder locations, cover-removal methods, and dead-fob starting procedures are not identical across the range (Mercedes-Benz Burlington dead-fob guidance).
The verification rule is straightforward: identify the fob, open it only at its designed release point, confirm the specified battery and orientation, and test the key before pursuing programming or replacement. If a correct, properly seated battery does not restore operation—or the vehicle continues to report that the key is not detected—follow the exact Mercedes-Benz manual for that model and seek qualified diagnosis rather than forcing the housing or guessing at another battery.