
Change Your Honda Fob Battery Without Damaging the Case
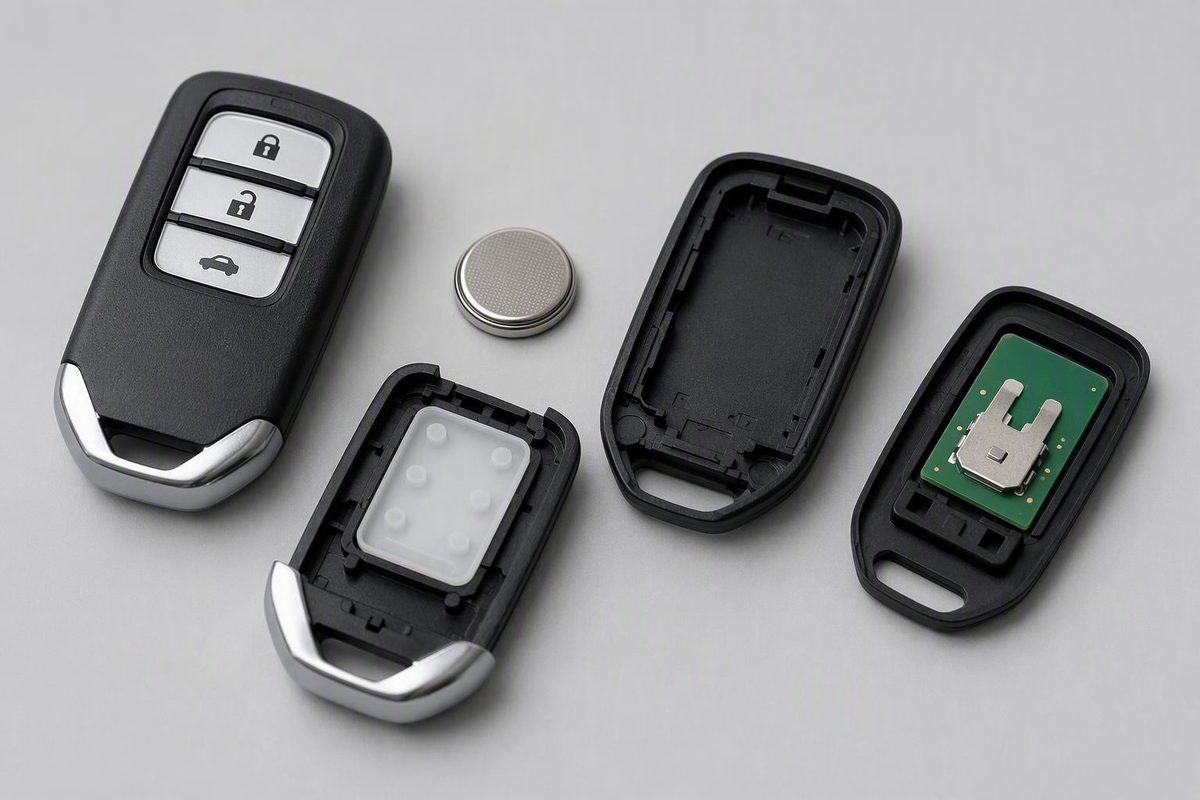
Verify the exact code, open only at the designated point, and preserve polarity and alignment. If it remains unresponsive, check installation before programming.
The correct procedure depends on the model, model year, and physical fob design.
Before applying pressure to the case, identify the fob and verify its battery. Then open it only at its intended slot or notch, photograph the original battery orientation, keep the internal parts aligned, and test every available function after reassembly. If the fob remains unresponsive, check the installation before attempting any programming procedure.
Before You Start: Identify the Honda, Fob Design, and Battery
Write down three details before buying a battery or opening the case:
- Honda model, such as Accord, Civic, CR-V, Pilot, Odyssey, Fit, or Clarity.
- Model year.
- Physical fob design, including whether it has: - A removable emergency key - A metal key permanently integrated into the housing - A small retaining screw - A molded opening slot or notch - Proximity-entry or push-button-start functions
The physical design matters as much as the vehicle name.
Most available Honda replacement guides describe a flat, circular 3-volt coin cell, but they do not establish one battery code for every Honda. The required cell can vary by vehicle and fob design (Shottenkirk Honda Huntsville’s battery guide).
Verify the exact code in this order:
- Read the code printed on the old battery, such as CR2032, CR1620, or CR1616.
- Look for a battery designation inside the housing.
- Check the owner’s manual for the exact Honda model and year.
- If those sources do not settle the question, ask a qualified Honda parts counter to identify the battery for the specific fob.
If you must open the fob to identify its battery, do not remove the cell immediately. Take a clear photograph of the battery in its holder, including its visible face and orientation. If the code is on the concealed side, photograph the installed battery first and then photograph the code as soon as you lift it out.
Illustrative Honda battery references—not guaranteed fitment
A third-party retailer lists CR2032 for selected newer Accord, Civic, CR-V, Odyssey, and Fit applications identified as fobs. Some older or alternate entries list CR1620 or CR1616. The table includes overlapping model-year ranges and does not clearly explain every distinction between entries labeled “FOB” and other entries. It demonstrates that Honda battery requirements vary, but it does not prove that a particular battery fits your key (Microbattery’s vehicle battery finder).
Do not choose a battery solely because it is circular or appears close to the right size. The replacement should match the verified code and sit flat in the holder without being forced.
If you want to buy the battery before opening the case, use documentation that distinguishes the exact model, year, and fob design. A search for a vehicle name alone can return batteries for several key styles. When sources conflict, prioritize the code on the existing battery, markings inside the housing, and instructions for the exact vehicle.
Preflight checklist
Before continuing, confirm that you have:
- Identified the model, year, and fob design
- Verified the replacement battery code
- Found the intended opening point
- Prepared a clean work surface
- Planned to photograph the battery before removal
- Stopped using any instructions that do not match the fob in front of you
Tools and Precautions for a Damage-Free Battery Change
The essential supply is the correct replacement battery. The opening tool depends on the fob’s construction.
Prepare:
- The verified replacement coin cell
- The removable emergency key, if fitted
- A small flathead screwdriver for a designated pry point
- An appropriately sized jeweler’s screwdriver if the case has a retaining screw
- A plastic pry tool if suitable for the housing
- A clean cloth
- A phone or camera
- A small container for any retaining screw
Honda dealership guidance identifies jeweler’s and flathead screwdrivers as useful for screw-retained or carefully pried housings, while also advising readers to verify the required battery from the fob or old cell (Phil Hughes Honda’s replacement guide).
Work at a clear, well-lit table. Lay down the cloth so the fob is less likely to slide and loose parts remain visible. Avoid opening it over carpet, a vehicle seat, or a cluttered surface where a button or screw could disappear.
Inspect every side of the fob before applying pressure. Look for:
- A sliding or push-button emergency-key release
- A designated slot near the top of the housing
- A molded pry notch
- A small retaining screw
- A visible opening feature at the base of an integrated key
- Cracks, deformation, moisture, or evidence of previous forced opening
Use only the designated opening point. Generic key-fob guidance advises opening at the intended notch or seam and avoiding excessive force because construction varies among fobs (AutoZone’s general replacement guide).
The internal assembly may contain separate external buttons, a rubber membrane, a circuit board, a battery holder, and small separators. Some parts may lift when the cover comes off. Keep the fob level and support the area around the battery as the housing separates.
Handle the new battery by its edges so its contact faces remain clean. Place it on the clean cloth rather than on a dirty or greasy work surface.
Stop and seek model-specific guidance if:
- The case is cracked, badly deformed, or wet
- The opening method does not match the design in front of you
- The seam does not release under gentle, controlled pressure
- A tool begins slipping toward the electronics
- The battery holder or one of its contacts appears damaged
- You cannot identify an intended slot, notch, or fastener
How to Open the Main Honda Key-Fob Designs
Choose the procedure by construction, not simply by the Honda badge.
Removable-emergency-key fob
This design has a release switch and a metal emergency key stored inside the housing.
- Hold the fob securely.
- Press or slide the emergency-key release.
- Pull the metal key straight out.
- Inspect the top of the housing for its designated opening slot.
- Insert the edge of the emergency key into that slot.
- Twist lightly rather than pushing the key deeply into the case.
- Stop when the two housing halves begin to separate.
- Place the fob flat and lift the cover slowly while supporting the area near the battery.
This opening method is documented for a removable-key Honda fob, with the additional recommendation to support the housing near the battery so the internal components remain in place (First Texas Honda’s opening instructions).
If the emergency key does not provide enough leverage, a small flathead screwdriver may work at the same designated opening point. Use only enough of the tip to engage the notch, then apply slow rotational pressure.
If the housing does not begin to separate gently, stop. Make sure the tool is in the opening slot rather than the emergency-key storage channel or an arbitrary section of the perimeter.
Screw-retained fob
Some fobs use a small screw to secure the housing.
- Choose a jeweler’s screwdriver that fits the screw head precisely.
- Place the fob flat on the cloth.
- Hold the screwdriver straight and turn slowly.
- Put the removed screw in the prepared container.
- Inspect the case for its intended notch or separation point.
- Separate the housing gently while supporting the buttons and internal assembly.
Remove the screw before trying to open the case.
Older integrated-key or unfamiliar design
Other fobs may lack both a removable emergency key and an obvious screw.
For an unfamiliar design:
- Inspect the front, back, key base, and perimeter.
- Look for a screw, molded notch, battery marking, or opening diagram.
- Check the owner’s manual for the exact model and year.
- Use only the documented opening point.
- Support the button face while lifting the rear cover.
Do not assume the removable-key method applies. If there is no matching opening feature, stop rather than inserting another key or screwdriver into the center of the seam.
Visual checkpoints before twisting or prying
Use this fob-specific identification table instead of relying on a generic photograph:
| Feature | What to look for | What to do |
|---|---|---|
| Release switch | A small sliding or pressing control | Operate it before pulling the emergency key |
| Emergency key | A removable metal blade stored inside the fob | Use it only if the housing has a matching opening slot |
| Retaining screw | A small screw on the case or near the key base | Remove it with a correctly sized screwdriver before separating the housing |
| Designated pry slot | A reinforced notch sized for a key edge or tool | Engage the notch shallowly |
| Safe twisting direction | Rotation that begins separating the case halves | Twist lightly; do not push the tool deeply inward |
| Battery-side support point | The housing area directly over or beside the battery | Support it as the cover lifts |
Because layouts differ, an illustration or photograph of one Honda fob should not be treated as a universal map for another.
A Honda Clarity owner described opening that particular fob with a cloth-wrapped coin between exposed tabs, keeping it flat because the circuit board could lift, and fitting a CR2032 beneath retaining tabs. That is a model-specific owner report, not a procedure for every Honda fob (Honda Clarity owner’s replacement report).
Replace the Battery and Match the Original Polarity
Once the housing is open, pause before touching the battery.
Take a close photograph showing:
- The battery in its holder
- The visible battery face
- Any
+or−marking - The surrounding retaining tabs
- The positions of the circuit board and rubber membrane
Write down the battery code if it is not legible in the photograph. If the code is on the concealed face, first record the installed polarity and then photograph the code immediately after removing the cell.
Coin cells have positive and negative sides. The holder or circuit board may also have polarity marks. Install the replacement in the same orientation as the original battery and according to the fob’s markings. Honda of Watertown’s instructions likewise advise noting the original polarity and using the positive and negative symbols inside the case as the guide (Honda of Watertown’s battery guide).
Do not assume the positive side always faces outward. Some published procedures show that orientation for the fobs they describe, but the evidence does not establish it for every Honda design.
To replace the battery:
- Stabilize the housing. Keep the opened fob flat or support the components around the battery.
- Identify the retaining method. Look for a spring contact, plastic lip, or metal tab.
- Lift the old battery gently. Use a fingernail or a small tool only at the intended release edge.
- Keep the tool off the circuit board. Do not use the board as a leverage point.
- Work around retaining tabs. Ease the battery from beneath them without deliberately bending them.
- Confirm the replacement code. Compare every character on the new battery with the old cell or model-specific specification.
- Hold the new cell by its edges.
- Match the recorded polarity.
- Slide the cell beneath or within the holder’s retaining features.
- Press only as needed to seat it.
The battery should lie flat and remain secure. If it sits at an angle, appears unusually high, or moves loosely, remove it and verify the code and installation position.
Do not move the circuit board, rubber membrane, or button array merely to create more working space. If those components remain seated, leave them in place. If something shifts accidentally, correct its alignment before closing the housing.
Inspect the holder without modifying it. The intended contacts should meet the battery when it is seated. If a contact or retaining feature appears broken, stop rather than trying to reshape it as part of a routine battery change.
Close the Fob and Test Every Available Function
Before replacing the cover, inspect the complete internal assembly.
Confirm that:
- The circuit board lies in its intended recess
- The rubber membrane sits flat against the button area
- Every external button occupies the correct opening
- No component crosses the case seam
- The battery is flat and secure
- The housing halves are correctly oriented
Position the two halves directly over one another. Avoid sliding a cover across the circuit board or using the case to force displaced components into position.
Close the housing with controlled, even pressure:
- Engage any visible alignment points first.
- Press one short section of the perimeter.
- Continue around the case gradually.
- Listen and feel for the clips seating.
- Inspect the seam as each section closes.
For a screw-retained design, align and close the housing before reinstalling the screw. Tighten it only until secure.
Reinsert the emergency key where applicable. It should slide fully into place and remain retained when the release returns to its normal position.
Inspect the closed fob from every side. The seam should be even, and the buttons should sit at their normal heights. Press each button separately. If one remains stuck, recessed, tilted, or unusually loose, reopen the case and check the button and membrane alignment.
Stand near the vehicle and test every function fitted to the fob:
- Lock
- Unlock
- Trunk or hatch release
- Panic alarm
- Remote start, if fitted and normally available
- Proximity entry
- Push-button-start detection
Use each function according to the vehicle’s normal operating procedure, including a normal long press where required.
Testing every function provides more information than checking lock alone. If several functions work but one button does not, inspect that button’s alignment. If nothing works, recheck the battery code, polarity, seating, and case closure.
Successful testing is the normal next step after replacement. The available evidence does not establish automatic reprogramming as a requirement for every Honda key fob.
If the Buttons or Internal Parts Fall Out
If a button, membrane, separator, circuit board, or battery falls out, stop. Do not snap the housing together over loose or misaligned components.
Collect every piece and place it on the clean cloth. Check the table and floor for:
- Individual button caps
- A rubber button membrane or film
- A plastic crossbar or separator
- The circuit board
- The battery
- The retaining screw
- Any loose case component
Use the photographs taken during opening as your first reassembly reference. If you have an identical spare fob, compare its exterior button positions and general shape without dismantling it unnecessarily.
For the assembly described in Honda dealership guidance, the general order is:
- Place the front faceplate button-side down.
- Return each external button to its matching opening.
- Position any crossbar or separator in its original location.
- Lay the rubber membrane or film against the backs of the buttons.
- Return the circuit board to its original recess.
- Install the battery according to the recorded polarity and case markings.
- Check that no component crosses the perimeter seam.
- Keep the assembly flat while fitting the rear cover.
Tampa Honda’s documented reassembly sequence places the external buttons first, followed by the crossbar, battery, and circuit board with its rubber film against the buttons. Its positive-side-outward instruction applies only when the particular fob’s original orientation and markings confirm it (Tampa Honda’s reassembly guide).
Before closing the case, check that each button moves and returns normally. Make sure the membrane is flat and the circuit board sits securely in its recess.
Internal layouts vary. Do not force a component into a position copied from a different Honda model or a visually similar fob.
Obtain model-specific assistance if:
- The circuit board is cracked or chipped
- A battery contact, holder feature, or case clip has broken
- A component appears to be missing
- The housing will not close under controlled pressure
- The correct assembly order cannot be established
- A button remains trapped after careful realignment
Keep the parts organized if you need assistance. That preserves the original layout better than repeated attempts with an uncertain assembly order.
What to Check If the Honda Key Fob Still Does Not Work
An unresponsive fob does not automatically need programming. Begin with the components just handled.
1. Verify the battery code
Compare the new battery with:
- The old cell
- The photograph you took
- Any battery marking inside the housing
- The exact model’s documentation
Check every character. Do not treat two visually similar coin cells as interchangeable.
If the replacement came in a multipack, keep the removed cell separate so it cannot be confused with an unused battery.
2. Recheck polarity
Open the housing carefully and compare the replacement with the recorded orientation. Check the positive and negative markings inside the fob.
Correct its orientation gently and without altering the holder.
3. Confirm seating and contact
Verify that the cell is:
- Beneath the intended retaining features
- Flat in the holder
- Touching the intended contacts
- Secure rather than tilted or loose
If a contact appears displaced or damaged, stop rather than repeatedly bending it.
4. Inspect internal alignment
Check that:
- The circuit board is in its recess
- The rubber membrane rests correctly against the buttons
- Every external button aligns with the control beneath it
- Nothing is caught in the perimeter seam
- The housing is completely closed
If one side of the seam remains open, reopen the case and identify the obstruction rather than applying more pressure.
5. Test all functions close to the vehicle
Test each function individually while standing near the Honda. The results can help distinguish among:
- Total fob failure
- Reduced operating range
- One nonworking or misaligned button
- A proximity-detection problem
- A function-specific vehicle issue
If one button fails while the others work, inspect that button and the corresponding membrane position. If remote buttons work but passive entry or start detection does not, consult the model-specific instructions.
6. Compare an identical spare, if available
A working spare can provide useful context. Test it from the same location and under the same conditions.
If the spare operates normally while the serviced fob does not, the difference suggests that the serviced fob needs further inspection. This comparison does not identify the exact fault by itself.
There is usually no need to open a working spare merely for comparison. Its button feel, exterior arrangement, and operation may provide enough information.
7. Treat programming as a separate question
Some dealership pages publish generalized ignition-cycle and lock-button procedures. Those instructions are not consistently tied to particular Honda models, model years, fob designs, or starting systems. Honda of Danbury, for example, presents a general programming sequence after replacement but does not establish that every routine battery change erases a fob’s programming (Honda of Danbury’s key-fob guide).
Do not begin a generic programming sequence merely because the replacement battery did not restore operation. First finish the installation checks.
If the fob still does not work, consult the owner’s manual for the exact model and year. Persistent failure may involve:
- A damaged battery holder
- Worn button controls
- A shifted or damaged circuit board
- Moisture or impact damage
- A housing that no longer holds the assembly correctly
- A vehicle-side receiver or detection issue
- A model-specific synchronization or programming requirement
A new battery addresses only one possible cause.
Weak-Battery Signs and Responsible Disposal
Possible signs of a weakening key-fob battery include:
- Reduced operating range
- Delayed or failed unlocking
- Intermittent response
- Repeated button presses becoming necessary
- Push-button-start detection trouble
- Inconsistent passive entry
- A dashboard key-battery or key-not-detected warning
These symptoms can suggest a weak battery, but they do not prove that the battery is the only cause. Similar behavior can occur when a button, battery contact, fob component, or vehicle-side system has a problem.
General automotive guidance places key-fob battery life at roughly two to four years, depending on use. That is a broad planning range rather than a fixed replacement deadline (AutoZone’s key-fob battery guide).
Respond to symptoms and model-specific dashboard warnings rather than assuming every battery will fail on a particular anniversary. For additional general context—not Honda-specific guidance—see Key Fob Zone’s overview of key-fob battery lifespan and warning signs.
After replacement, keep the spent and unused batteries clearly separated. Mark the removed cell as used or place it in a separate container so it cannot be mistaken for a new one.
Recycle or dispose of the old coin cell through an appropriate local battery-collection route. Programs and requirements vary by location, so follow the instructions of the relevant waste authority, battery retailer, or collection facility.
Frequently Asked Questions
What battery does a Honda key fob use?
Most Honda replacement guides describe a flat, circular 3-volt coin cell, but they do not establish one code for every Honda fob. Third-party fitment listings include CR2032, CR1620, and CR1616 for selected Honda applications, with overlapping years and different fob classifications (Microbattery’s vehicle battery finder).
Verify the exact code on the old battery, inside the housing, or in the owner’s manual for the model and year. Do not install a battery solely because it resembles the original.
Which side of the battery faces up in a Honda key fob?
Install the replacement in the same orientation as the original battery and follow the + and − markings inside the housing. Photograph the old cell before removing it.
Some documented fobs place the positive side outward, but that is not established as a universal Honda arrangement. The original installation and the specific fob’s markings take precedence.
Do I need to reprogram my Honda key fob after changing the battery?
The supplied evidence does not show that every Honda fob requires reprogramming after a routine battery replacement. Test it normally first. If it does not respond, recheck the battery code, polarity, seating, internal alignment, and case closure.
Programming or resynchronization procedures can be model-specific. Consult the owner’s manual for the exact model and year before attempting an ignition-cycle or button sequence.
Why does my Honda key fob not work with a new battery?
Start by checking:
- The battery code
- Battery polarity
- Whether the cell is flat and fully seated
- Contact with the holder
- Circuit-board and membrane alignment
- Button position
- Complete case closure
If those points are correct, the fob may have internal damage, worn controls, or another fault. A vehicle-side detection issue is also possible. Persistent failure does not by itself prove that the replacement battery is defective or that programming is required.
How do I open a Honda key fob that has a screw instead of a removable emergency key?
Place the fob on a clear, well-lit surface and remove the retaining screw with an appropriately sized jeweler’s screwdriver. Store the screw safely, locate the designated notch or opening point, and separate the housing gently while supporting the buttons and internal assembly.
After installing the verified battery in its original orientation, align and close the case before reinstalling the screw. Tighten it only until secure.
The safe sequence is straightforward: identify the fob, verify the exact battery code, open the housing only at its designated point, preserve the original polarity and internal alignment, close the case fully, and test every available function. If those checks do not restore operation, avoid an unverified programming ritual and consult the instructions for the exact Honda model and year or obtain qualified assistance.