
Change Your Nissan Fob’s Coin Cell Without Damaging the Case
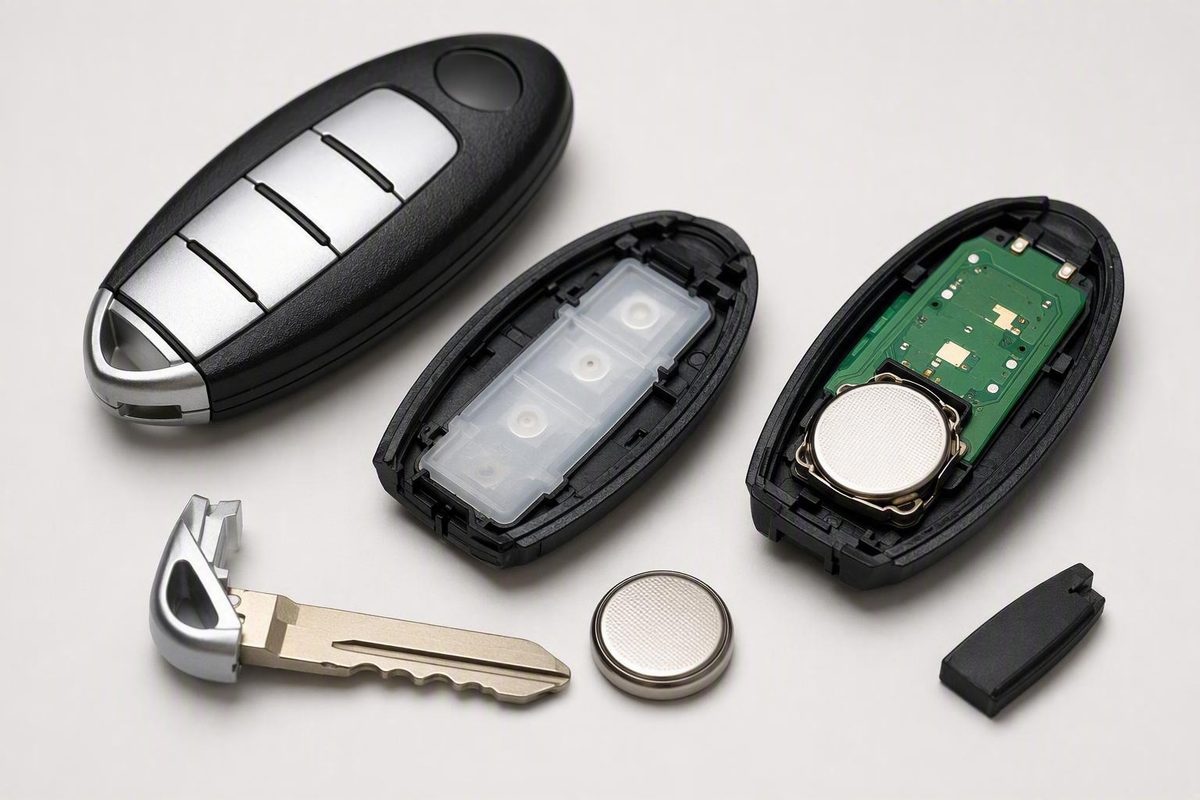
The job comes down to four safeguards: verify the exact battery code, record the old cell's orientation, avoid force, and test every function afterward.
Most Nissan Intelligent Key batteries can be replaced at home: remove the mechanical key, open the housing at its designated slit or seam, record the installed battery’s code and orientation, fit the correct new cell, close the case, and test every function.
The important word is most. Nissan has used different fob housings, battery sizes, polarity arrangements, opening points, and backup-start procedures. Treat this as a guide for a common Nissan Intelligent Key, and follow the owner’s manual whenever its instructions differ.
Before You Begin: Confirm That a Weak Battery Is the Likely Problem
A weak key-fob battery may cause:
- Reduced operating range
- Intermittent lock or unlock response
- Buttons that require repeated presses
- Completely unresponsive buttons
- A dashboard message such as “Key Battery Low”
These symptoms are clues, not proof. A worn button, damaged internal connection, poor battery contact, or vehicle-side recognition problem can produce similar behavior.
A “Key ID Incorrect” message is also not a definitive battery warning. A discharged fob battery is one possible cause, but Nissan’s parts guidance notes that the message can appear for several reasons.
Consider how the problem developed:
- If several functions gradually became weaker or less consistent, the battery is a reasonable first check.
- If only one button fails while the others work normally, that button or its contact may be worn.
- If the fob stopped working after a drop or exposure to moisture, physical damage may be more likely.
- If the housing has separated, the cell may no longer be held securely against its contacts.
- If a spare fob has the same symptoms, the vehicle may need model-specific diagnosis.
Before opening the case, locate the manual for your exact model and model year. Nissan provides an official owner-manual lookup; search the relevant manual for terms such as Intelligent Key, battery replacement, and emergency starting. Confirm the specified battery, polarity instructions, opening method, and backup-start procedure.
This walkthrough is intended for a common Intelligent Key design with:
- A release switch or latch on the rear
- A removable mechanical emergency key
- A slit, notch, or seam used to open the housing
- A replaceable coin cell inside
Stop and obtain model-specific instructions if your remote does not have those features. Older Nissan remotes, aftermarket fobs, replacement shells, and other Intelligent Key designs may open differently. Forcing an unfamiliar housing can damage its clips or internal parts.
Identify the Correct Battery and Gather the Tools
Do not buy a replacement based only on the words “Nissan key fob.” Verify the complete battery code using:
- The battery specification in the owner’s manual
- The code printed on the coin cell already installed in the fob
Ideally, check both. Record the complete code, including every digit.
Nissan Parts & Accessories recommends a CR2032 for most Nissan Intelligent Keys, but that is not a universal specification. Some Nissan fobs use a CR2025 or another cell, so the model-specific manual and installed battery take priority over a brand-level recommendation (Nissan Parts & Accessories key-fob battery guide).
CR2025 versus CR2032
CR2025 and CR2032 batteries may look interchangeable, but they differ in thickness:
| Battery | Voltage | Diameter | Thickness |
|---|---|---|---|
| CR2025 | 3 volts | 20 mm | 2.5 mm |
| CR2032 | 3 volts | 20 mm | 3.2 mm |
Both are non-rechargeable lithium coin cells, but the CR2032 is thicker (CR2025 and CR2032 technical comparison).
Matching voltage and diameter does not make the cells automatically interchangeable. A cell that is too thin may shift or fail to maintain reliable contact. A cell that is too thick may stop the holder or housing from closing correctly. Do not use foil, stacked cells, paper, improvised shims, or extra pressure to make the wrong battery fit.
What you will usually need
Gather these supplies before opening the fob:
- The exact replacement coin cell
- A small flat-head screwdriver or a suitable coin
- A clean, soft cloth
- A phone camera
- A clean, well-lit work surface
- The vehicle owner’s manual
- A small tray or container for the mechanical key and old battery
The cloth can be wrapped around the screwdriver tip where space permits to reduce marking on the plastic. Use the camera to document the old cell’s code, position, and polarity before removing it.
Tool requirements vary. One dealership guide specifies both Phillips-head and flat-head screwdrivers for the particular fob it describes, but that does not make a Phillips screwdriver necessary for every Nissan remote. If your housing has a visible screw or separate battery cover, consult the instructions for that design before proceeding.
How to Replace the Battery in a Common Nissan Intelligent Key
Work slowly.
1. Verify the new battery
Place the fob, owner’s manual, and replacement battery on a clean, well-lit surface. Confirm that the complete code on the new cell matches the manual’s specification or the code on the installed battery.
If the manual and old battery disagree, pause. The old cell may be incorrect, or the manual section may refer to another transmitter design. Find guidance for the exact model, year, and fob rather than guessing.
Avoid working over carpet, a vehicle seat, or a cluttered counter. The mechanical key and coin cell are easy to misplace.
2. Remove the mechanical key
Turn the fob over and locate the release switch or latch. Hold or slide the release as designed, then pull the hidden mechanical key out of the housing.
Set the key in a tray or another obvious place. Removing it commonly exposes or provides access to the intended opening point.
Do not force the key if it does not move. Confirm that the release is fully engaged and that you are pulling in the correct direction. If your fob has no removable key, stop and find instructions for that design.
3. Find the opening point
Inspect the area exposed by the removed key and the perimeter of the housing. Look for a deliberate:
- Slit
- Notch
- Recess
- Widened section of the seam
Use that feature rather than inserting a tool at an arbitrary point along the case.
If you are using a small flat-head screwdriver, wrap its tip in a layer of clean cloth if the covered tip will still fit securely. A suitable coin may work on some housings.
4. Separate the case gently
Insert the tool only as far as needed at the designated opening point. Twist gently instead of driving the tool inward or using it as a long lever.
Once the first section releases, work around the seam gradually if necessary. Alternate sides and allow each clip to release with minimal movement. Nissan dealership instructions similarly recommend using the intended edge slot or seam and twisting carefully to avoid cracking the plastic (Walser Nissan Coon Rapids replacement walkthrough).
Stop if:
- The plastic begins turning white from stress
- The housing bends sharply
- You hear cracking rather than a clip releasing
- The tool slips toward the center of the fob
- One area remains firmly attached
- A screw or separate cover appears to be retaining the case
Resistance may mean that you are using the wrong opening point, a clip is still engaged, or the fob requires another procedure. More force is not the answer.
5. Photograph the old battery before removing it
Do not immediately lift out the battery. First take a clear photo showing:
- The complete printed battery code
- Which printed face is visible
- The battery’s position in the holder
- Its relationship to the contacts
- Any polarity symbols molded or printed near the holder
The photograph is more reliable than memory and safer than relying on a generic rule such as “positive side up.”
Published Nissan-related guides describe different visible faces because fob layouts vary. Copy the original arrangement, then confirm it against the holder’s polarity markings and the owner’s manual. If the old cell conflicts with those markings or model-specific instructions, do not copy an apparently incorrect installation.
6. Remove the old coin cell
Identify the battery edge that can be released without using the circuit board as a fulcrum. Lift the cell gently from its holder.
Avoid:
- Levering against the circuit board
- Scraping components
- Bending metal terminals
- Pulling the battery holder away from the board
- Touching internal circuitry unnecessarily
Hold the replacement cell by its edges, and keep both the old and new batteries secured during the job. Nissan’s guidance cautions against touching the internal circuit or electrical terminals and directs owners to dispose of the removed cell according to applicable local rules (Nissan Parts & Accessories replacement procedure).
Place the removed cell in a separate container so it cannot be confused with the replacement.
7. Install the new battery in the same orientation
Hold the new battery by its edges. Align it with the holder and install it in the orientation documented in your photo, provided that orientation agrees with the holder markings and owner’s manual.
Do not apply a universal “positive side up” or “positive side down” rule. The correct direction depends on the particular holder and case design.
Depending on the holder, one edge may need to slide beneath a retaining tab before the opposite edge presses into place. Use light pressure only. The cell should not crush or sharply deflect a contact as it enters.
8. Check the seating and contacts
Before closing the fob, inspect the battery from several angles. It should:
- Lie flat
- Sit fully inside the holder
- Remain securely retained
- Touch the intended terminals
- Match the holder’s polarity markings
- Leave the case clips and edges unobstructed
A tilted cell can cause intermittent operation.
If the replacement looks noticeably thinner or thicker than the old cell, recheck the complete battery code. Do not bend the contacts to accommodate a different battery.
9. Close the housing
Align the case halves without immediately pressing them together. Check that:
- The button pad is seated correctly
- The circuit board and other components have not shifted
- The battery remains flat
- The clips line up
- The mechanical-key channel is clear
Press the halves together evenly around the perimeter until the clips engage. The seam should be uniform, and the case should close flush.
If a gap remains, stop pressing. Reopen the housing and check:
- Battery code and thickness
- Battery seating
- Button-pad alignment
- Internal component position
- Clip alignment
- Whether a clip was damaged during opening
A correctly assembled fob should not require clamping, striking, or excessive hand pressure.
10. Reinsert the mechanical key
Slide the emergency key back into its channel until it clicks or locks into place. Give it a gentle pull without operating the release to confirm that it is retained.
Inspect the completed fob. The seam should be even, the key should be secure, and the buttons should sit at their normal height.
Test the Fob After Reassembly
Begin close to the vehicle so range does not complicate the first test.
Test the available functions in a logical order:
- Lock
- Unlock
- Trunk or liftgate release
- Panic button
- Proximity entry
- Remote start
Confirm that each button moves normally. Reopen the fob rather than repeatedly pressing a binding button.
Do not rely on one successful lock command. Try several lock and unlock cycles, then move farther from the vehicle and check whether useful range and consistent operation have returned.
A routine coin-cell replacement should generally restore operation immediately. Dealership guidance indicates that changing the battery usually does not erase the fob’s vehicle pairing, so reprogramming is generally unnecessary after a straightforward replacement (Nissan of Olathe battery-replacement guidance).
That is general guidance, not a guarantee for every fob or fault. Battery replacement and programming are separate tasks. A damaged, unsynchronized, or unrecognized fob may require additional diagnosis even after the correct battery is installed.
If the New Battery Does Not Fix the Fob
Start with installation checks before assuming that the electronics have failed.
1. Verify the complete battery code
Reopen the case and compare the replacement code with:
- The old battery
- The owner’s manual
- Any battery specification marked inside the fob
Do not substitute a CR2025 for a CR2032, or vice versa, merely because the cells look similar. Their different thicknesses can affect contact pressure and case closure.
If the old battery is no longer available, rely on the model-specific manual or parts information rather than a general list of common Nissan batteries.
2. Check polarity
Compare the new battery’s position with the photograph taken before removal. Then verify it against the holder’s + and − markings and the owner’s manual.
A reversed cell can leave the fob completely unresponsive. If generic online instructions conflict with the markings inside your fob, follow the fob and model-specific documentation.
3. Confirm that the battery is fresh and seated flat
Make sure the replacement cell was not confused with the removed one and has no visible damage. It should lie flat, remain securely retained, and touch both intended terminals.
Do not stack batteries, add foil or paper, or force a spacer into the holder. If the specified cell does not fit normally, recheck the battery selection, holder, and instructions.
4. Inspect the case closure
Run a fingertip around the seam. A raised edge or persistent gap can indicate:
- The wrong battery thickness
- A tilted battery
- A displaced button pad
- A shifted internal component
- A trapped piece
- A damaged or unengaged clip
Squeezing the case is not a repair; reopen it and inspect the assembly.
5. Look for visible contamination or damage
Without attempting an electrical repair, inspect for:
- Dirt around the buttons
- Corrosion or residue
- Evidence of moisture
- A loose or displaced contact
- Broken case clips
- Cracked plastic around the holder
- Worn button surfaces
- A visibly damaged circuit board
- Detached components
Do not scrape, solder, wash, or aggressively bend internal parts without the appropriate documentation and repair skills. Visible corrosion or circuit damage warrants qualified diagnosis.
6. Retest every function near the vehicle
Stand near the driver’s door and test every available function. Note the failure pattern:
- No functions work
- Only one button fails
- Buttons work but proximity entry does not
- Operation is intermittent
- Range remains short
- The vehicle displays a warning
One failed button is less suggestive of a battery problem than several functions becoming weak together.
7. Compare the spare fob, if available
A spare fob can help separate a problem affecting one transmitter from a possible vehicle-side problem:
- Spare works normally: Recheck the repaired fob’s battery installation, contacts, buttons, internal condition, and recognition.
- Spare shows the same symptoms: A vehicle-side recognition or receiver problem may require model-specific diagnosis.
This comparison is useful but not conclusive. The spare may also have a weak battery or an unrelated fault.
8. Escalate persistent problems
If a verified fresh battery of the correct type is installed with the correct polarity, lies flat, contacts its terminals, and allows the housing to close flush—but the fob remains unreliable—the battery may not be the cause.
Possible next issues include:
- Worn button contacts
- A failed internal connection
- Drop or moisture damage
- Corrosion
- A damaged battery terminal
- Pairing or synchronization trouble
- A vehicle-side receiver problem
Service-center troubleshooting guidance identifies worn contacts, corrosion, internal damage, and receiver trouble as possibilities after correct battery installation (Woodmen Nissan Service Center troubleshooting guide).
At that point, seek model-specific diagnosis from a qualified Nissan service provider or an automotive locksmith familiar with Nissan Intelligent Keys. Provide the original symptoms, the exact replacement battery code, and the checks already completed.
How to Unlock and Start a Nissan When the Fob Battery Is Dead
Emergency entry, backup starting, battery replacement, and key programming are separate procedures. A depleted coin cell does not necessarily prevent entry or starting, but the correct method depends on the vehicle.
Emergency entry
On applicable Nissan Intelligent Keys, operate the rear release latch and remove the mechanical emergency key. Use that key to unlock the driver’s door manually.
This only provides mechanical entry. Follow the owner’s manual for the next steps required by your model.
Backup starting without a dedicated fob port
Many dealership guides describe the following procedure for certain push-button-start vehicles without a dedicated fob port:
- Enter the vehicle using the mechanical key if necessary.
- Press and hold the brake pedal, or the clutch on an applicable manual-transmission vehicle.
- Hold the key fob directly against the START/STOP button.
- Operate the START/STOP button as directed by the owner’s manual.
The required fob position, timing, and indicator behavior can vary, so do not assume this method applies to every Nissan.
Backup starting with a dedicated fob port
Some vehicles use a different arrangement:
- Insert the fob into the dedicated key-fob port.
- Press the brake or clutch as applicable.
- Operate the START/STOP button.
Countryside Nissan describes both the dedicated-port method and the hold-against-the-button method, depending on vehicle equipment (dead-fob entry and starting guidance).
Do not push the fob into an unidentified opening. Confirm the exact emergency-start procedure in the owner’s manual for your model and year.
These methods may help you enter or start an applicable vehicle with a depleted fob battery. They do not replace the battery, repair a damaged transmitter, or program a new key.
Protect the Fob and Dispose of the Old Battery Properly
Keep these damage-prevention rules in mind:
- Open the housing only at its designated slit, notch, or seam.
- Twist the opening tool gently instead of forcing it inward.
- Protect the case with a clean cloth where practical.
- Keep the tool away from the circuit board and terminals.
- Handle the replacement cell by its edges.
- Record and verify the old battery’s orientation.
- Make sure the new cell lies flat before closing the housing.
- Stop if the case will not open or close with modest pressure.
If the housing will not open, you may be using the wrong point or overlooking a fastener. If it will not close, check battery thickness, seating, internal alignment, and the clips. Extra force can turn a battery replacement into a broken-shell or circuit-board repair.
Keep the new and removed cells secured and separate throughout the job. Do not return the used battery to the new battery’s package, where it could be mistaken for a fresh cell. Take the removed lithium coin cell to an appropriate local recycling or disposal route.
Stop the DIY attempt and seek qualified help if:
- The housing starts cracking
- A metal contact bends or breaks
- The battery holder separates
- The circuit board is visibly damaged
- There is evidence of moisture or corrosion
- The specified battery will not fit normally
- A verified fresh battery does not restore reliable operation
Frequently Asked Questions
What battery does a Nissan key fob take?
Many Nissan Intelligent Keys use a CR2032, while some use a CR2025 or another size. There is no universal battery for every Nissan fob.
Check the complete code on the installed coin cell and confirm it in the owner’s manual before buying a replacement. Do not assume that visually similar cells are interchangeable.
Which side of the battery faces up in a Nissan key fob?
There is no reliable universal “up” direction for every Nissan key fob. Holder and case layouts vary.
Photograph the old cell before removing it, install the replacement in the same orientation, and confirm that position using the holder markings and owner’s manual. If the old installation conflicts with the markings or manual, follow the model-specific documentation.
Do I have to reprogram my Nissan key fob after changing the battery?
Usually not. Routine battery replacement generally does not erase the fob’s pairing, so correct operation should return when the proper cell is installed.
If the fob is still not recognized, first verify its battery code, polarity, seating, contact, and case closure. Persistent trouble may involve damage, synchronization, programming, or a vehicle-side fault.
Can I start my Nissan if the key fob battery is dead?
Often, yes. An applicable Intelligent Key contains a mechanical key for the driver’s door. Many push-button-start models use a backup procedure in which the driver presses the brake or clutch, holds the fob against the START/STOP button, and operates the button. Some vehicles instead use a dedicated fob port.
The correct procedure varies by model and equipment. Confirm it in the owner’s manual rather than assuming either method applies.
Why does my Nissan key fob still not work with a new battery?
Check these items first:
- Incorrect battery code
- Reversed polarity
- A damaged or confused replacement cell
- Battery not lying flat
- Poor terminal contact
- Housing not closed fully
- Misaligned internal parts
- Dirt, corrosion, or moisture evidence
- Broken clips or visible circuit damage
If those checks are satisfactory, the problem may involve a worn button, internal connection, fob damage, pairing, or the vehicle’s receiver. Compare a spare fob if available, then seek model-specific diagnosis if a verified fresh battery does not restore reliable operation.
Four Safeguards for a Successful Battery Change
The job comes down to four safeguards: verify the exact battery code, record the old cell’s orientation, open and close the housing without force, and test every function afterward.
Most routine Nissan Intelligent Key battery changes are straightforward. If the fob remains unreliable after correct installation of a verified fresh battery, the underlying problem may involve its contacts, buttons, circuitry, pairing, or the vehicle receiver and should be diagnosed for the specific model.