
Change Your Mazda Fob Battery Without Guessing the Cell or Damaging the Case
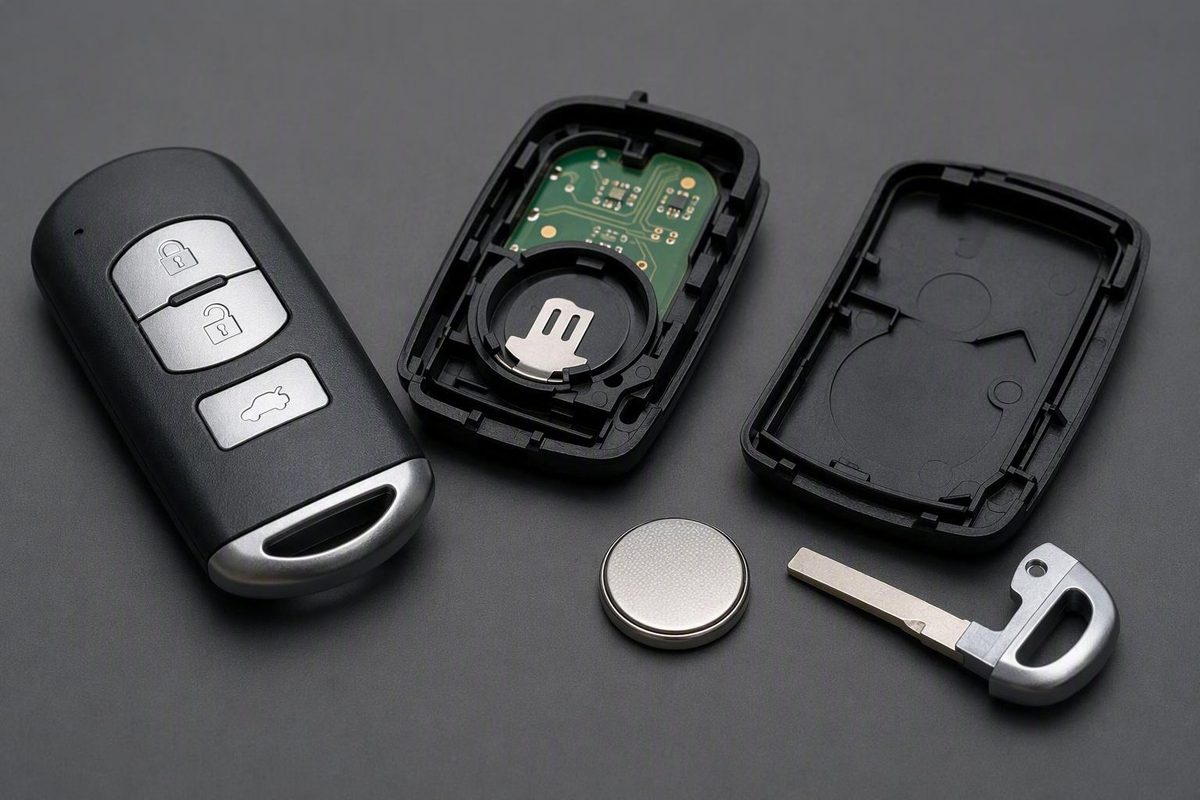
Identify the installed cell before buying, photograph its orientation and use only intended opening points to protect contacts and the sealing ring.
Replacing a Mazda key-fob battery is usually a manageable DIY task, but there is no adequately supported universal battery specification or opening method for every Mazda fob. Depending on the model year and fob design, the correct coin cell may be a CR2025 or CR2032, and the housing may use different release points.
The safest approach is to identify the installed battery before buying a replacement, photograph its orientation, open the housing only at its intended seam or slots, and protect the internal contacts and sealing ring. This guide covers a general procedure for common Mazda fob designs; it is not an official model-by-model compatibility chart.
If you are still deciding whether the battery is the likely problem, review these general key-fob battery warning signs first.
Before You Begin: Identify the Fob and Verify the Battery
Do not purchase a battery solely because a package or search result lists your Mazda model. Fob designs and battery requirements can vary by model year, and the fob in your hand may not match instructions written for another Mazda.
Third-party Mazda dealership guides identify CR2025 and CR2032 as common possibilities, with the correct choice depending on the vehicle and fob. They recommend checking the applicable owner’s manual or reading the code on the existing battery before selecting a replacement (Koeppel Mazda’s battery-identification guidance).
Use the existing battery as your physical reference
Before removing anything:
- Note the vehicle’s model year.
- Photograph the front and back of the complete fob.
- Note whether the fob is long and narrow, square, or another shape.
- Find the auxiliary-key release and note its location.
- Identify the intended opening seam or access slots.
- After opening the case, photograph the installed battery while its printed code and orientation are visible.
The battery marking should contain the complete type, such as CR2025 or CR2032. Match that code exactly unless the owner’s manual for your particular vehicle and fob specifies otherwise.
Do not treat CR2025 and CR2032 as interchangeable. An owner discussion comparing the two reports that they have the same nominal diameter and voltage but that the CR2032 is thicker. That difference can affect battery-cover fit and closure around the sealing ring (Mazda6 owner discussion about battery fit). A cell that can be pushed into the holder is not necessarily the specified battery.
A narrowly applicable CX-9 example
In an informal owner discussion involving a 2017 Mazda CX-9 with an older narrow fob, participants identified the battery as a CR2025 and distinguished that fob from a newer square design. This unverified report does not establish a rule for every CX-9, every 2017 vehicle, or every market (2017 CX-9 owner troubleshooting thread).
Use the visible fob design, installed cell, and applicable manual together. Model name alone is not enough.
CR2025 or CR2032: the practical decision rule
Use this order of preference:
- The applicable owner’s manual specification
- The complete code printed on the original installed cell
- Verified instructions for the exact fob design
- Professional confirmation if the original cell is missing, unreadable, or appears not to fit correctly
If the original cell is unavailable, do not infer the type merely from the apparent diameter of the holder. Pause and verify the specification before proceeding.
Tools, Workspace, and Damage-Prevention Checklist
You do not need a large tool kit, but every tool should fit the intended opening point without being forced.
Required items
- Your Mazda key fob
- The correctly specified replacement coin cell
- A small flat-head screwdriver or suitable plastic pry tool
- Tape for covering the tip of a metal screwdriver
Dealership instructions for one documented Mazda-style fob recommend a small flat-head screwdriver with tape over the tip to reduce cosmetic scratching (Manchester Mazda’s replacement procedure). Tape may protect the surface during ordinary tool contact, but it does not make deep insertion or forceful prying safe.
Optional items
- A clean microfiber cloth
- Tweezers suitable for delicate work
- A small tray for loose components
- A phone or camera for reference photographs
- Bright task lighting
Use tweezers only where they improve control without scraping the contacts or nearby components. If the battery can be lifted safely with a fingertip or plastic edge, there is no need to bring a metal tool close to the electronics.
Coin-cell handling notice
Prepare the workspace
Work on a clean, dry, well-lit table. Lay down the microfiber cloth so the housing does not slide or become scratched. Keep drinks, sprays, oils, and loose debris away from the open fob.
Place removed components in order:
- Auxiliary metal key
- Outer housing piece
- Battery cover, if fitted
- Old battery
This arrangement simplifies reassembly and reduces the chance that a component will be omitted.
Stop rather than force the case
If light pressure at an apparent opening point does not begin releasing the housing, stop and reassess. You may be pressing at a decorative joint rather than the intended seam, or your fob may use a different release arrangement.
A wrapped screwdriver can still cause damage if it is inserted too deeply or twisted aggressively.
Pre-opening checklist
Before inserting a tool, confirm that:
- [ ] The replacement cell’s complete code has been verified.
- [ ] The fob shape matches the instructions you intend to follow.
- [ ] The auxiliary-key release has been located.
- [ ] The intended opening seam or slots have been identified.
- [ ] A reference photograph has been taken.
- [ ] The workspace is clean, dry, and well lit.
- [ ] A secure place is ready for loose coin cells and small components.
- [ ] You are prepared to stop if the housing does not release with light pressure.
Step 1: Remove the Auxiliary Metal Key
Many documented Mazda-style fobs contain a removable metal auxiliary key. Removing it is normally the first disassembly step because the key recess exposes the opening area or access slots.
Fobs with a rear release button
Inspect the back and sides of the fob for a small release button or slider.
- Hold the fob securely over the work surface.
- Press and continue holding the release.
- Pull the metal key straight out of the housing.
- Release the button after the key has cleared the fob.
Do not twist the key against the plastic housing. If it does not slide out, confirm that the release is fully depressed rather than using the key as a lever.
Dealership instructions for Mazda6- and CX-5-style fobs describe pressing an auxiliary-key button on the back, removing the key, and using the slots revealed in the casing (Team Mazda’s opening instructions). This is a documented pattern, not a universal Mazda arrangement.
Older-design variation
Some earlier fobs may have a small release tab inside the auxiliary-key recess. On that design, the tab may need to be pressed gently with a small tool before the internal section or key can be released.
Use only enough pressure to operate an identified tab. Do not probe deeper into the recess or push against a component whose function is unclear.
Do not assume every release is identical
Fobs may differ in overall shape, button location, auxiliary-key direction, rear-cover design, internal release placement, and the number or location of access slots. If your fob does not resemble the documented remove-key-and-expose-slots arrangement, consult its applicable owner’s manual before proceeding.
Place the auxiliary key in the parts tray. Do not reinstall it until the housing has been closed and inspected.
Step 2: Open the Housing at the Intended Seam or Slots
With the auxiliary key removed, inspect the exposed recess under bright light. Look for shallow slots on either side of the casing or another clearly designed opening point along the seam.
An intended slot should provide a controlled place for a small tool tip. An arbitrary gap or decorative joint elsewhere on the housing is not a substitute.
For fobs with slots on both sides
If your fob matches the documented two-slot layout:
- Cover the screwdriver tip with a smooth layer of tape.
- Insert the tip shallowly into one designated slot.
- Apply a small twisting motion rather than pushing inward.
- Stop when that side loosens slightly.
- Move to the slot on the opposite side.
- Repeat the gentle twisting motion.
- Separate the loosened housing halves slowly with your fingers.
The objective is to release the clips progressively, not to lever the entire case apart from one point. Dealership guidance for this fob style describes beginning on one side and then moving to the other with a tape-wrapped flat-head screwdriver (Biggers Mazda’s two-slot procedure).
A tool that is too thick should not be forced into the slot.
If the expected slots are absent
Pause if you encounter:
- No visible access slots after removing the key
- A housing shape unlike the reference instructions
- A seam that remains rigid under light pressure
- An identified release that has not been disengaged
- Evidence of previous damage or modification
Do not invent a pry point in the middle of the housing. Check the applicable owner’s manual or obtain help from a qualified automotive-key professional.
Keep the tool away from the electronics
Do not:
- Drive the screwdriver deeply into the fob
- Lever directly against the circuit board
- Scrape across a battery contact
- Bend the housing until the plastic discolors or cracks
- Drag the tool around the entire perimeter
- Use the auxiliary key as an aggressive pry bar
Once the clips release, separate the halves with your fingers.
Lay the housing pieces down in their removal order. Note which side faced upward and which end aligns with the auxiliary-key recess.
Step 3: Remove the Old Cell and Protect the Rubber Seal
Do not lift the battery immediately after opening the case. First record how everything fits.
Photograph before lifting anything
Take a close photograph showing:
- The complete battery code
- Which battery face is visible
- The location of the positive marking
- The battery cover’s orientation
- The position of any surrounding rubber ring
- The relationship between the battery and retaining contacts
If the code is partly obscured, photograph the installed orientation first. Then lift only what is necessary to read the full marking.
Remove the battery cover
Some documented fobs have a circular or shaped battery cap.
- Note which face is upward.
- Observe any tabs, notches, or alignment features.
- Lift the cover without twisting it against the surrounding plastic.
- Set it beside the fob in the same orientation.
Do not trim or flatten a part that appears to interfere with the cover.
Lift the old battery gently
Use a fingernail, suitable plastic edge, or delicate tweezers at the available removal point. Apply pressure to the cell rather than the circuit board.
Avoid bending spring contacts, scratching the compartment, snapping retaining clips, pushing the cell underneath a contact, or dragging a metal tool across the electronics.
Observe how the battery fits beneath or against its retaining points. The replacement should occupy the same position and lie flat.
Protect the rubber ring
Several documented Mazda-style fobs contain a rubber sealing ring beneath or around the battery cover. Leave an undamaged ring in place where possible.
Do not scratch, stretch, roll, pinch, contaminate, or pull it from its groove. Before closing the fob, confirm that the ring is:
- Clean
- Flat
- Undamaged
- Fully seated in its channel
- Free of fibers and debris
- Clear of the battery-cover edge
An owner-generated Mazda6 discussion notes that the battery lid should close around its O-ring to limit moisture entry. This is an informal observation rather than official Mazda service guidance, but it reinforces the need to avoid forcing a thicker cell or trapping the seal under the cover.
More consequentially, dealership instructions for the documented two-slot design state that a scratched rubber ring should be replaced before continuing (Biggers Mazda’s sealing-ring instruction). If the ring is damaged, missing, stretched, or will not stay seated, stop and obtain the correct replacement part or professional assistance.
Do not use glue, household sealant, tape, or excessive clamping pressure as a substitute for a correctly fitted seal.
Step 4: Install the New Battery, Close the Case, and Test Every Button
The primary orientation rule is simple: reproduce the original installation exactly. Your reference photograph and the applicable manual take priority over generalized online instructions.
Several dealership procedures show the replacement battery installed with the positive side facing upward, but that orientation should not be assumed for every Mazda fob. Cross-model guidance also advises recording the original orientation and checking the reassembled case for gaps (Seacoast Mazda’s replacement guidance).
Install the replacement cell
Before insertion, compare the old and new cells:
- The complete battery codes match.
- The diameter and thickness appear the same.
- The new cell is not visibly damaged.
- The positive and negative faces can be identified.
Then:
- Hold the replacement by its edges where practical.
- Position it in the same orientation as the old cell.
- Slide it beneath any retaining lip in the same direction as the original.
- Press gently until it lies flat.
- Confirm that the contacts meet the cell without being bent or trapped beneath it.
Do not force the battery past a retaining point. If it sits high, rocks, or prevents the cover from lying flat, remove it and recheck the code, orientation, and insertion path.
Restore the seal and battery cover
Inspect the rubber ring again. It should remain in its groove rather than resting on top of a clip or beneath an uneven edge.
Return the battery cover to its original position:
- Align its tabs or shaped edges.
- Lower it evenly.
- Confirm that it sits flush without heavy pressure.
- Check that the seal has not moved.
If the cover will not seat naturally, do not use the outer case to force it down. Reopen the battery area and identify the obstruction.
Join the housing halves
Align the housing before applying pressure. Check the ends, button openings, and auxiliary-key recess.
Press around the perimeter in stages:
- Begin where the halves are clearly aligned.
- Apply light, even finger pressure.
- Work along both sides.
- Listen and feel for the clips engaging.
- Continue around the complete perimeter.
One click does not prove that every clip has engaged.
Inspect the complete seam
Perform a visual and tactile check:
- Run a fingertip around the full seam.
- Look for uneven gaps.
- Check for rubber protruding from the joint.
- Confirm that no button is trapped beneath the housing.
- Make sure the case does not rock or flex.
- Compare it with the pre-opening photograph.
If a gap remains, do not squeeze harder without knowing the cause. Reopen the case and inspect the battery, cover, seal, buttons, and internal alignment.
Reinstall the auxiliary metal key only after the housing is fully aligned. It should slide into place without twisting or force.
Test every available function
Stand near the vehicle and test each available button separately:
- Lock
- Unlock
- Trunk or liftgate
- Panic
- Any other button fitted to your fob
Pause between presses so each response is clear. Confirm that every button moves normally and returns after being pressed.
During testing, check that:
- The case remains closed.
- The seam does not widen.
- No side flexes excessively.
- Buttons are not sunken, stiff, or continuously depressed.
- The auxiliary key remains secure.
A successful lock command alone does not establish that every button and internal component is aligned correctly.
If the Mazda Key Fob Still Does Not Work
Do not jump immediately to programming or replacement. Begin with the parts you just handled.
1. Verify the battery specification
Reopen the fob carefully and compare the replacement battery’s complete code with the original cell, your photograph, and the applicable owner’s manual. Check every character rather than assuming that a similar-looking battery is equivalent.
2. Recheck polarity and seating
Confirm that:
- The visible battery face matches the original.
- The cell lies flat.
- It sits beneath the correct retaining points.
- The contacts touch the intended battery surfaces.
- No contact has been pushed away or trapped underneath.
- The battery cover is correctly installed.
If the cell rocks or springs out of place, inspect the holder instead of forcing the cover over it.
3. Check internal and external alignment
Inspect the button components, battery-cover orientation, rubber-ring position, housing clips, auxiliary-key recess, and complete case closure. A displaced button component may prevent one or more switches from being pressed even when the battery is installed correctly.
4. Look for contamination or visible damage
Without attempting invasive electronic repair, look for:
- Lint, dirt, or loose debris
- Corrosion
- Displaced components
- Visibly bent battery contacts
- Cracked clips
- A warped or broken housing
- Exposed or visibly damaged electronics
Remove only loose surface debris that can be cleared without scraping or dismantling the electronics. Corrosion, broken contacts, or circuit-board damage are stopping points for DIY work.
5. Try another verified-fresh battery
A newly opened or purchased coin cell may still fail to restore operation. If the code and installation are correct, try a second verified-fresh battery of the same specification.
In the previously discussed 2017 CX-9 forum thread, the owner reported that another fresh CR2025 restored operation after earlier battery attempts had not. The reason was not established, and the anecdote does not demonstrate that one brand is generally superior (2017 CX-9 battery anecdote).
6. Use the failure pattern as a decision tree
- No button works: Recheck the battery code, polarity, seating, contacts, and internal alignment.
- Operation is intermittent: Check whether the cell is flat and firmly engaged, then inspect for incomplete closure, case flex, or a visibly displaced contact.
- Only one button fails: Inspect that button’s physical movement and alignment. A one-button problem differs from total loss of operation.
- The case will not close: Stop forcing it. Recheck the cell specification, battery-cover orientation, seal position, and internal component placement.
Persistent failure may involve the contacts, buttons, electronics, physical damage, or another vehicle-specific issue. The symptoms alone do not identify the cause and do not prove that the fob has lost programming.
Reprogramming, Unsafe Shortcuts, and When to Get Help
A routine battery replacement should not automatically be treated as a programming job. First verify the battery specification, orientation, seating, contacts, internal alignment, and closure.
The available evidence does not establish one universal Mazda reset or synchronization sequence. If your model requires another step, obtain it from the applicable owner’s manual rather than following a procedure written for a different model, year, or market (Koeppel Mazda’s troubleshooting guidance).
Do not force a CR2032 into a CR2025 holder
Do not install a CR2032 in a holder specified for CR2025 merely because the cells share a nominal diameter and voltage. The CR2032 is thicker, so an incorrect substitution may interfere with natural battery-cover fit or sealing-ring closure.
A forum user reported that a CR2032 physically fit one 2014 Mazda6 Sport fob originally fitted with a CR2025. Another participant described modifying a battery cover to make room for the thicker cell. These are unverified owner anecdotes, not compatibility recommendations or Mazda-approved procedures (Mazda6 battery-fit and modification discussion).
Explicitly avoid:
- Sanding or grinding the battery cover
- Cutting the housing
- Removing retaining features
- Compressing the case around an oversized cell
- Leaving out the rubber ring to create space
- Gluing a housing that will not clip together
The correct response to an ill-fitting replacement is to obtain the specified cell, not reshape the fob around a different battery.
Stop DIY work when you find damage
Seek professional assistance if you encounter:
- Cracked or missing clips
- A split, warped, or damaged housing
- A scratched, stretched, pinched, or missing seal
- Bent or broken battery contacts
- Corrosion
- Exposed electronic damage
- Loose internal components whose positions are unclear
- Abnormal button movement after reassembly
- A case that cannot close without force
- Continued failure after installation checks and a second correctly specified fresh battery
Capabilities vary, so provide the vehicle model and year, describe the fob shape and symptoms, and explain what work has already been performed.
Use the applicable Mazda owner’s manual rather than assuming that a method for one Mazda applies to another.
Before finishing, confirm:
- [ ] Exact battery code verified
- [ ] Original polarity reproduced
- [ ] Only intended opening points used
- [ ] Battery contacts left straight and unobstructed
- [ ] Rubber seal clean, undamaged, and correctly seated
- [ ] Battery cover flush
- [ ] Housing closed without gaps
- [ ] Auxiliary key secure
- [ ] Every available button tested
- [ ] Case rigid and aligned during use
If a second correctly specified and correctly installed fresh battery does not restore operation—or the case, contacts, electronics, clips, or seal are damaged—stop disassembling the fob and consult the applicable owner’s manual or a qualified automotive-key professional.
Frequently Asked Questions
What battery does a Mazda key fob take: CR2025 or CR2032?
It may use either type, depending on the fob and model year. Dealership guidance identifies CR2025 and CR2032 as common possibilities but does not establish either as universal (Seacoast Mazda’s battery-selection guidance).
Check the applicable owner’s manual and read the complete code printed on the installed battery. Match that code exactly rather than buying solely by vehicle model name.
How do I open a Mazda key fob without damaging the case?
Remove the auxiliary metal key using its identified release. If removing the key reveals designated slots, insert a tape-wrapped screwdriver tip shallowly into one slot, twist gently, and then loosen the opposite side before separating the housing with your fingers (Team Mazda’s opening procedure).
Do not pry at an unidentified seam or insert the tool deeply. If your fob does not match that layout, stop and consult its manual.
Which side of the Mazda key-fob battery faces up?
Follow the orientation of the original battery. Photograph it before removal and reproduce that position exactly.
Several documented Mazda-style procedures place the positive side upward, but that should not be generalized to every fob (Manchester Mazda’s battery-orientation procedure). The original installation and applicable owner’s manual are the safer references.
Does a Mazda key fob need to be reprogrammed after a battery change?
Do not assume that a routine battery replacement requires reprogramming. First check the cell code, polarity, seating, contacts, internal alignment, and case closure.
There is no universal Mazda synchronization procedure supported here. Use the applicable owner’s manual for any model-specific instruction rather than trying reset sequences intended for another vehicle.
What should I check if the key fob still does not work with a new battery?
Check, in order:
- The complete battery code
- Battery orientation
- Flat seating and contact engagement
- Battery-cover position
- Button and internal-part alignment
- Dirt, lint, corrosion, or visible damage
- Complete housing closure
- Every button separately
- A second verified-fresh battery of the same specification
If those checks do not restore operation, or you find damaged contacts, electronics, clips, housing, or sealing material, stop opening the fob and arrange professional diagnosis.