
Identify Your X3 Key Before You Open It
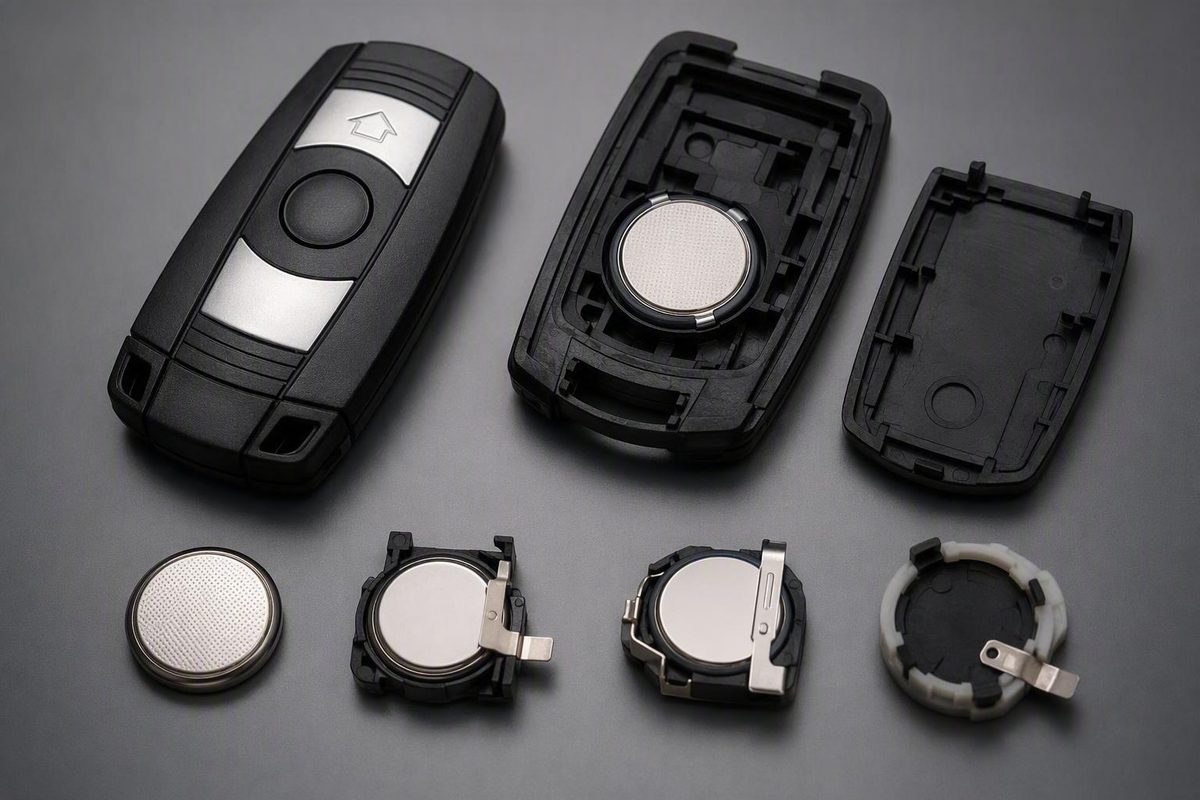
Identify the key first: confirmed glued E83-style fobs need a VL2020 with welded right-angle tabs; removable compartments should match the installed cell.
A BMW X3 key fob battery replacement is not universal. Identify the vehicle’s model year and key design before buying a battery. The community-documented key associated with the 2007–2010 BMW X3 3.0si E83 uses a glued housing and a soldered VL2020 rechargeable battery with welded right-angle connectors. A key with a removable battery compartment should instead be opened normally and matched to the marking on its existing battery. Never cut a fob that has a removable battery cover (community iFixit guide for the BMW X3 E83 key).
First, choose the correct replacement path
| Key design | How to identify it | Correct path |
|---|---|---|
| Confirmed E83-style glued housing | Model year and key design match the documented guide; no removable battery cover | Consider the VL2020 cut-and-solder procedure below |
| Accessible battery compartment | Removable cover, release point, or case intended to open without cutting | Open it normally, read the installed battery marking, and follow documentation for that vehicle and key |
| Unconfirmed bonded housing | No obvious battery cover, but the model year or key design does not match the documented E83 key | Do not assume it uses a VL2020; obtain model-specific documentation or professional identification |
The absence of a removable cover does not by itself prove that a key is the documented E83 design. The detailed invasive procedure here applies only when both the vehicle and key match the covered design.
Before purchasing anything:
- Confirm the X3’s model year.
- Inspect both sides and all edges of the key for a removable cover or intended opening point.
- If the battery is accessible, read its complete designation before removing it.
- Compare the key and battery with documentation for the exact vehicle.
- If identification remains uncertain, ask a qualified key-repair professional to inspect it.
Generic references to CR2032, CR2025, or CR2450 batteries do not establish compatibility with a particular BMW X3 key. These sizes appear in general coin-cell guidance, but the existing battery marking is the better starting point when the compartment is accessible (general key-fob coin-cell guidance).
What the documented E83 repair requires
For the covered E83-style key, the specified replacement is a VL2020 rechargeable battery with welded flag connectors positioned at right angles. This specification comes from a community-contributed repair guide, not an official BMW parts instruction.
A plain, tabless VL2020 is not a direct substitute. The replacement needs factory-welded connectors that match the original battery’s physical arrangement.
The documented tools are:
- Utility knife or box cutter
- Opening pick or similar thin separator
- Soldering iron
- Desoldering pump or desoldering wick
The guide rates the job as moderate. It involves cutting a bonded housing close to the circuit board, desoldering the existing battery, and installing a replacement without lifting pads or damaging nearby components.
Two essential details are not clearly documented: battery polarity and the exact connector orientation. Before removing the original battery, record its orientation, tab positions, and relationship to the circuit board. Do not rely solely on a product photograph, because a visually similar battery may have a different connector layout.
This is a poor first soldering project. Choose professional repair if you are not comfortable controlling a blade around electronics or desoldering a component without pulling on circuit-board pads.
Try synchronization before cutting the housing
Before opening a glued key, try the synchronization or recognition procedure applicable to the exact vehicle and key.
Do not use a sequence merely because it worked for another BMW model, year, or key shape. Consult documentation for the exact vehicle or obtain the applicable procedure from a qualified BMW service or key-repair provider. The community sequence is not verified here as an official BMW procedure.
Synchronization also cannot repair every fault. If a verified procedure restores normal operation, do not cut the housing. If it does not, proceed only after positively identifying the key as the covered E83 design.
E83 cut-and-solder replacement workflow
For a confirmed glued E83-style key, follow this order:
-
Document the original assembly. Take clear close-up photographs showing battery polarity, connector positions, and the way the battery sits against the circuit board.
-
Cut the bonded seam gradually. Work around the perimeter instead of forcing the blade deeply into one spot. Do not cut more than approximately 3 millimeters into the shell because the circuit board sits close to the housing (iFixit’s E83 opening and battery-replacement procedure).
-
Separate the housing. Use an opening pick or another thin separator to ease the halves apart. Stop if the board appears caught, the blade cannot be controlled, or opening requires excessive force.
-
Desolder the old battery. Remove solder from the battery-tab connections with a pump or wick. Once the joints are free, lift the battery without pulling on the board pads.
-
Compare the replacement. Confirm that the new VL2020 has welded connectors matching the original geometry. Recheck polarity and determine where both tabs will sit before applying heat.
-
Install the new battery. Solder its connectors to the appropriate board locations while limiting heat exposure and avoiding solder bridges. The available model-specific evidence does not support a prescribed soldering temperature or a definitive polarity diagram.
-
Add insulation when necessary. If the replacement lacks insulation on its rear surface, place insulation tape behind it. Make sure the tape does not interfere with button movement or prevent the shell from fitting correctly.
-
Inspect and test. Look for lifted pads, bridged joints, displaced components, debris, or trapped insulation. Test the key before permanently closing it.
-
Reseal only after a successful test. No specific adhesive is established by the available model-specific documentation.
Do not assume resealing restores the original factory seal.
Stop and seek professional help if cutting depth, polarity, connector geometry, or soldering technique cannot be verified confidently.
Test everything before applying adhesive
Do not permanently close the shell immediately after soldering. Complete this pre-seal checklist:
- Confirm that the battery and insulation sit flat.
- Inspect both solder joints for incomplete connections or accidental bridges.
- Check that no tab or insulation obstructs the housing.
- Press every button and verify that each underlying microswitch clicks.
- Hold the shell together temporarily with a rubber band.
- Test locking, unlocking, and any other applicable remote functions.
- Verify vehicle recognition using instructions for the exact model and key.
The community guide says the key normally requires synchronization after replacement. It also says that, when a second key is involved, it should be handled within 10 seconds. Because that sequence and timing are community guidance rather than verified BMW instructions, confirm them against documentation for the exact vehicle before relying on them.
Apply adhesive only after the key works and all buttons move normally. No particular adhesive or method can be recommended from the available evidence, and closing the housing should not be represented as restoring factory water resistance.
If the key still does not work
A fresh battery does not prove that the repair is electrically or mechanically correct. Diagnose the result in this order:
- Recheck polarity. Compare the new battery with the photographs or notes made before removal.
- Inspect connector geometry. Confirm that the welded tabs reach the correct board locations without twisting, crossing, or strain.
- Examine the solder joints. Look for loose connections, excess solder, bridges, or lifted pads.
- Check insulation. Ensure that exposed battery surfaces and tabs cannot contact unintended parts of the board.
- Operate every microswitch. An inconsistent click may indicate a worn switch, damaged button pad, or poor shell alignment.
- Look for opening damage. Inspect the board edge and nearby components for blade contact, cracks, or displacement.
- Investigate recognition. Use a synchronization procedure confirmed for the exact vehicle rather than repeatedly trying a generic sequence.
Reduced range, intermittent response, and complete failure can have causes other than the battery. A replacement cell will not repair a damaged button, fractured joint, circuit-board defect, or vehicle-side recognition problem.
Use professional diagnosis if the board has been cut or cracked, solder pads have lifted, the key remains unrecognized after a verified synchronization attempt, or you cannot test the electrical work safely.
Frequently asked questions
What battery does a 2007–2010 BMW X3 E83-style key use?
The community-documented repair specifies a VL2020 rechargeable battery with welded right-angle flag connectors. This applies only to the covered glued E83-style key, not every BMW X3 fob.
Can I use a standard tabless VL2020 in the documented E83 key?
Not as a direct replacement. The documented installation requires welded connectors with the appropriate geometry. Do not solder directly onto a bare tabless cell; obtain a compatible battery whose factory-welded tabs match the original arrangement.
Does a BMW X3 key always need reprogramming after battery replacement?
No universal requirement is established for every BMW X3 key. The E83 community guide says synchronization is normally needed after its soldered-battery repair, but that does not establish the same requirement for every X3 model or battery change.
For a confirmed glued E83-style key, consider the VL2020 cut-and-solder repair only after trying verified vehicle-specific synchronization and confirming the required battery tabs and repair skills. For any other X3 key, use the accessible battery marking and model-specific documentation rather than applying the E83 procedure. If the key design, polarity, or synchronization method remains uncertain, use a qualified key-repair professional.