
How to Change Your Cadillac Key Fob Battery Without Guessing the Size or Polarity
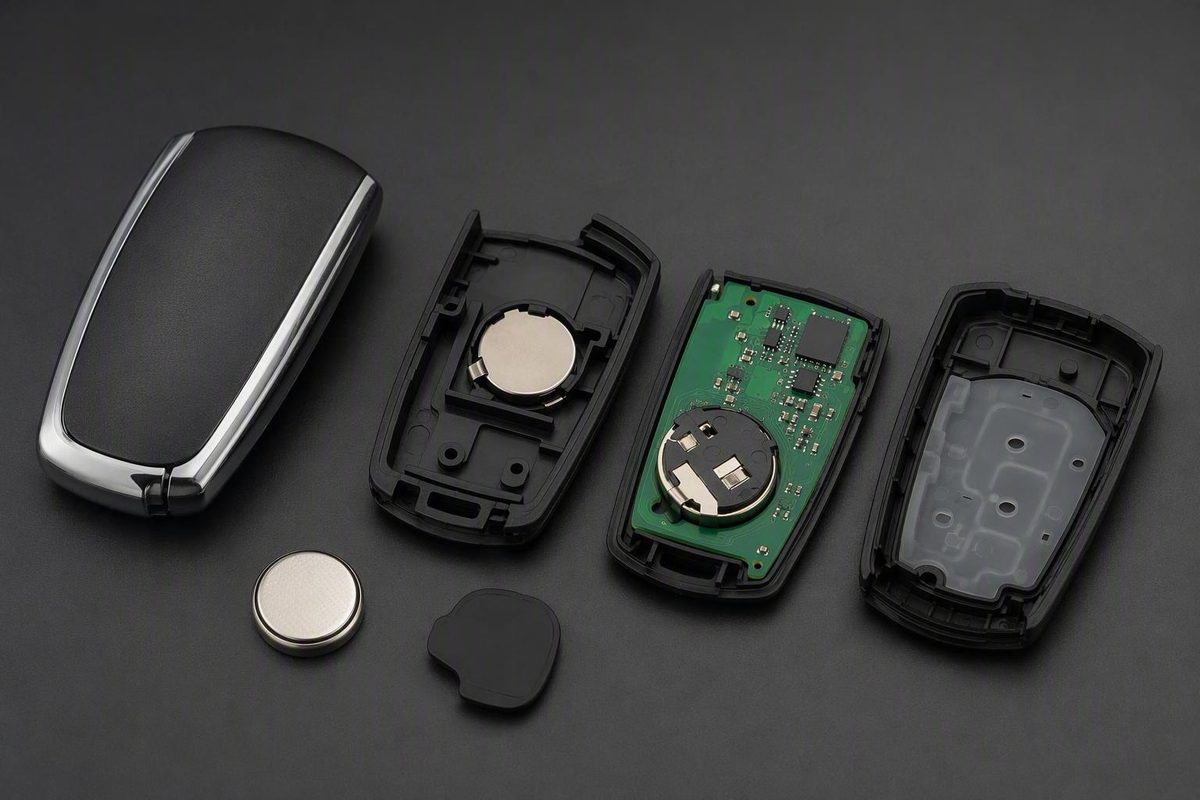
Record the old cell's full code and orientation before removal. Routine reprogramming after a straightforward battery change is not established.
Cadillac key fob battery replacement is often manageable at home, but Cadillac fobs do not all use one universal battery, internal layout, or polarity. Before buying a replacement, identify the vehicle’s model year and the physical fob design.
Use this verification-first process:
- Read the complete code printed on the existing battery.
- Inspect the compartment for a battery designation or polarity symbols.
- Check the owner’s manual for the exact model year.
- Photograph the old battery’s orientation before removing it.
- Open the housing only at its designated notch or groove.
- Install an exact battery-code match without forcing the cell or case.
- Test every equipped function after reassembly.
Editorial note: This guide synthesizes dealership-authored instructions and general key-fob guidance. Those sources are not official Cadillac or General Motors technical documentation, and they do not establish one procedure for every model year, trim, market, or replacement fob. The actual battery, compartment markings, and model-year owner’s manual take priority.
Is the Battery Really the Problem?
Reduced range, intermittent or delayed response, repeated button presses, and a dashboard low-battery warning can indicate a weakening key-fob battery. A dealership replacement guide identifies those symptoms as reasons to investigate the battery, but they do not conclusively diagnose it. Coulter Tempe Cadillac describes these possible weak-battery signs.
Other possible causes include:
- A damaged or jammed button
- A worn internal switch
- Poor battery contact
- A cracked circuit board or housing
- Radio interference
- A synchronization problem
- A vehicle-side receiver or antenna issue
Do not use a fixed operating distance as a universal pass-or-fail test. A better test is whether your fob has become less reliable under similar conditions.
Compare both fobs if you have a spare
A spare remote can help narrow the problem:
- Only one fob is unreliable: Begin with that fob’s battery, contacts, buttons, and housing.
- Both fobs fail in the same place: Consider local interference or a vehicle-side problem as well as the batteries.
- The spare works normally: The fault is more likely confined to the serviced fob, although that comparison does not identify the exact internal problem.
- Both fobs have declined over time: Verify both batteries independently.
Also inspect the exterior before opening the case. A torn, sunken, loose, or jammed button suggests a mechanical problem. A separated housing, corrosion, or visible impact damage may justify professional inspection rather than further prying.
Battery verification remains the simplest relevant first check. Treat it as a diagnostic starting point, not proof that the battery is responsible.
Verify the Battery Before You Buy or Install It
The safest answer to “Which battery does my Cadillac key fob use?” is the complete code printed on the cell already installed in that specific fob, checked against the compartment markings and exact model-year owner’s manual.
Do not assume that the first Cadillac listing in an online chart applies.
Identify the vehicle and fob
Record:
- Cadillac model and model year
- Whether the remote is original or a replacement
- The fob’s shape and button arrangement
- Any identifier visible on the housing
- Whether the compartment contains one cell or more than one
- Whether the compartment has a seal, cover, or battery carrier
The physical fob matters.
Follow this verification order
1. Read the old cell. Copy every character printed or stamped on the battery. Do not identify it only by diameter or appearance.
2. Inspect the compartment.
Look for a molded battery code, printed label, or + and − symbols. Use good lighting because the markings may be small.
3. Check the model-year owner’s manual. Look under headings such as keys, remote keyless entry, transmitter battery replacement, or remote control.
If these sources disagree, stop. A previous owner may have installed the wrong cell, or a generalized guide may not cover your fob revision.
Is CR2032 the standard Cadillac battery?
CR2032 is frequently specified in dealership instructions for the fob design those sources group as model year 2014 and newer. Heiser Cadillac also describes the 2020 CT5 fob as similar internally to the design introduced around 2014. This is dealership guidance, not official year-by-year Cadillac documentation. Heiser Cadillac describes its CR2032-based procedure and claimed coverage.
That claim does not establish CR2032 as the battery for every Cadillac fob.
One dealership guide separately reports CR2032 for XT5 and XT6 fobs, CR2450 for Escalade, CT4, and CT5 fobs, and two CR2032 cells for the Lyriq. It also reports a silicone battery cover in CT4- and CT5-style fobs. The source does not establish year-by-year applicability, so these are model notes to verify against the actual remote—not purchasing specifications. Turan-Foley Cadillac reports those configurations and limitations.
Why similar-looking cells are not automatically interchangeable
Coin cells that look alike can differ in thickness and fit. A commercial key-fob guide reports that CR2032 and CR2025 are both 20 millimeters in diameter, while CR2032 is 3.2 millimeters thick and CR2025 is 2.5 millimeters thick. It warns that the wrong thickness can produce poor contact or place stress on the fob’s internal parts. The guide provides the stated dimensions and fit cautions.
Match the complete printed code. Do not try to compensate for an incorrect cell by bending contacts, adding a spacer, stacking batteries, or forcing the housing closed.
This article does not provide a replacement procedure for pre-2014 Cadillac fobs. The available Cadillac-specific sources do not establish one dependable opening method, battery specification, or polarity for those earlier designs.
Resolve the Polarity Question Before Removing the Old Cell
There is no safely supported universal rule that every Cadillac key-fob battery must have its positive side facing up or down. The available dealership instructions conflict.
Holiday Cadillac instructs owners to install a CR2032 with the positive side facing down in the design it groups as model year 2014 and newer. Holiday Cadillac gives the positive-side-down instruction.
By contrast, Coulter Camelback Cadillac instructs readers to place the positive side upward. Its dealership guide gives the conflicting positive-side-up instruction.
Neither instruction should be generalized to every Cadillac. Verify polarity from the actual fob.
Record orientation before removal
After opening the case but before moving the battery:
- Photograph the entire open fob.
- Take a close photograph of the visible battery face.
- Note whether the visible face carries the
+symbol. - Record the complete battery code.
- Observe which edges sit beneath the contacts or retaining tabs.
- Look for molded or printed polarity symbols in the compartment.
Photographs help because the case halves can be turned around during the repair, making the original orientation easy to misremember.
Follow the compartment markings
If the compartment has a clear + or − symbol, align the battery with that marking. If the original orientation and the compartment markings agree, install the replacement the same way.
If they conflict, do not automatically copy the old installation; the old battery may have been inserted incorrectly. Check the model-year owner’s manual or obtain qualified assistance.
If the old cell moves before you record it and no polarity marking is visible, stop rather than testing the battery in both directions. Even the correct battery code will not power the fob when installed with the wrong polarity.
Tools and Setup for Opening the Fob Carefully
Prepare the work area before releasing the emergency key. You will need:
- A replacement battery with a verified full code
- The exact model-year owner’s manual, if available
- The emergency-key tip, a plastic pry tool, or a small flat tool
- A soft, clean cloth
- A stable, well-lit work surface
- A phone or camera
Work over the cloth so the housing is less likely to be scratched and small components are easier to see. Keep the old and new batteries separate so they are not confused during reassembly.
Use only the designated opening point
After removing the emergency key, inspect the cavity it leaves behind. Many serviceable Cadillac fobs have a narrow groove or shaped opening in this area.
Use that opening rather than inserting a tool arbitrarily into the middle of the exterior seam. Apply light, controlled pressure. The goal is to release the housing clips, not bend the case.
If the housing does not separate:
- Confirm that the emergency key is fully removed.
- Check that the tool is in the intended groove.
- Adjust the tool angle slightly.
- Look for another release feature.
- Stop if substantial force is required.
A resistant fob may use a different construction from the one described here.
Protect the contacts and internal components
Keep the tool shallow as the housing opens. Do not pry against the circuit board or use a battery contact as a lever.
Once the case is open:
- Put the opening tool down before handling the cell.
- Avoid unnecessary contact with the circuit board.
- Hold the replacement battery by its edges.
- Do not bend a contact to make an unverified battery fit.
- Record the position of any seal or silicone cover before moving it.
A dealership guide recommends recycling the removed battery. Use an appropriate battery-recycling option accepted in your area rather than assuming one disposal method applies everywhere.
Cadillac Key Fob Battery Replacement: Step by Step
These steps reflect a method broadly reported for serviceable Cadillac fobs. They are not an official procedure for every Cadillac year or fob design.
If your remote has no side release, no removable emergency key, no designated groove, or a materially different internal arrangement, stop and use instructions for that exact fob.
1. Release and remove the emergency key
Hold the fob securely. Locate the small release button or slider on the side of the housing. Press or move it while pulling the hidden mechanical key straight out.
Set the emergency key on the cloth.
2. Find the designated opening
Inspect the cavity exposed by the removed key. Look for a narrow groove, slot, or shaped opening intended for separating the case.
The emergency-key tip, plastic pry tool, or small flat tool should engage this opening without being pushed deeply into the housing.
3. Separate the housing gently
Insert the tool only far enough to engage the groove. Apply gentle twisting or levering pressure until the first clips release.
Once a gap appears, support both halves and continue carefully around the intended edge. Do not force one point wide open.
Stop if the case does not respond as expected. The tool may be in the wrong location, or the fob may use a different retention method.
4. Observe the internal layout
Open the housing slowly. In a commonly described dealership procedure, the circuit board is in one case half and the battery is in the other. Cadillac Lakeland also describes releasing the emergency key, using the exposed narrow groove, and separating those two compartments. Its guide illustrates that general layout and opening sequence.
Your fob may instead contain a cover, seal, carrier, or different contact arrangement. Take a wide photograph before moving anything.
5. Record the battery code and orientation
Photograph the battery closely enough to read its complete code. Record:
- The visible battery face
- Whether the
+symbol is visible - Any compartment polarity symbols
- The edges held beneath contacts or tabs
- The position of any cover or seal
If you have not purchased the replacement, obtain an exact match before continuing.
6. Remove the old cell
Identify the edge that is not trapped beneath a retaining contact. Lift or slide that edge according to the holder’s design, using light pressure.
Do not scrape the circuit board, bend the contacts, or use the board as leverage. If the cell does not release easily, inspect the holder again for a retaining tab, cover, or slide-out arrangement.
7. Install the exact replacement
Compare the old and new cells without stacking them:
- The complete codes should match.
- The apparent diameter and thickness should match.
- The positive face should be identifiable.
- The new cell should fit without altering the contacts.
Hold the replacement by its edges. Guide the appropriate edge beneath the retaining contact and lower the other side into the holder, following the verified polarity.
The battery should sit flat and secure. If it rocks, stands above the holder, or requires force, remove it and recheck the code, orientation, and insertion angle.
8. Realign covers and close the housing
Return any seal, gasket, or silicone cover to the position shown in your photograph. Make sure it is not twisted, folded, or obstructing a clip channel.
Align the case halves evenly. Check that the buttons and internal components remain seated, then press around the perimeter with even hand pressure.
Inspect the entire seam. If one corner remains open, separate the housing again and check the battery seating and internal alignment. Do not use pliers or another clamp to force the case shut.
9. Reinstall the emergency key
Slide the mechanical key back into its channel until the release mechanism captures it. Tug gently without pressing the release to confirm that it is retained.
The completed fob should have an even seam, normally moving buttons, and no loose internal rattle.
Test Every Function After Reassembly
Test the remote before putting away the tools. If something is wrong, your orientation photographs and work setup will still be available.
Start close to the vehicle
Stand near the vehicle and test:
- Lock
- Unlock
- Trunk or liftgate release, if equipped
- Remote start, if equipped and operating conditions permit
- Any other dedicated fob button
Observe both the vehicle’s response and the feel of each button.
If the fob has an indicator LED, note whether it responds when a button is pressed.
Compare performance at different distances
After close-range operation is confirmed, move farther away and repeat the lock and unlock tests. The purpose is to determine whether the earlier reduced-range or intermittent symptom has improved.
Compare:
- Close and farther operation
- The serviced fob and the spare
- Current behavior and the fob’s previous normal behavior
- Performance in another location if interference is suspected
Do not expect a universal normal distance.
Test passive entry separately
If the vehicle has passive entry, test it separately from the physical buttons. Carry the fob normally and check the door-handle or proximity behavior described for your vehicle.
Physical-button operation and passive entry are different tests. One can work while the other remains unreliable.
Finish by checking that:
- The case seam is fully closed.
- Every button moves and returns normally.
- The emergency key remains latched.
- No seal or cover protrudes.
- Nothing rattles inside the housing.
If the Fob Still Does Not Work
A fresh battery does not prove that the fob is defective. Check the installation systematically before paying for programming, repair, or replacement.
1. Verify the complete battery code
Reopen the case and compare the replacement code with your photograph of the original cell. Check every character.
If the original code is unreadable, use the compartment designation and exact model-year owner’s manual rather than a generic compatibility list.
2. Confirm polarity
Compare the replacement orientation with:
- The original installation photograph
- The compartment’s polarity markings
- Model-specific owner’s-manual instructions
Do not copy the orientation from an unrelated Cadillac fob. The available dealership guidance conflicts.
3. Check that the cell is flat and secure
Inspect for:
- A retaining tab positioned over the wrong edge
- A contact trapped beneath the battery
- A cell that rocks in the holder
- A cover or seal pushing the cell out of position
- A contact displaced during removal
Do not aggressively reshape a contact. A loose or detached contact requires qualified repair.
4. Inspect the contacts
Remove the battery and look for residue, corrosion, or physical damage. A dealership troubleshooting article suggests using only a small amount of isopropyl alcohol on a microfiber cloth or cotton swab, then allowing the fob to dry before reassembly. It also lists physical damage, interference, and loss of vehicle communication as possible causes beyond the battery. Turan-Foley Cadillac outlines that limited cleaning and inspection approach.
Do not pour liquid into the housing or reinstall the battery before the components are dry. Visible corrosion, lifted metal, broken connections, or contamination beneath electronic components warrants professional inspection.
5. Confirm complete case closure
An incompletely closed case can leave the battery or button membrane out of position. If the housing will not close normally:
- Remove the battery.
- Recheck its code and orientation.
- Reposition any cover or seal.
- Confirm that the circuit board and button membrane are seated.
- Reassemble using hand pressure only.
A housing that closes only under heavy pressure may contain an incorrect or displaced component.
6. Apply model notes only after identifying the fob
If the actual fob has a silicone battery cover, confirm that it is aligned and not interfering with the contacts.
If the compartment is verified to contain two cells, check both cells individually for the correct code, orientation, and seating. Do not expect a second cell solely because an online guide associates one model name with a dual-cell configuration.
7. Inspect for physical damage
Look for:
- Cracked or missing housing clips
- A warped battery holder
- Bent, loose, or detached contacts
- Corrosion
- Torn or sunken buttons
- Loose internal components
- Visible circuit-board damage
- Signs of liquid entry
- Damage around a previous pry point
8. Test the spare fob
If the spare works reliably, the issue is probably confined to the serviced fob or its installation.
If both remotes fail similarly, consider:
- Whether both batteries need independent verification
- Whether the warning may refer to the other remote
- Environmental interference
- A vehicle-side receiver, antenna, or electrical issue
- A need for model-specific synchronization or diagnosis
If interference is plausible, compare both remotes in another location using the same buttons and approximate distance.
Know when to stop
Seek professional diagnosis when:
- The verified battery is installed correctly but operation does not return.
- Contacts are loose, corroded, bent, or detached.
- The circuit board or housing is cracked.
- Buttons remain trapped after correct reassembly.
- Neither remote communicates reliably.
- The fob works only when squeezed or flexed.
- The problem followed liquid exposure or significant impact.
- The case cannot be opened or closed without substantial force.
Continued failure may involve installation error, physical damage, synchronization trouble, interference, internal electronics, or a vehicle-side issue.
Persistent Warnings, Resynchronization, and Reprogramming
The available evidence does not establish reprogramming as a routine requirement after a straightforward battery replacement.
That does not mean synchronization or pairing can never become relevant. If a verified battery and correct installation do not restore communication, consult the exact model-year owner’s manual or seek diagnosis.
Why a low-battery warning may remain
Possible explanations include:
- The replacement has the wrong code.
- The battery is backward or not seated correctly.
- The contacts are not reaching the cell.
- The replacement battery is weak or damaged.
- A cover or seal is interfering with contact.
- The warning concerns the other fob.
- The problem is not battery-related.
If the vehicle does not identify which remote triggered the warning, check both fobs rather than repeatedly reopening only the one most recently serviced.
A narrow CT6 owner report
In one Cadillac Owners Forum discussion, a CT6 owner said a weak-battery warning remained after installing two successive CR2032 replacements. The owner later reported that the warning cleared after unlocking the vehicle with the fob button instead of relying on passive entry. The forum thread records that individual experience.
This is a single owner anecdote, not an official Cadillac reset procedure. It should not be generalized to other models or used as a substitute for verifying the battery and installation.
Consult the exact owner’s manual
Use the manual for guidance on:
- Transmitter synchronization or pairing
- Warning-message behavior
- Recognition of multiple remotes
- Emergency access
- Starting the vehicle when the fob battery is depleted
- Any model-specific location used to detect a depleted fob
Those procedures and locations can vary. Do not apply a sequence or cabin location from one Cadillac model to another without confirmation.
Stop DIY troubleshooting when a warning persists after the installation has been verified, neither fob communicates reliably, the vehicle cannot detect the remote, or physical damage is visible.
Frequently Asked Questions
What battery does a Cadillac key fob take?
There is no single battery established for every Cadillac key fob. Read the complete code on the existing cell, inspect the compartment markings, and check the exact model-year owner’s manual.
Dealership guides report different batteries and battery counts for different fob designs, but their year-by-year applicability has not been established. Do not buy a battery solely from a generalized model list.
Which way does the battery go in a Cadillac key fob?
Follow the compartment’s + and − markings and the original orientation recorded before removal. Photograph the installed battery before lifting it out.
Dealership sources conflict about whether the positive face should point up or down, so neither orientation is a universal Cadillac rule. If the original position and compartment markings are unclear, consult the model-year owner’s manual or a qualified service provider.
Does a Cadillac key fob need reprogramming after a battery change?
The available evidence does not establish reprogramming as a routine requirement after a straightforward battery replacement.
If the remote remains unresponsive, first check the battery code, polarity, seating, contacts, internal covers, and case closure. Synchronization or pairing remains possible when a correct installation does not restore communication, so use only the procedure documented for the exact vehicle.
Why does my Cadillac still say the key-fob battery is low after replacement?
The cell may be incorrect, backward, weak, poorly seated, or separated from the contacts by a displaced cover. The warning may also refer to the spare remote.
Verify both fobs and use the serviced remote normally. One CT6 owner reported that a persistent warning cleared after using the fob’s unlock button, but that was an individual anecdote—not an official reset procedure.
Can I use these instructions for a pre-2014 Cadillac key fob?
Not reliably. The available dealership instructions frame the commonly described opening method around later fob designs and do not establish a dependable procedure for earlier Cadillac remotes.
For an older fob, identify the exact remote and use its model-year owner’s manual or qualified model-specific assistance. Do not assume its battery, polarity, pry point, or internal layout matches a newer design.
Final Verification Checklist
Before considering the job complete:
- Match the complete code printed on the old battery.
- Confirm polarity from the original installation or compartment markings.
- Open the housing only at its designated notch or groove.
- Keep the opening tool away from the circuit board and contacts.
- Seat the replacement flat without bending contacts or forcing the cell.
- Realign every cover or seal.
- Close the housing evenly with no gaps.
- Reinstall and secure the emergency key.
- Test every equipped button close to the vehicle and from farther away.
- Test passive entry separately, if equipped.
- Compare the spare fob if trouble continues.
- Consult the exact model-year owner’s manual before pursuing synchronization, repair, or replacement.