
How to Change the Battery in a Matching 2017+ Pacifica Key Fob
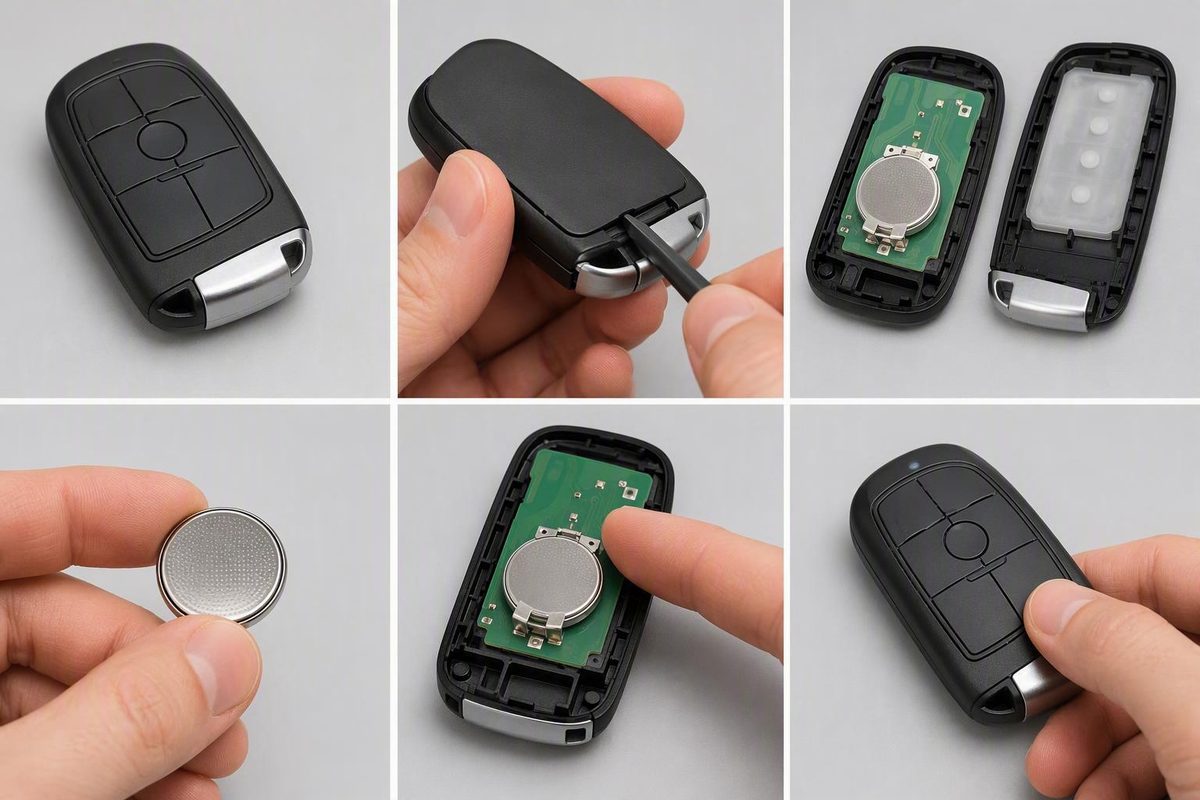
For the documented fob housing, follow six steps to open the case, verify the old cell is CR2032, match its polarity, test the remote, and diagnose failures.
For the Chrysler Pacifica fob covered by a third-party 2017–2024 parts guide, the reported replacement is a 3-volt CR2032 coin cell. That does not establish CR2032 compatibility for every Pacifica, Pacifica Hybrid, later model year, or remote style. Before buying a battery, confirm the number stamped on the old cell and check the polarity markings inside your own fob. See the covered 2017–2024 fob specification.
The “2017+” wording in this guide refers to the owner-forum category in which the matching housing was documented. It should not be read as confirmation that every Pacifica from 2017 onward uses the same battery or case.
Quick answer: Check the old battery before buying a CR2032
A CR2032 is the commonly reported choice for the documented fob, but treat that as a starting point rather than a universal specification. Use the old battery, markings inside the housing, or the key-fob section of your model-year owner’s manual to confirm the replacement.
Check all four of these details when possible:
- The complete battery number stamped on the old coin cell
- Any battery-size or polarity markings molded into the housing
- The instructions in the owner’s manual for your exact model year
- The fob’s case design and opening points
Do not choose a battery solely because it has the same diameter as another coin cell. CR2016, CR2025, and CR2032 are different battery designations, and their thicknesses can differ. Installing the wrong type may prevent reliable terminal contact or keep the case from closing correctly.
Proceed only if the fob matches
The documented housing has a removable emergency key, a rear cover on the side opposite the buttons, and an opening point inside the empty key slot. Once opened, its battery holder has a small removal notch opposite the key opening.
If your remote lacks those features, has a different case shape, contains a battery marked with another number, or conflicts with the owner’s manual, stop and identify the correct procedure before proceeding.
What you need and what to protect
Prepare the following:
- One new coin cell with exactly the same designation as the old battery
- The fob’s hidden emergency key
- Optional: a small plastic pry tool or narrow flat screwdriver for the battery-removal notch
Work over a clean, well-lit surface. Before lifting out the old battery, photograph it in place so you have a record of its orientation and labeled side.
Use only light pressure when opening the housing. Do not push a tool toward the circuit board or use the board as a leverage point. Avoid bending the battery terminals, disturbing the rubber gasket or buttons, or forcing the plastic retaining tabs. A third-party Chrysler key-fob guide specifically cautions against damaging these components during opening and reassembly. Review the handling precautions.
Replace the battery in six steps
-
Remove the emergency key. Find the release near the key end of the fob. Operate the release and pull the hidden mechanical key completely out.
-
Release the rear cover. Hold the matching fob with its back—the side away from the buttons—facing up. Insert the emergency key into the opening from which it was removed and twist gently until the rear cover pops free. Do not drive the key or another tool along the outer seam toward the electronics.
-
Lift off the cover. Raise the cover from the key-opening end, following the direction in which it naturally releases. Do not bend the cover sharply. Locate the small battery-removal notch on the side of the holder opposite the key slot.
-
Remove and identify the old battery. Place the end of a small plastic tool or narrow flat screwdriver in the removal notch and lift the cell carefully. Do not lever against the circuit board or bend either battery contact. Record the full battery designation and compare it with the replacement before continuing.
-
Install the matching cell in the same orientation. For the documented housing, the labeled positive side faces outward or up. However, the removed battery’s position and any polarity symbol molded into your particular housing take precedence. A Pacifica owner-forum walkthrough documents the removal notch, outward-facing battery label, and cover sequence for this case design. See the documented battery orientation.
-
Close the case and reinstall the key. Engage the cover at the end opposite the key opening first. Press around the perimeter until the cover sits evenly with no visible gap, then slide the emergency key back into place.
Before testing, confirm that you can identify each working point on the assembled fob:
- Emergency-key release
- Opening point inside the key slot
- Rear-cover edge
- Battery-removal notch opposite the key slot
- Cover engagement end opposite the key opening
If the cover will not close with gentle, even pressure, reopen it and check the battery size, seating, gasket, and buttons. Do not clamp or force the case shut.
Test the fob before assuming it needs programming
Begin beside the van rather than testing from normal remote range.
If your fob has an indicator LED, press a button and look for a response. Then test only the functions actually present on your remote:
- Lock and unlock
- Power sliding doors
- Liftgate
- Panic alarm
- Remote start
Once the buttons work beside the vehicle, move farther away and check whether normal operating range has returned. A feature that fails at a distance should be tested again close to the van before you conclude that the battery installation failed.
Third-party guidance generally distinguishes a coin-cell change from replacement of the complete transmitter. A battery-only replacement commonly does not require programming, while a replacement fob commonly must be programmed to the vehicle by a Chrysler dealer or qualified automotive locksmith. This is not a universal promise that every remote will resume operation without synchronization; consult the model-year owner’s manual if the fob remains unresponsive after the installation checks. See the battery-versus-transmitter distinction.
If the fob still does not work: use this decision table
| Symptom | Next check | Likely next action |
|---|---|---|
| No LED or button response | Reopen the case and verify polarity, seating, and contact with both terminals. Try a known-good battery of the exact same type. | Close the case evenly and retest beside the van. If it remains dead, compare it with the spare fob. |
| Intermittent response or poor range | Confirm that the case is fully closed and the battery cannot move. Test close to the vehicle, then compare the spare. | If only one fob has poor range, have that fob’s contacts and electronics inspected. |
| One fob is dead but the spare works | Install a known-good matching cell and check for a displaced contact, gasket, button pad, or cover. | Seek professional diagnosis of the affected fob. This pattern alone does not prove that the transmitter is defective. |
| Both fobs behave poorly | Retest beside the vehicle and note whether the problem began in one location or at the same time. | Possible causes extend beyond the coin cells and may include radio interference, a weak vehicle battery, or a vehicle receiver problem. |
| The battery measures near 3 volts but the fob remains dead | Recheck polarity and try a battery known to operate the spare fob. | Treat the reading as one troubleshooting detail rather than proof that the complete fob is functioning. |
A 2020 Pacifica Touring L owner reported correct polarity and an approximately 3-volt reading after replacement, but the affected fob still failed when fitted with the battery from a working spare. That individual report does not diagnose the cause; it shows why comparing fobs and trying a known-working cell can be more informative than relying on the voltage reading alone. Read the owner’s troubleshooting report.
If a known-good battery of the correct type is seated in the documented orientation and the fob still does not respond, stop repeatedly opening the housing.
How to get into and start the van with a dead fob
Remove the hidden mechanical key using the fob’s release. On an applicable newer Pacifica, the mechanical key can be used in the driver’s-door lock to enter the van.
For an applicable push-button-start model, third-party guidance describes this fallback procedure:
- Enter with the mechanical key if the remote buttons do not work.
- Hold the brake pedal.
- Use the fob itself to press the Start/Stop button.
This backup method is reported for the covered newer design, but it is not established here for every Pacifica year, variant, or remote. If your fob or ignition arrangement differs, use the emergency-entry and starting instructions in the owner’s manual rather than improvising.
If a correctly installed, known-good battery does not bring those functions back, have both the fob and the vehicle-side system diagnosed.