
Replace Your Subaru Key-Fob Battery Without Damaging the Case
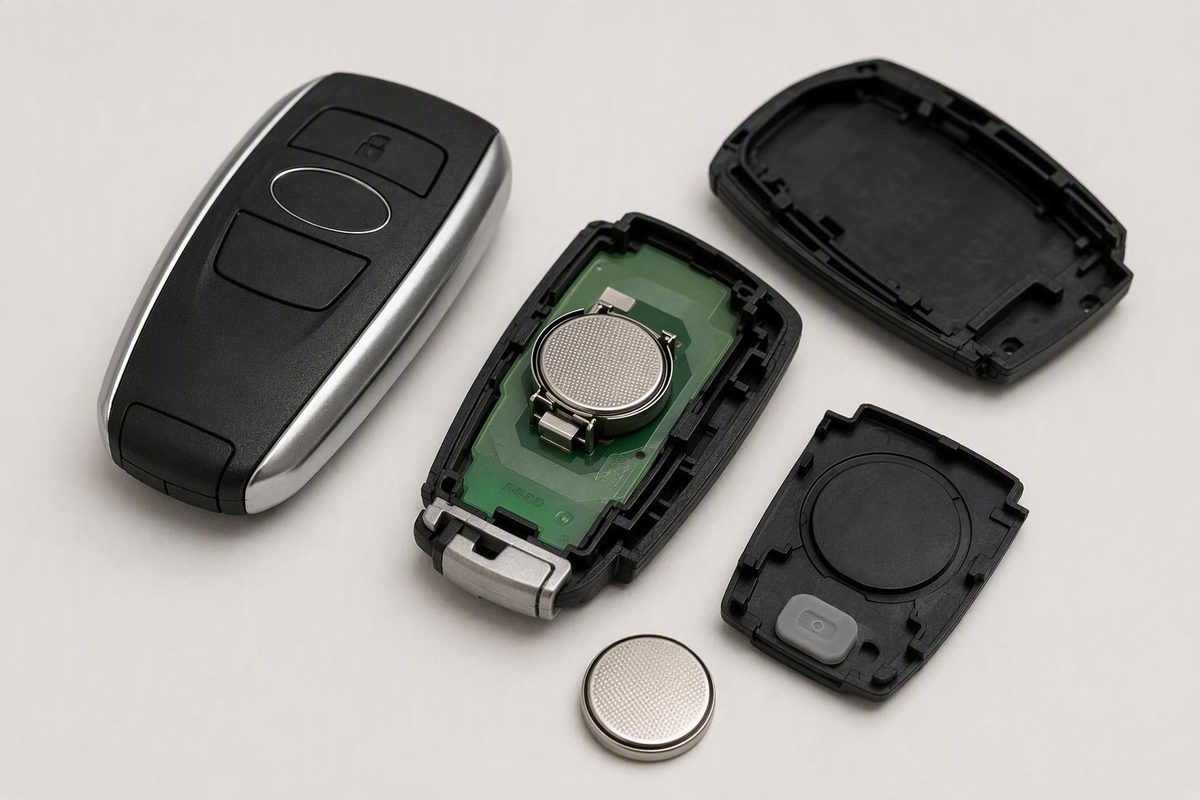
Find its notch, seam tab or key-cavity gap and photograph the cell before removal. CR2032, CR2025 and CR1620 are common types, but verify the full code.
Quick answer: the safe Subaru key-fob battery replacement sequence
Subaru key fobs do not all use the same battery or opening method. Before buying a replacement, identify the fob’s intended opening point: an outer notch, a tab in the seam, or a gap exposed after removing the mechanical emergency key.
The safest general sequence is:
- Remove the mechanical key, if equipped.
- Find the designated opening point instead of prying along an arbitrary edge.
- Protect the housing by using a plastic pry tool or a small flathead screwdriver wrapped with a thin layer of cloth or tape.
- Separate the case gently. Stop if the housing bows substantially, whitens, or begins to crack.
- Photograph the installed battery so its complete code and orientation are recorded.
- Release the battery without bending its retaining tabs or contacts.
- Install an exact match with the same printed code and orientation as the original.
- Align and close the housing, then reinsert the mechanical key.
- Test every function available on the fob and vehicle.
Fob shape can suggest the likely procedure, but it is not enough to select a battery. Third-party dealership guidance commonly associates newer rounded rectangular fobs with CR2032, older teardrop remotes with CR2025, and some integrated metal-key designs with CR1620. These are design-based patterns, not universal Subaru assignments (Serra Subaru’s guide to three common fob designs).
If you cannot inspect the installed cell safely—or your fob differs from the designs below—consult the owner’s manual for the exact Subaru model and year. The procedures here reconcile third-party dealership and retailer instructions; they are not a supplied Subaru factory procedure.
Identify your fob and confirm the correct battery
The model-specific owner’s manual is the other appropriate authority. Treat shape only as a preliminary clue.
| General fob appearance | Battery commonly associated with the design | Typical opening point | What you must verify |
|---|---|---|---|
| Rounded or bulging rectangular smart-key fob with a removable emergency key | CR2032 | Gap exposed beside or behind the removed emergency key | Installed code, polarity, and internal layout |
| Older teardrop-shaped remote | CR2025 | Small niche or notch in the outer seam | Installed code and orientation |
| Exposed or integrated metal ignition key with buttons | CR1620 in some designs | Outer seam, sometimes followed by a separate inner transmitter housing | Whether an inner unit is present, plus its code and orientation |
| Any design that does not clearly match | Unknown until inspected | Owner’s manual or an identifiable case notch | All details before purchase or disassembly |
Dealership instructions associate these three fob families with CR2032, CR2025, and CR1620 respectively, but do not provide an official compatibility table covering every model year, trim, or fob part number (Brewster Subaru’s design-based battery guide). Do not select a battery solely because your Subaru has push-button start, uses a metal ignition key, or resembles an online photograph.
CR2032, CR2025, and CR1620 are not interchangeable defaults
Similar names do not make these batteries interchangeable. CR2032 and CR2025 are both listed as 20 millimeters in diameter, but CR2032 is 3.2 millimeters thick while CR2025 is 2.5 millimeters thick (AutoZone’s Subaru battery-size explanation). CR1620 is a different format again.
Do not compensate by bending contacts or forcing the housing shut.
Some third-party instructions shorten the codes to “2032” or “2025.” That shorthand is not permission to substitute a merely similar cell. Match the complete designation printed on the old battery or specified in the owner’s manual.
The prudent purchasing sequence is:
- Identify the correct pry point.
- Open the fob without disturbing its electronics.
- Photograph the battery in place.
- Read the complete code.
- Buy that exact battery type.
If you need to shop after opening the fob, keep the shell, inserts, transmitter, and mechanical key together in a clean container. You may take the removed cell to a retailer for comparison, but retain the photograph showing how it was installed.
Tools, workspace, and damage-prevention checks
Prepare everything before opening the housing:
- A replacement coin cell matching the confirmed code
- A small flathead screwdriver with an undamaged tip
- A plastic pry tool, if available
- A soft cloth, paper towel, or thin tape to protect the case
- A phone or camera for documenting the battery
- A clean tray or shallow container for loose parts
On some rectangular fobs, the removable mechanical key can serve as the opening tool. Use it only if it fits the designated gap naturally; that method does not apply to every design.
Work over a clean, well-lit surface. The battery may not be the only loose component. Depending on the design, the housing can contain a rubber button pad, seal, transmitter assembly, or small insert that shifts when the halves separate.
Before removing the old battery, photograph:
- Its complete printed code
- The face currently visible
- The location of the positive symbol, if visible
- The edges held beneath retaining tabs
- The orientation of the transmitter and button pad
That description can become ambiguous after the transmitter or housing has been turned over.
Coin-cell safety: Keep new and removed batteries away from children and pets. Do not leave the old battery loose on a counter, in a pocket, or among the fob parts; secure it and dispose of it appropriately as soon as possible.
Protect the housing and electronics
If you use a metal screwdriver, cover its tip with one thin layer of cloth or vinyl tape. A documented rectangular-fob procedure recommends placing a protected screwdriver in the opening left by the emergency key rather than forcing a tool into an arbitrary exterior edge (Subaru North Orlando’s protected-tool procedure).
Use one of the documented opening tools—a protected flathead screwdriver, plastic pry tool, or properly fitting mechanical key tip. Do not substitute a knife.
As you open the case:
- Apply only enough pressure to begin releasing the intended opening.
- Twist the tool gently instead of pushing it deeply into the housing.
- Continue along an already released seam with a plastic tool if necessary.
- Keep the tool away from the circuit board.
- Do not bend battery-retaining tabs or electrical contacts.
- Do not pull on an indexed rubber button pad or seal.
- Do not force one corner while another remains locked.
Stop if there is no identifiable opening point, the selected gap does not accept the tool naturally, or the plastic flexes without releasing. Recheck the owner’s manual or seek help from a qualified automotive locksmith or Subaru service department rather than risk damaging the housing or electronics.
How to replace the battery in a newer rectangular Subaru fob
This procedure applies to the common rectangular smart-key style with a removable mechanical or emergency key. Before starting, confirm that your fob has the described release latch and internal opening gap.
1. Remove the mechanical key
Find the release button or silver latch on the back or side of the fob. Hold it in the released position and pull the metal key straight out. Do not twist the key while the latch is still holding it.
Set the key in your parts tray. You will need to reinstall it, and it may also be suitable for opening the case.
2. Find the internal opening gap
Inspect the cavity exposed by the removed key. Look beside or behind it for a small gap between the front and rear sections of the housing.
Some rectangular fobs appear nearly seamless around their exterior sides because the useful opening point is inside this cavity. If the outer edge has no clear notch, do not force a screwdriver into the middle of the seam.
3. Begin separating the housing
Insert one of the following into the designated gap:
- The tip of the removed mechanical key, if it fits correctly
- A plastic pry tool
- A small flathead screwdriver covered with thin tape or cloth
Twist gently. The two housing sections should begin to separate without the tool being pushed deeply into the fob.
Once a gap appears, withdraw the tool slightly and continue releasing the seam without contacting internal components. If nothing moves under modest pressure, stop and verify that you have found the correct opening.
4. Lift the halves apart carefully
Set the fob down and lift the upper housing half slowly. Watch for a rubber button membrane, seal, or insert that may remain attached to either side.
The battery might be immediately visible. In some rectangular layouts, however, it is on the reverse side of the transmitter assembly. Do not automatically pry out the circuit board. First determine whether it lifts freely from a molded recess and whether access to its reverse side is clearly necessary.
If the board appears clipped, wired, or firmly retained, stop and consult instructions for the exact fob. Do not force it out.
5. Verify the battery and polarity
Read the full code printed on the old cell. CR2032 is documented for the particular rectangular fob described in one dealership procedure, but it should be installed only when the existing cell or owner’s manual confirms that specification. That same procedure places the positive side upward; this is not established as a universal orientation for every Subaru fob (Subaru North Orlando’s CR2032 procedure).
Photograph the installed battery before disturbing it, then copy its actual orientation.
6. Remove and replace the cell
Identify which edge is held by spring pressure and which edges sit beneath stationary tabs. Ease the battery out from its release side without levering against circuit-board components or bending a contact.
Install the replacement by reversing the movement:
- Slide the correct edge beneath the stationary retaining features.
- Press the opposite edge down gently.
- Confirm that the battery sits flat and is securely retained.
- Compare the visible face and position with your photograph.
If the battery rocks, stands above the holder, or requires unusual pressure, remove it and recheck the code rather than forcing it into place.
7. Close the fob
Return the transmitter, button pad, seal, and any inserts to their original positions. Align the housing projections, recesses, and clips before applying pressure.
Press around the perimeter in stages until the seam is even. Reinsert the mechanical key and confirm that the latch holds it securely.
How to replace batteries in older teardrop and integrated-key fobs
Older Subaru remotes use different opening points and internal layouts. Do not attempt to remove an emergency key from a remote that does not have one, and do not assume that the battery will be visible immediately after opening an integrated metal-key shell.
Teardrop-style remote
Look around the perimeter for a small niche in the seam between the front and rear housing sections. Use that niche rather than the middle of an arbitrary edge.
- Place the remote on a soft cloth.
- Insert a protected small flathead screwdriver or plastic tool into the niche.
- Twist gently until the housing begins to separate.
- Lift the halves apart while watching the rubber button pad and transmitter.
- Photograph the battery in place.
- Read the complete code and record its orientation.
- Release the cell without bending the contacts.
- Install the exact replacement in the documented orientation.
- Align the internal parts and close the housing evenly.
Third-party dealership guidance commonly associates this teardrop design with CR2025. Treat that as an expectation to verify, not as a universal buying instruction.
Integrated or exposed-metal-key design
An ignition key with buttons may contain an outer shell and a separate inner transmitter unit. Opening the outer shell can therefore reveal a compact module rather than the battery.
Proceed in stages:
- Locate the niche or tab in the outer shell.
- Open the shell gently with a protected flathead screwdriver or plastic tool.
- Note the positions of the transmitter, rubber buttons, and inserts.
- Lift out the transmitter only if it is clearly designed as a removable unit.
- Find the inner unit’s own seam or notch.
- Open that housing with minimal pressure.
- Photograph and identify the battery before removing it.
- Install an exact match in the same orientation.
- Close the inner transmitter and return every component to its original position.
Dealership guidance documents the outer-shell-plus-inner-unit arrangement and commonly associates the exposed metal-key design with CR1620, but it does not establish that battery for every integrated Subaru key (Serra Subaru’s integrated-key instructions).
If the case will not close
Do not squeeze harder. Reopen the housing and check for:
- A battery that is not fully seated
- A replacement with the wrong code or thickness
- A shifted rubber button pad
- A seal outside its channel
- An inner transmitter installed in the wrong position
- A loose insert caught in the seam
- A bent retaining tab or contact
- Case clips that are offset rather than interlocked
Correct the alignment instead of trying to overcome it with additional force.
Reassemble and test every key-fob function
Before final closure, confirm that the battery is flat beneath its retaining features and that no contact, seal, button membrane, or insert overlaps the housing edge.
Align the projections and recesses before pressing the halves together. Check that each external button sits normally rather than remaining depressed. Work around the perimeter until the seam is even.
If the fob has a mechanical key, slide it into its cavity until the latch engages. Tug gently without pressing the release to confirm that the key is retained.
Test in a useful order
Stand close to the vehicle for the first test and try every supported function:
- Lock
- Unlock
- Panic alarm
- Trunk or liftgate release
- Other remote functions, where equipped
For a smart-key system, also test:
- Proximity entry at the doors you normally use
- Detection of the key inside the cabin
- Push-button starting
- Touch-to-lock operation, where equipped
Retailer guidance recommends testing lock, unlock, panic, and trunk-release controls after reassembly (AutoZone’s Subaru fob testing procedure).
After the close-range test succeeds, move to a normal operating distance and repeat lock and unlock several times. This checks consistent ordinary operation rather than attempting to establish a maximum range.
Reduced range, intermittent operation, repeated button presses, delayed key detection, and some dashboard warnings can be signs of a weak fob battery. For more context, see this overview of key-fob battery warning signs and replacement basics.
Do not jump directly to reprogramming
Available third-party guidance indicates that an ordinary battery-only replacement generally retains the fob’s programming (Centennial Subaru’s battery-change guidance). Reprogramming should therefore not be the first response when a newly serviced fob fails.
Replacing the entire transmitter is different and may involve separate programming or registration. A fob that had already lost pairing or suffered electronic damage before the battery change also requires a different diagnosis. Recheck the battery and assembly first, but do not rule out model-specific pairing requirements if those physical checks pass.
Troubleshooting a Subaru fob that still does not work
Change one variable at a time so you can identify the actual problem.
1. Confirm the battery code
Open the fob and compare the replacement’s full code with:
- The photograph of the old battery
- The removed battery itself
- The specification in the owner’s manual
Do not rely on package color, brand, diameter, vehicle model, or ignition type.
2. Verify polarity
Compare the visible face of the replacement with your pre-removal photograph. If you did not take one, inspect the holder for polarity markings and consult the owner’s manual.
Do not treat “positive side up” as a universal Subaru rule.
3. Check battery seating
The battery should sit flat beneath its intended retaining features and touch the contacts in the same manner as the original. If one edge sits above a tab, remove and reinstall the cell rather than pressing harder.
If a contact appears displaced, do not bend it speculatively. Compare it with the original layout or seek qualified help.
4. Confirm complete case closure
Run a fingertip around the seam. A remaining gap can point to a displaced insert, incorrectly positioned transmitter, unsuitable battery, or housing clip that has not engaged.
Check the external buttons as well. If one remains depressed or feels different from the others, reopen the case and verify the position of the rubber membrane.
5. Try another fresh battery
A recently purchased battery is not necessarily known to be good. If its condition or storage history is uncertain, install another fresh cell of the confirmed type, preserving the documented orientation.
Keep every loose coin cell away from children and pets, and secure the removed batteries for appropriate disposal.
6. Inspect for physical damage
With the battery removed, look for:
- Dirt or debris around the holder
- Visible corrosion
- Bent or loose contacts
- Torn or displaced rubber buttons
- Cracked housing supports
- Signs of liquid entry
- A cracked or displaced circuit board
- Components that appear loose or detached
Do not apply an improvised chemical cleaner to the circuit board. If corrosion or contamination is present, obtain qualified advice appropriate to the materials and extent of damage.
7. Compare a second fob
If you have a known-working spare, test it under the same conditions. If the spare works normally, the first remote is the more likely location of the fault.
Generic key-fob diagnostic guidance likewise recommends using a second fob to distinguish a remote fault from a possible vehicle problem and identifies contacts, corrosion, circuit-board damage, and pairing as separate possible causes (AutoZone’s nonworking-fob diagnostic guide).
8. Recognize what a new battery cannot repair
A fresh coin cell will not repair:
- Corrosion or liquid damage
- A broken battery contact
- A cracked circuit board
- Failed transmitter electronics
- Worn or damaged button contacts
- A housing that no longer retains the battery
- Signal interference
- A vehicle receiver or related electrical fault
- A pre-existing pairing or registration problem
Consult a qualified automotive locksmith or Subaru service department if both fobs fail, the case cannot close securely, a battery contact is broken, electronic damage is visible, or the verified battery and assembly checks do not restore operation.
Reprogramming may eventually be part of the diagnosis, but it is usually not the first step after an ordinary battery replacement.
What to do when the fob battery is already dead
If the fob has a removable mechanical key, release it and use it for emergency entry. The physical door-lock location and operation can vary, and the key cylinder may be concealed by trim. Follow the model-specific owner’s manual rather than prying at exterior door-handle components without instructions.
Mechanical entry opens the door; it does not restore the remote transmitter or prove that the vehicle itself is ready to start.
That procedure has not been verified here for every Subaru model, so confirm the exact fob position, pedal use, and starting sequence in the owner’s manual before relying on it (Brewster Subaru’s dead-fob entry and starting guidance).
Keep the remote battery and the vehicle’s electrical system separate in your diagnosis. Replacing the coin cell will not repair a discharged vehicle 12-volt battery, starter fault, ignition problem, receiver failure, or another vehicle-side electrical issue.
The practical sequence is:
- Use the mechanical key for entry, if equipped.
- Verify the emergency-start procedure for the exact vehicle.
- Replace the fob battery as soon as practical.
After reassembly, test every available function and resolve battery seating, contacts, inserts, and case alignment before considering programming or replacing the fob. When the design or emergency procedure is unclear, the exact Subaru owner’s manual takes priority over generic instructions.
Frequently asked questions
What battery does a Subaru key fob take?
There is no universal Subaru key-fob battery. The design-based assignments documented in third-party guidance are CR2032 for many newer rectangular fobs, CR2025 for some older teardrop remotes, and CR1620 for some integrated metal-key designs.
Confirm the complete code on the installed battery or in the model-specific owner’s manual. Do not choose solely from the vehicle model, model year, ignition type, or fob shape.
Which side of a Subaru key-fob battery faces up?
Copy the original battery’s orientation. Photograph it before removal so the visible face and positive-symbol position are documented.
Positive-side-up is specified for one documented rectangular CR2032 procedure, but it is not established as a universal rule for every Subaru remote. If the original orientation was not recorded, check the holder markings and owner’s manual.
Will changing the battery erase the key fob’s programming?
A routine battery-only replacement generally retains the fob’s programming according to available third-party guidance. If the fob fails afterward, first check the battery code, polarity, seating, contacts, internal alignment, and case closure.
Replacing the entire transmitter is different and may require registration or programming. Re-pairing is not normally the first step after a battery swap, but it should not be ruled out if the physical checks pass and model-specific instructions require it.
How do I open a Subaru key fob that appears to have no seam?
Remove the mechanical emergency key, if equipped, and inspect the cavity it leaves. Some rectangular fobs open from a small internal gap beside or behind that cavity rather than from an exterior edge.
Place a protected flathead screwdriver, plastic pry tool, or properly fitting key tip only in the intended gap, then twist gently. Stop if the case flexes without releasing or you cannot identify the correct opening point.
Why does my Subaru key fob still not work with a new battery?
Check, in order:
- The complete battery code
- Polarity
- Seating beneath the retaining features
- Battery freshness
- Complete case closure
- Button-pad, seal, insert, and transmitter alignment
- Contacts for dirt, corrosion, looseness, or damage
- The housing and circuit board for physical or liquid damage
- Operation of a known-working spare fob
- Possible interference, vehicle-side faults, or pre-existing pairing problems
If the confirmed battery and assembly checks fail—or the contacts, electronics, or housing are visibly damaged—consult a qualified automotive locksmith or Subaru service department.