
Find the Right Coin Cell and Change It Without Damaging the Fob
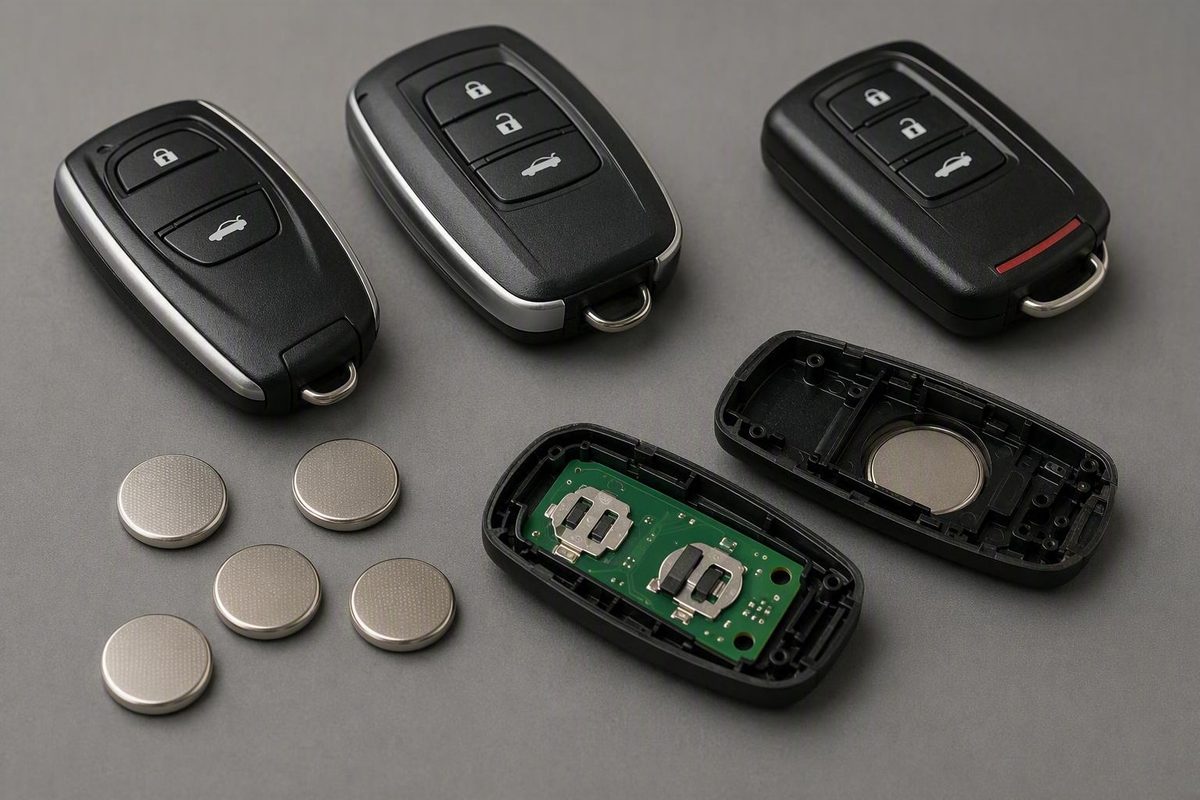
CR2032 is commonly associated with newer rectangular fobs, CR2025 with some older teardrop remotes, and CR1620 with some exposed-metal-key designs.
The quick answer: verify the battery before opening or buying
There is no single coin-cell battery that can safely be recommended for every Subaru Forester key fob. The correct battery may vary with the fob design, model year, ignition type, equipment, and market. “Subaru Forester” alone is not a complete battery specification.
Before buying a replacement, verify the battery number using one or more of these sources:
- The complete number printed on the installed coin cell, such as CR2032, CR2025, or CR1620
- A battery specification printed on the fob or inside its housing
- Polarity or battery-size markings molded into the holder
- The owner’s manual for the exact vehicle
- Model-specific Subaru documentation or a Subaru service department
- The fob’s part number, if reliable documentation maps that number to a battery
General Subaru guides provide useful starting associations, but they do not establish an authoritative Forester compatibility chart. A CR2032 is commonly associated with newer rectangular smart fobs, a CR2025 with some older teardrop remotes, and a CR1620 with some remotes built around an exposed metal key. These associations still require verification against the actual fob (Subaru key-fob battery and design guide).
Treat apparently precise year-based answers cautiously. For example, a third-party Q&A response identified CR2032 for one specifically described 2019 Subaru Forester Touring with push-button start. That is a narrowly bounded example, not proof that every 2019 Forester—or every push-button-start Forester—uses the same cell (2019 Forester Touring battery Q&A).
Possible signs of a weak fob battery include:
- Reduced operating range
- Intermittent lock or unlock response
- Buttons that must be pressed repeatedly
- Complete loss of remote operation
- Delayed passive-entry response
- A key-detection or low-key-battery warning, where supported
These symptoms are clues rather than diagnoses. A damaged button, dirty battery contact, water exposure, internal circuit fault, incorrectly seated battery, or vehicle-side problem can produce similar behavior. Verification—not guessing from the vehicle badge or buying the most common coin cell—is the first step in a Subaru Forester key fob battery replacement.
Coin-cell safety: Keep new and used coin cells out of reach of children and pets, and do not leave loose batteries unattended during the repair. If a battery may have been swallowed, seek immediate emergency medical guidance. Follow the battery packaging for storage and disposal instructions.
Identify the fob style and compare the likely coin cells
Start with the physical fob rather than relying only on the Forester’s model year. Three broad designs appear frequently in Subaru replacement guides.
Newer rectangular smart fob
What it looks like: A compact rectangular or rounded-rectangular body with several buttons and a removable mechanical emergency key. A release tab or button on the rear allows the key shank to slide out. This design is commonly paired with push-button start or passive entry.
Likely association: CR2032.
Required verification: Remove the emergency key and open the case carefully enough to read the installed cell. Confirm the complete battery number and polarity before removing it. If you do not want to open the fob before buying a battery, consult the owner’s manual or documentation tied to the exact vehicle or fob.
Do not assume that every rectangular fob has the same internal layout. In some versions, the battery is immediately visible; in others, the transmitter assembly may sit over or around it.
Older teardrop remote
What it looks like: A separate rounded or teardrop-shaped remote, usually without a removable emergency key concealed inside it. It opens along a perimeter seam or at a small notch.
Likely association: CR2025.
Required verification: Check the old battery, the back of the remote, the holder, or model-specific documentation. The shape narrows the possibilities but does not establish fitment by itself.
An owner discussion shows why this matters. One participant initially suggested CR2032, but an owner replacing the battery in a 2006 Forester teardrop remote later reported that its specified cell was CR2025. The owner managed to insert the thicker CR2032, but the housing closed with a slight gap—evidence of poor physical fit, not compatibility (2006 Forester teardrop battery discussion).
Exposed-metal-key remote
What it looks like: A conventional metal ignition key remains visibly attached to the remote housing. Lock, unlock, or panic buttons are integrated into the plastic head or nearby remote body. There is no concealed emergency key to remove.
Likely association: CR1620 in some designs.
Required verification: Inspect the case label, old cell, internal holder, or exact documentation. Some designs open at an indent near the key-ring hole and contain a smaller internal transmitter unit that must also be opened. That does not mean every older keyed Forester remote uses CR1620.
CR2032 versus CR2025
CR2032 and CR2025 can look almost identical from above:
| Battery | Diameter | Thickness | Practical implication |
|---|---|---|---|
| CR2032 | 20 mm | 3.2 mm | Thicker of the two |
| CR2025 | 20 mm | 2.5 mm | 0.7 mm thinner |
| CR1620 | Verify from the marking | Verify from the marking | Used in some exposed-key designs |
CR2032 and CR2025 share a 20 mm diameter, but their thickness differs by 0.7 mm.
A thicker battery fitting after firm pressure does not prove that it is correct.
Match the complete printed battery designation. Equal diameter does not make different coin cells interchangeable.
A model-year table would suggest more certainty than the available evidence supports. Fob style, ignition system, market, equipment, and part number can matter, so identify the actual remote and verify the cell inside it.
Tools, workspace, and checks before you pry
A careful replacement requires little equipment:
- The verified replacement coin cell
- A plastic pry tool, spudger, or guitar-pick-style opener
- Alternatively, a small flathead screwdriver wrapped with cloth, vinyl tape, or another non-scratching barrier
- A clean, stable, well-lit work surface
- A phone or camera for recording the original battery orientation
- An optional shallow tray for retaining small parts
Work at a table rather than holding the fob over a vehicle seat, grass, carpet, or cluttered counter. A stable surface makes it easier to control the tool and reduces the chance of losing the key shank, seal, button insert, or another small component.
Before applying pressure, inspect the entire housing. Look for:
- A designated notch in the seam
- A crevice exposed when the emergency key is removed
- An indent near the key-ring opening
- A wider section of the perimeter seam intended for a pry tool
- A screw, if the housing uses one
Use the intended opening point. A dealership procedure for an emergency-key fob recommends wrapping a flathead screwdriver with vinyl tape or cloth before inserting it into the opening left by the removed key (protected-tool opening procedure).
Insert the tool only far enough to gain purchase, then twist gently. If the housing does not begin to release, stop and reassess. The fob may have another notch, an unreleased tab, a screw, or a different construction from the guide you are following.
Once the case is open, do not immediately remove the battery. First:
- Read the complete battery number.
- Photograph the battery and holder.
- Note which face is visible.
- Find any
+and–markings. - Observe which edge sits beneath each retaining point.
- Check whether a gasket, membrane, frame, or transmitter assembly could shift.
Positive-side-up is documented for some fobs, but it is not established as universal for every Forester remote. The original battery orientation and holder markings should control. Avoid scraping the circuit board, levering against surface-mounted components, bending the battery contacts, or displacing the button membrane.
How to replace the battery in a rectangular emergency-key fob
Use this procedure only when the rectangular fob contains a removable mechanical key. If the remote has a fixed exposed key or no emergency-key release, use the older-fob instructions in the next section.
-
Place the fob button-side down. Position it on the work surface so you can operate the rear release without dropping the key or remote.
-
Press and hold the emergency-key release. Pull the mechanical key shank straight out. Do not twist it against the release mechanism.
-
Locate the opening exposed by the key. Look inside and around the empty key channel for a crevice or designated pry point between the case halves.
-
Insert a plastic tool or protected flathead screwdriver. Keep the tool shallow and twist gently. Once one section releases, work carefully around the perimeter only if necessary.
-
Lift the housing apart slowly. Observe how the transmitter assembly, internal frame, button membrane, and battery holder are positioned. The battery may be directly visible or may sit behind the transmitter assembly, depending on the fob.
-
Record the cell number and orientation. Take a clear photograph before touching the battery. Confirm that the replacement has the identical designation—not merely the same diameter or a similar appearance.
-
Remove the old battery carefully. Lift it at the accessible edge without levering against the circuit board. If it sits beneath retaining tabs, move it in the direction allowed by the holder. Do not flatten, stretch, or sharply bend the metal contacts.
-
Install the verified replacement. Match the original polarity and holder markings. Slide the cell beneath its retaining points as required and press it gently into place. It should sit flat and stable rather than rocking, tilting, or resting on top of a tab.
-
Inspect the internal alignment. Confirm that the transmitter assembly is seated in its recess, the button membrane has not shifted, and no part of the battery or circuit board is caught between the case halves.
-
Align and close the housing. Match the case projections, recesses, and clips. Press around the perimeter in small increments until the seam closes evenly. Do not use pliers or clamp the housing.
-
Reinsert the emergency key. Slide it fully into its channel and confirm that it locks in place.
-
Test the fob near the vehicle. Check every function the fob is equipped to control rather than stopping after one successful lock command.
One dealership procedure specifies CR2032 with the positive + side facing upward for the emergency-key fob it describes. That instruction applies to the documented procedure, but it should not override the holder markings or original orientation in a different fob (documented CR2032 polarity procedure).
Stop if the housing bows, leaves a visible gap, springs apart, or requires unusual force. Reopen it and check:
- Whether the new and old battery numbers match
- Whether the cell is fully beneath its retaining points
- Whether the transmitter or button membrane shifted
- Whether a clip is folded inward
- Whether the emergency-key mechanism is misaligned
- Whether another component is trapped in the seam
A case that will not close is a fit or alignment warning. It is not an invitation to squeeze harder.
How to open older teardrop and exposed-key remotes
Older remotes must be treated as separate designs. Do not search for an emergency-key release if the remote never contained a removable key.
Teardrop remote
- Inspect both sides and the full perimeter for a notch, widened seam, label, screw, or battery marking.
- If the battery specification appears on the outside, record it before opening.
- Insert a plastic tool or protected small screwdriver at the designated notch or suitable section of the side seam.
- Twist gently until the first clips release.
- Work around the perimeter only as needed, keeping the tool away from the circuit board.
- Open the case slowly so the button membrane and internal frame remain in position.
- Photograph the battery orientation and read its complete number.
- Remove the cell without bending the holder contacts.
- Install the identical verified type with matching polarity.
- Confirm that the membrane, circuit board, and any gasket are seated before closing the clips evenly.
CR2025 is commonly associated with older teardrop remotes, but the old cell, fob label, holder, or documentation must confirm it.
Exposed-metal-key remote
For a remote built around a visible metal ignition key:
- Look for a notch or indent near the key-ring hole or along the housing seam.
- Use that opening point instead of forcing the seam near the buttons.
- Separate the outer housing carefully.
- Check whether the battery is inside a smaller removable transmitter unit.
- If an internal unit is present, locate its own opening notch and release it gently.
- Record the battery number and orientation before removal.
- Install the matching cell without disturbing the circuit board or button contacts.
- Reassemble the internal unit first, then seat it correctly in the outer shell.
- Confirm that the buttons move normally before closing the housing.
General Subaru guides associate CR2025 with some teardrop remotes and CR1620 with some exposed-metal-key designs. They do not establish that every older keyed Forester uses either cell (older Subaru fob design guide).
Be particularly careful around individual button contacts. In the teardrop-remote owner discussion, the original poster ultimately found that a detached unlock-button contact—not the battery—caused the unlock failure.
Reassemble, test, and decide whether programming is relevant
Routine battery-only replacement generally does not erase the fob’s existing registration. Changing the coin cell is different from replacing the complete remote; a new or replacement fob is much more likely to require registration or programming (battery replacement and programming guidance).
Published guidance is not completely consistent, however. One general dealership guide warns that newer rectangular fobs may require authorized service or programming. Because that source does not establish a universal Forester rule, follow the owner’s manual for the exact vehicle if the fob does not resume operation after the basic checks (conflicting programming guidance).
Do not begin an online programming procedure merely because the first button press fails. Stand near the vehicle and test methodically:
- Press lock and confirm the expected vehicle response.
- Press unlock.
- Test panic.
- Test the rear-gate or trunk-release button, if equipped.
- Test remote start, if equipped.
- Approach the vehicle and test passive entry, if equipped.
- Enter the vehicle and verify push-button key detection, if equipped.
- After confirming operation nearby, repeat the test from a modest distance.
If a spare fob is available, test it under the same conditions.
Before considering programming, verify:
- Exact battery number
- Correct polarity
- Full seating beneath the contacts
- Even case closure
- Proper placement of the button membrane and transmitter
- Clean, undamaged contacts
- No visible water residue or corrosion
- No cracked housing or displaced switch
Do not apply an older online programming sequence across Forester generations. Procedures can depend on the vehicle, market, security system, and fob type. A sequence intended for an older keyed remote may be irrelevant to a newer smart fob.
If you replaced the complete fob, registration or programming is a separate and more likely requirement. That work may call for a Subaru dealer or qualified automotive locksmith with appropriate equipment.
Troubleshooting a fob that still does not work
Use the symptom to choose the next check rather than assuming that the replacement battery failed or that programming was lost.
The fob is completely dead
Check these items in order:
- Battery number: Compare every digit and letter on the old and new cells.
- Polarity: Match the photograph and holder markings.
- Seating: Confirm that the cell lies flat and touches the intended contacts.
- Retaining contacts: Look for a contact pushed beneath, beside, or away from the battery.
- Internal alignment: Ensure that the circuit board and button membrane are in their recesses.
- Case closure: Confirm that the housing is fully and evenly closed.
- Replacement-cell condition: A newly purchased battery may still be weak or defective.
- Visible damage: Inspect for corrosion, water residue, cracked components, or broken connections.
Do not scrape, sand, or aggressively bend the holder to compensate for uncertain fit. If the replacement battery came with handling instructions, follow its manufacturer’s packaging.
Operation is intermittent or the range remains poor
Poor range after replacement does not automatically mean that the wrong battery was selected. Inspect for:
- Dirty or oxidized battery contacts
- Debris between the cell and holder
- A battery that rocks when lightly touched
- Water exposure or residue
- A cracked housing that no longer holds the assembly correctly
- A shifted internal frame
- Circuit-board or antenna damage
- A button that does not fully actuate its switch
Test immediately beside the vehicle and then at increasing distances. Compare the spare fob if available. If the spare performs normally while the serviced fob remains short-range, the fault is more likely inside that fob than in the vehicle.
Only one button fails
When lock works but unlock does not—or every function works except the rear-gate button—the common battery is unlikely to be the sole explanation.
Inspect the failed button’s rubber contact, plastic actuator, and circuit-board switch. Look for a displaced membrane, detached contact, worn conductive pad, cracked switch, or debris preventing movement. The owner report involving a detached unlock contact demonstrates how one failed button can be unrelated to battery condition (single-button failure example).
Professional inspection is preferable if repair would require soldering or replacing a board-mounted switch.
The housing will not close
Reopen it rather than applying more force. Compare the complete old and new battery numbers and inspect their thicknesses. A CR2032 and CR2025 may share the same diameter, but the CR2032 is thicker. Do not force the thicker cell into a holder specified for CR2025.
Also check whether:
- The battery is sitting on top of a retaining tab
- The circuit board is upside down or out of its recess
- The button membrane has folded
- A perimeter clip has turned inward
- The emergency-key mechanism is displaced
- An internal frame is caught in the seam
Both fobs fail
Two coin cells can be depleted, but simultaneous failure also raises the possibility of a shared vehicle-side problem. Test each remote with its verified battery and follow the owner’s manual before drawing conclusions.
Symptoms alone cannot identify which component has failed.
The vehicle has broader electrical symptoms
Separate fob behavior from whole-vehicle electrical behavior. Flickering instrument lights, intermittent start-stop operation, slow cranking, or several unrelated systems malfunctioning are not ordinary proof of a weak fob coin cell.
In the third-party Q&A concerning a 2019 Forester Touring, the responding mechanic recommended evaluation of the vehicle’s 12-volt battery and alternator when the owner also reported start-stop trouble and flickering panel lights. That was troubleshooting advice rather than a confirmed diagnosis, but it illustrates why system-wide symptoms should not be attributed to the fob alone (2019 Forester electrical-symptom Q&A).
Seek diagnosis from a Subaru dealer or qualified automotive locksmith when:
- Battery contacts are bent, detached, or corroded
- Perimeter clips or the housing are broken
- A button switch or circuit-board component is damaged
- The fob has been wet
- Both fobs fail
- A verified fresh battery does not restore operation
- The owner’s-manual recovery procedure does not work
- Broader vehicle electrical symptoms are present
Installing several guessed battery sizes will not correct damaged contacts, failed circuitry, or a vehicle-side fault.
What to do when the fob battery is already dead
A dead coin cell does not necessarily prevent immediate vehicle entry. Rectangular smart fobs commonly contain a removable mechanical emergency key. Operate the release, pull out the key, and consult the owner’s manual for the location and use of the driver’s-door key cylinder.
Do not assume that manual entry will always trigger the alarm—or that it never will. Follow the emergency-entry instructions for the exact Forester.
Applicable push-button-start Subarus may also recognize a dead-battery fob when it is held near the start button. This is general Subaru guidance rather than a procedure proven for every Forester configuration, so the exact owner’s-manual sequence should control (dead-fob entry and starting guidance).
Emergency entry or starting is temporary access, not a fob repair. Once the immediate trip is complete:
- Identify the fob design.
- Read the installed battery number.
- Photograph its polarity.
- Install the identical verified cell.
- Close the housing without force.
- Test every equipped function.
Escalate the problem if the manual’s emergency procedure does not work, both fobs fail, the mechanical key or housing is damaged, broader electrical symptoms appear, or a correctly installed verified battery does not restore operation. A Subaru dealer or qualified automotive locksmith may be able to diagnose fob damage, vehicle-side faults, or programming requirements.
The verification-first checklist is straightforward: identify the fob, read the installed battery number, photograph its orientation, use the same cell, pry only at the intended opening, close the case without force, and test every equipped function. Most battery-only replacements are straightforward and generally preserve programming. A fob that remains faulty after a verified battery is installed correctly needs diagnosis—not another guessed coin cell.
Frequently asked questions
What battery does a Subaru Forester key fob use?
It depends on the fob. CR2032 is commonly associated with newer rectangular fobs, CR2025 with some older teardrop remotes, and CR1620 with some exposed-metal-key designs. These are design-based starting points rather than a universal compatibility chart (Subaru battery associations by fob design).
Confirm the answer by reading the installed battery, holder, fob label, owner’s manual, or documentation for the exact Forester and fob. Do not select a battery solely from the model name or year.
Do I need to reprogram my Subaru Forester key fob after changing the battery?
Usually not. Replacing only the coin cell generally preserves the fob’s registration. Replacing the complete fob is different and is much more likely to require programming.
Because published dealership guidance is not completely consistent, consult the exact Forester owner’s manual if operation does not return. Before pursuing programming, verify the battery type, polarity, seating, internal alignment, contact condition, and case closure.
Which side of the key-fob battery should face up?
Follow the original battery orientation and the polarity markings in the holder. Photograph the installed cell before removing it.
Some procedures for rectangular emergency-key fobs specify that the positive + side of a CR2032 faces upward, but that should not be treated as universal for every Forester remote. If the photograph, holder markings, and a general guide appear to conflict, stop and consult documentation for the exact fob.
Why does my Forester key fob still not work with a new battery?
Common possibilities include:
- The wrong battery number
- Reversed polarity
- Incomplete seating
- A weak or defective replacement cell
- Bent, dirty, or corroded contacts
- Water exposure
- A shifted button membrane or circuit board
- A housing that is not fully closed
- A broken individual button contact
- Damaged fob circuitry
- A vehicle-side receiver or electrical problem
- A programming or registration issue
Use the symptom to narrow the cause. One failed button points toward its individual contact or switch; complete failure calls for checking battery type, polarity, and seating first. If both fobs fail or the vehicle has wider electrical symptoms, seek professional diagnosis rather than continuing to replace coin cells.
Can I unlock or start a Subaru Forester with a dead key-fob battery?
Possibly, depending on the Forester’s equipment. A fob with a removable mechanical key may permit manual entry through the driver’s-door key cylinder. Applicable push-button-start models may recognize a dead-battery fob when it is positioned near the start button.
The exact entry and starting procedure—and possible alarm behavior—can vary. Follow the emergency instructions in the owner’s manual for the exact Forester. These methods provide temporary access; they do not restore the fob, so verify and replace its battery afterward.