
Change Your Subaru Fob Battery Without Guessing the Cell or Orientation
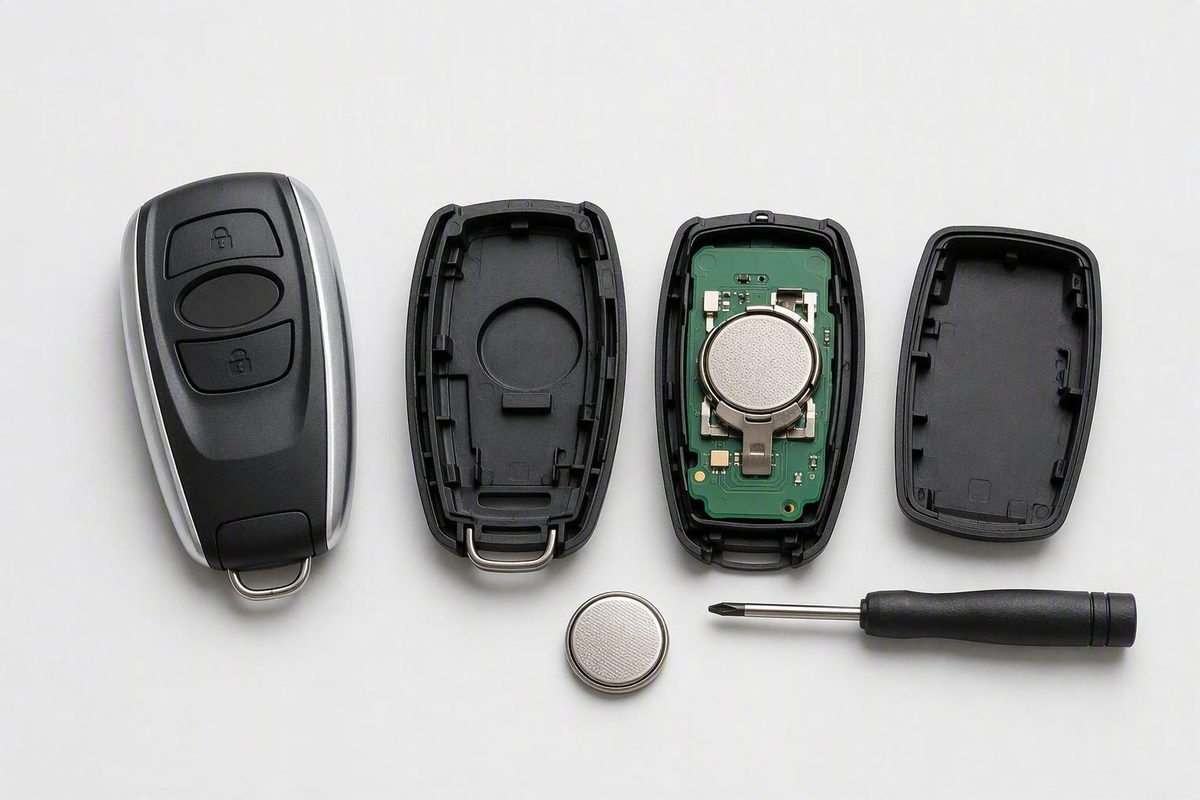
Match the fob by its visible design, verify the installed battery code and photograph its orientation. Open the housing only at its intended notch or seam.
Change your Subaru fob battery without guessing the cell or orientation.
Replacing a Subaru keyless-fob battery is often a manageable DIY task, but there is no single battery or opening method for every Subaru remote. The reliable approach is to identify the fob by its visible design, verify the code on the installed battery or in the model-specific owner’s manual, photograph the original orientation, and open the housing only at its intended notch or seam.
The procedures below are conservative, design-based guidance assembled from third-party dealership instructions. They are not official Subaru service procedures or a model-year compatibility chart. Instructions in the owner’s manual for your exact vehicle take priority.
Before starting, use this quick design selector:
- Rectangular fob with a removable mechanical key: Follow the removable-key procedure.
- Rounded or teardrop-shaped remote without a removable key: Follow the teardrop procedure.
- Exposed metal ignition key with buttons in its plastic head: Follow the integrated-button key procedure.
- Anything that does not clearly match: Verify the procedure in the owner’s manual before opening it.
First confirm that the fob battery is the likely problem
A weakening coin cell can produce one or more of these symptoms:
- Reduced operating range
- Intermittent lock, unlock, panic, or trunk-release response
- Buttons that require repeated presses
- Delayed passive-entry or key detection
- An applicable dashboard low key-battery warning
These symptoms indicate a possible weak battery, but they do not prove it. For general background rather than Subaru-specific fitment advice, see Key Fob Zone’s overview of key-fob battery warnings and replacement.
If you have a spare fob, compare it with the suspect one:
Separate fob symptoms from wider vehicle-electrical problems. Dashboard flickering, general starting trouble, or erratic automatic stop-start operation should not automatically be attributed to the fob. In a question concerning a 2019 Forester Touring, a responding mechanic recommended testing the vehicle’s 12-volt battery and alternator after the driver reported flickering instruments and a delayed restart following an automatic stop. That was a case-specific diagnostic opinion, not a diagnosis for every Subaru (JustAnswer’s Forester discussion).
Do not diagnose the battery by age alone. Published life estimates differ, while operating conditions, storage, battery quality, and fob design can affect service life. Current symptoms, comparison with a spare, and direct inspection are more useful than a universal replacement interval.
Identify the fob and verify its exact battery before buying
Verify the battery code before purchasing a replacement. Read the complete marking stamped on the installed coin cell or consult the owner’s manual for your exact vehicle and fob. If you must open the housing to see the code, open it first and buy the battery afterward.
Before removing the old cell, take a clear photograph that shows:
- The complete battery code
- The marked face that is visible
- How the cell fits beneath or against its retaining tabs
- The position of the holder and nearby components
The image gives you a reference if the old battery moves or falls out during removal.
Third-party dealership guides commonly make these design-based associations:
- CR2032: newer rectangular or push-button-start fobs
- CR2025: some older teardrop-shaped remotes
- CR1620: some exposed metal keys with remote buttons in the head
For example, Brewster Subaru’s guide assigns those three cells to those respective visual categories, while also explaining that the procedure depends on the fob type. These are clues, not universal fitment rules (Brewster Subaru’s design-based guide).
Identify your design visually:
- Rectangular removable-key fob: A silver release button or sliding latch allows a mechanical key to be removed.
- Teardrop remote: The housing is rounded or tapered, has buttons on its face, and lacks a removable emergency key.
- Integrated-button ignition key: An exposed metal blade extends from a plastic head containing the buttons and remote components.
Do not convert these visual associations into model-year rules. The available guidance does not establish a complete Subaru-wide table covering every model, year, trim, fob part number, and battery orientation.
One bounded example shows why this matters: a third-party mechanic identified a CR2032 for the push-button fob used in the questioner’s 2019 Subaru Forester Touring. That does not establish CR2032 as the correct battery for every Forester, every 2019 Subaru, or every push-button fob (JustAnswer’s model-specific answer).
Once you identify the installed battery, buy an exact code-and-size match. Do not substitute a different coin cell merely because it has the same nominal voltage or appears close enough. General key-fob guidance recommends matching the complete code because different coin-cell codes may represent different physical sizes (keylessbest’s battery-identification guide).
Gather the tools and record the original setup
Prepare the following before opening the fob:
- The exact verified replacement coin cell
- A clean, well-lit work surface
- The removable mechanical key, if the housing uses one
- A plastic pry tool, suitably sized coin, or small flathead screwdriver
- A thin cloth for wrapping a metal screwdriver
- A phone or camera for recording the original battery
Work over a clear table or tray so the battery and small internal parts remain visible. Keep old and new cells secured while you work, and follow the battery packaging and applicable local instructions for storage and disposal.
Record the old battery’s complete code and exact orientation before lifting it out. Do not rely on a universal statement that the positive side always faces up. Some guides describe positive-side-up as common, but Wilsonville Subaru also instructs readers to note the old battery’s position and install the replacement in the same direction (Wilsonville Subaru’s step-by-step guide).
Use only a designated notch or clearly intended opening point. Insert the tool shallowly and twist gently rather than driving it into the broad face of the shell. General fob guidance likewise recommends using the hidden notch at the seam instead of pushing a screwdriver into the middle of the housing (Key Fob Zone’s general replacement guidance).
A few practical rules apply across the designs:
- Prefer a plastic tool when it can release the clips.
- Wrap a metal screwdriver in cloth to reduce scratching.
- Keep the opening tool at the shell edge.
- Use controlled twisting pressure rather than pushing the tool deeper.
- Stop if the housing bends sharply or will not begin to separate.
- Do not assume the removable key opens every fob design.
Replace the battery in a rectangular fob with a removable key
Use this procedure only for a generally rectangular housing with a release latch and a mechanical key stored inside it.
-
Locate the release control. Find the small silver button, tab, or sliding latch on the back or side of the fob.
-
Remove the mechanical key. Press or slide the release while pulling the metal key straight out.
-
Find the opening point. Inspect the area next to or inside the mechanical-key slot. Look for a crevice or notch where the two housing sections meet.
-
Insert the opening tool. Place the tip of the mechanical key, a plastic pry tool, or a cloth-wrapped small screwdriver in the intended opening. Keep the insertion shallow.
-
Twist gently. Rotate the tool rather than pushing it farther into the fob. Stop once the first retaining clips release.
-
Separate the housing gradually. Continue around the edge with your fingers or a plastic tool. Do not pull the halves apart abruptly. In some rectangular designs, the battery is located on the reverse side of the transmitter assembly.
-
Check your photograph. Confirm that the recorded battery code is readable and that the original orientation is clear.
-
Remove the old cell. Lift it from the accessible edge of the holder. If it does not release easily, inspect the holder for a retaining lip or tab instead of applying more force.
-
Install the exact replacement. Fit the verified battery into the holder in the same orientation as the old cell. Do not assume positive-side-up applies to your particular fob.
-
Inspect the fit. Confirm that the battery lies flat, remains beneath or against the intended retaining tabs, and does not rock in the holder.
Centennial Subaru describes the same basic removable-key sequence: release the mechanical key, open the case at the exposed seam, install the replacement, close the shell, reinsert the key, and test the fob. Its instructions are dealership guidance rather than model-year-specific Subaru documentation (Centennial Subaru’s procedure).
Replace the battery in an older teardrop-style remote
Do not try to use the rectangular fob’s mechanical-key method if no release mechanism exists.
-
Inspect the perimeter seam. Locate the line where the front and rear shells meet. Look for a small indentation intended for an opening tool.
-
Protect the housing. Use a plastic pry tool if it fits. If using a small flathead screwdriver, wrap the tip with a thin cloth while keeping it narrow enough to engage the notch.
-
Twist at the notch. Insert the tool only far enough to catch the case edge, then rotate it gently until the nearby clips release.
-
Release the remaining clips. Use your fingers or a plastic tool to open the rest of the seam gradually.
-
Verify the old cell. Before removing it, confirm that your photograph captures the complete battery code and visible face.
-
Lift out the battery. Remove it from its accessible edge or retaining lip. Keep the tool at the holder rather than using the circuit board as a lever point.
-
Install an exact match. Place the new cell in the same orientation and confirm that it lies flat in the holder.
-
Reassemble the remote. Align the button pad, internal assembly, and housing halves. Press around the perimeter until the clips engage.
Some dealership instructions associate teardrop Subaru remotes with CR2025, but that remains a visual association rather than authoritative model-year fitment. Verify the code on the actual cell or in the model-specific manual before buying the replacement.
If the seam does not release under gentle twisting pressure, stop. Recheck the design and seek model-specific instructions rather than choosing another point and forcing the housing.
Replace the battery in a physical key with integrated buttons
A physical ignition key with buttons in its plastic head may contain both an outer shell and a smaller internal remote module. The available third-party instructions provide less detail for this design, so use a conservative stop condition: if an inner module has no obvious serviceable seam or will not open with gentle pressure, do not force it.
-
Locate the outer-shell notch. Inspect the seam around the plastic key head for a small opening point.
-
Open the outer casing. Insert a small plastic pry tool or cloth-wrapped screwdriver into that notch and twist gently.
-
Record the internal arrangement. Before moving anything, photograph how the internal remote unit sits relative to the exterior buttons.
-
Remove the remote unit carefully. Lift it by its edges without pulling on exposed components.
-
Inspect for a serviceable inner seam. Open the module only if it has a clear notch or separable cover. If it appears bonded or does not release easily, stop and obtain design-specific assistance.
-
Record the battery. If the cell is accessible, photograph its complete code and orientation before removal.
-
Install the verified replacement. Replace the cell with an exact match in the same orientation.
-
Reassemble in reverse order. Close the inner module, return it to the position shown in your photograph, and press the outer casing together until its clips engage.
Serra Subaru associates exposed metal keys with integrated buttons with CR1620 and describes an outer casing containing a smaller internal unit. The same guide notes that Subaru fob styles and procedures vary, so confirm the installed battery instead of treating that association as universal (Serra Subaru’s multi-design guide).
Close the fob and test every relevant function
Before closing the housing, confirm that:
- The new battery has the exact verified code.
- Its orientation matches the old battery.
- It lies flat in the holder.
- It is positioned beneath or against the intended retaining tabs.
- The button pad and internal assembly remain aligned.
Bring the housing halves together without forcing them. If they do not sit nearly flush before pressure is applied, reopen the case and look for a shifted battery, button pad, or internal module.
Press around the perimeter until all clips engage. Run a fingertip along the seam and check for a visible or uneven gap. On a removable-key fob, return the mechanical key to its channel until the latch secures it.
Test the fob in stages:
- Stand close to the vehicle.
- Test lock and unlock.
- Test panic and trunk release, where equipped.
- Check passive entry, where equipped.
- Confirm that the vehicle detects the fob for starting.
- Repeat lock and unlock from a normal operating distance.
Changing only the battery generally preserves the fob’s existing pairing. Programming is more commonly relevant when the complete fob is replaced, although this is not a guarantee that no model will require a resynchronization step. If operation does not return, consult the model-specific owner’s manual before paying for programming.
Troubleshoot a fob that still does not work
Do not assume the programming was erased simply because the first installation failed. Check the basics in this order:
-
Verify the battery code. Compare the new cell’s complete marking with the photograph of the original.
-
Compare the old and new cells. Place them beside each other and confirm that their diameter and thickness appear identical.
-
Confirm polarity. Compare the visible face of the new cell with your photograph or any holder markings.
-
Reseat the battery. Remove and reinstall it so that it lies flat in the holder.
-
Inspect the contacts. Look for a contact that appears displaced, corroded, or no longer positioned against the cell. Do not reshape it unless the correct position is clear.
-
Try another exact-match battery.
-
Check internal alignment. Make sure the button pad and transmitter assembly remain seated correctly.
-
Close the housing completely. Confirm that every clip is engaged and that no gap remains.
If you must reopen the fob, return to the same designated notch and use the same shallow twisting method. Do not test multiple random pry points around the housing.
Then compare the result with the spare fob:
- The spare works normally: The fault is probably confined to the serviced fob.
- Both fobs fail: Investigate a vehicle-side problem or broader electrical condition.
- Only one button fails: Inspect the corresponding button pad or switch area.
- Buttons work but passive entry does not: Use model-specific troubleshooting because the fob is still transmitting at least some commands.
If a dashboard low-battery warning remains immediately after replacement, repeat the code, polarity, seating, freshness, contact, and case-closure checks before escalating.
Seek professional diagnosis when:
- The shell or retaining clips are broken.
- Battery contacts appear damaged or heavily corroded.
- The fob has been wet or contains visible residue.
- The internal assembly appears cracked or displaced.
- Both available fobs fail.
- A documented resynchronization procedure does not restore operation.
- Dashboard flickering, broad starting trouble, or other vehicle-electrical symptoms accompany the fob problem.
Enter or start the vehicle when the fob battery is dead
A rectangular fob with a removable mechanical key may permit manual door entry. Release the latch, remove the metal key, and use the applicable lock cylinder as directed by the owner’s manual.
For some push-button-start vehicles, dealership guidance describes positioning the dead fob near or above the start button while attempting to start the vehicle. That method is not universal. The correct fob position, brake-pedal sequence, start-button procedure, and alarm behavior can vary, so follow the emergency instructions for your exact model. Brewster Subaru describes both mechanical-key entry and a near-start-button method while warning that use of the mechanical key may activate the alarm (Brewster Subaru’s emergency guidance).
A dead fob coin cell and a weak vehicle 12-volt battery are different problems. If the mechanical key opens the door but the instrument panel flickers, the starter does not operate normally, or several electrical systems behave erratically, replacing the fob battery may not address the underlying fault.
Escalate the problem if:
- The documented emergency procedure does not permit entry or starting.
- The mechanical key, lock cylinder, or fob is physically damaged.
- Both fobs fail in the same way.
- The vehicle displays broader starting or electrical symptoms.
- You cannot identify the approved emergency procedure for your model.
What battery does a Subaru keyless fob use?
There is no single battery for every Subaru keyless fob. Third-party guides commonly associate CR2032 with newer rectangular fobs, CR2025 with some teardrop remotes, and CR1620 with some exposed metal keys that have integrated buttons. These are design-based clues, not universal fitment rules.
Read the complete code on the installed battery or consult the owner’s manual before purchasing a replacement.
Which side of the Subaru key-fob battery faces up?
Copy the orientation of the cell you remove. Photograph it while it remains in the holder, making sure the visible markings and retaining tabs can be seen.
Positive-side-up is described as common for some fobs, but it is not a reliable Subaru-wide rule. The original installation, holder markings, and model-specific manual take priority.
Will changing the battery make my Subaru key fob need programming?
Routine battery replacement generally preserves the existing pairing because the electronic fob itself has not been replaced. Programming is more commonly associated with adding or replacing a complete fob.
If the fob does not work afterward, check the battery code, orientation, seating, contacts, internal alignment, and case closure before assuming that programming was erased.
Why is my Subaru key fob still not working with a new battery?
Common immediate causes include:
- The wrong battery code or physical size
- Reversed polarity
- Poor seating in the holder
- A displaced or corroded contact
- A weak replacement battery
- A shifted button pad or internal assembly
- An incompletely closed case
Other possibilities include worn buttons, circuit damage, water intrusion, a vehicle-side receiver problem, or a model-specific resynchronization issue. Compare the result with a spare fob before paying for programming.
Can I unlock and start a Subaru when the key-fob battery is dead?
A removable mechanical key may permit manual door entry, although the alarm may activate. Some push-button vehicles may detect a dead fob when it is held in a specified position near the start button, but that procedure is not universal.
Use the emergency-entry and dead-fob starting instructions in the owner’s manual for your exact vehicle. Seek assistance if the documented method fails, both fobs are inoperative, or the vehicle shows broader electrical trouble.
The reliable sequence is verify, copy, open, test, and escalate: verify the complete battery code, copy the old cell’s orientation, open and close the intended seam gently, and test every equipped function. Repeat the basic installation checks before assuming the pairing was lost. Because Subaru fob designs vary, the removed battery and model-specific owner’s manual take priority over generic online fitment claims.