
How to Change Your CX-5 Key Fob Battery Without Damaging the Case
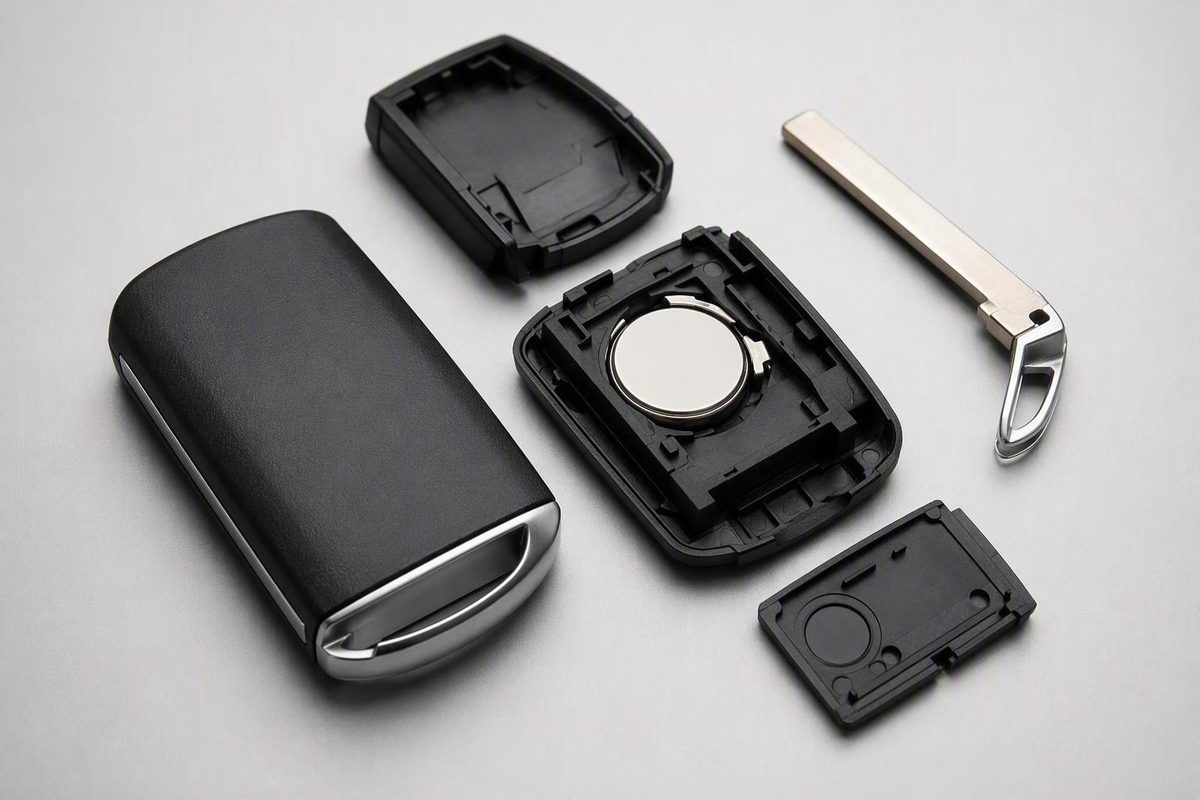
CR2025 and CR2032 both appear in CX-5 guidance, but they are not confirmed substitutes. Match the old cell's code and orientation, then test every function.
A Mazda CX-5 key-fob battery can often be changed at home, but there is no single battery, release mechanism, or opening method established for every CX-5 model year and fob design. This guide is therefore a general, verification-first procedure synthesized from Mazda dealership instructions—not an official Mazda owner-manual or service-bulletin procedure for every variant.
The safest sequence is to remove the auxiliary key, find the intended opening point, separate the housing gently, record the installed battery’s code and orientation, install an exact replacement, and test every available function. If the housing or internal layout does not match this guide, stop and consult documentation for the exact model year and fob rather than improvising a pry point.
Signs the CX-5 Key-Fob Battery May Be Weak
A weakening battery usually causes declining or intermittent performance before the fob stops working completely. Possible CX-5 symptoms include:
- Reduced operating range
- Intermittent lock or unlock response
- Failure to be recognized consistently by the vehicle
These symptoms are identified in Koeppel Mazda’s CX-5 battery-replacement guidance.
Repeated button presses and loss of proximity functions are also useful general warning signs. They are not, however, CX-5-specific diagnostic proof. For additional context, see this overview of general key-fob battery warning signs.
These symptoms justify checking the battery, but they do not conclusively identify the cause.
If you have a spare fob, make a controlled comparison:
- Stand close to the CX-5.
- Test lock and unlock with the primary fob.
- Repeat the test with the spare.
- Check passive entry and starting recognition with each fob, if applicable.
- Note whether the problem affects one fob or both.
If the spare works normally while the primary fob is unreliable, the primary fob and its battery deserve attention first. If both fobs exhibit the same problem, one depleted battery is a less complete explanation, although this comparison cannot diagnose a vehicle-side fault by itself.
Do not use a fixed battery age as the deciding factor. Usage and fob design vary, so observable behavior and verification of the installed cell are more useful than assuming every CX-5 battery follows the same replacement schedule.
Verify the Battery Before Buying: CR2025 Is Common, Not Universal
Several dealership procedures specify a CR2025 for the Mazda fobs they cover. Team Mazda, for example, identifies a CR2025 in a procedure that explicitly mentions the CX-5, but it does not map that specification to every model year or fob design. See Team Mazda’s CX-5-style procedure.
Other dealership guidance is broader. Mazda of Salem says CX-5 fobs typically use a CR2025 or CR2032 and instructs owners to verify the battery for their vehicle. That variation is why a generic compatibility result should not be your final check. Mazda of Salem explains the qualified CR2025-or-CR2032 guidance.
Use this verification workflow:
- Identify the exact fob in your hand. Do not assume two CX-5s have identical fobs because they share a model name.
- Locate documentation for the vehicle’s model year. Check the key, transmitter, or keyless-entry section of the applicable manual.
- Open the fob cautiously. Use only the release and opening features visible on that housing.
- Read the complete code stamped on the old cell.
- Purchase the same verified code.
- Photograph the original orientation before removing the battery.
Do not treat CR2025 and CR2032 as automatic substitutes. The available dealership guidance identifies both as possible batteries but does not say they are interchangeable. A replacement should agree with the installed battery and documentation for the exact fob, and it should sit naturally in the holder without forcing the case closed.
The available dealership instructions do not reliably map battery codes to every CX-5 model year and visible fob design, so a dependable model-year compatibility chart cannot be created from this evidence. If the original cell is missing, unreadable, or of uncertain origin, locate the manual for the exact model year and check its keyless-entry transmitter section.
Battery brand is not a substitute for checking the code. One unresolved owner discussion reported that an original Panasonic CR2025 worked while some replacement CR2025 cells did not, but another participant reported success with a different brand and no cause was established. The discussion does not show that the CX-5 requires Panasonic or rejects other brands. The Mazda owner-forum report remains inconclusive.
The practical rule is simple: match the verified battery code—not merely the vehicle name, the cell’s appearance, or a particular brand.
Tools, Workspace, and Checks to Complete Before Opening the Fob
Gather the following before separating the housing:
- Your Mazda CX-5 key fob
- The correctly verified replacement coin cell
- A plastic pry tool, if its edge suits the intended opening point
- Alternatively, a small flathead screwdriver with its tip wrapped in tape
- A phone or camera
- A clean, well-lit work surface
Dealership instructions commonly recommend a small flathead screwdriver and suggest wrapping its tip with tape to reduce scratching. A plastic pry tool may also be suitable, depending on the fob. Tape reduces direct metal-on-plastic contact but does not eliminate the possibility of scratching or damaging the case if excessive force is used. Seacoast Mazda describes the protected-screwdriver method.
Choose a surface where the auxiliary key, battery cap, and other small pieces will remain visible. Keep parts in the order removed so their positions are easier to reproduce.
Before applying force, inspect the entire housing:
- Find the auxiliary-key release.
- Determine whether it is a button, tab, latch, or switch.
- Remove the mechanical key only through that release.
- Examine the exposed key recess.
- Look for side slots, a notch, or a defined seam.
- Note any existing cracks or gaps that could be mistaken for opening points.
The seam around the case does not necessarily make every point along it suitable for a tool. Begin at a visible slot, notch, or other intended opening feature rather than inserting a screwdriver into the center of the housing.
Use this compact identification checklist before proceeding:
| Feature | What to look for |
|---|---|
| Auxiliary-key release | Back button, side tab, latch, switch, or recessed release |
| Opening point | Side slots, a notch, or a defined seam near the key recess |
| Battery cover | A removable cap over the coin cell, if present |
| Rubber ring | A small ring beneath or around the battery in some designs |
| Battery orientation | The stamped face and edge placement of the installed cell |
| Stop signal | A housing that does not separate gently or an internal layout that differs from the expected design |
Once the housing is open, photograph the battery before touching it. The image should show the stamped code, which face is upward, how the cell engages the contacts, and the positions of any cap or rubber ring.
Stop if the housing does not separate with gentle twisting, a contact begins to move out of position, or an internal component shifts unexpectedly. Recheck the release mechanism and opening point rather than increasing force.
Mazda CX-5 Key Fob Battery Replacement: Numbered Steps
The following procedure combines the broad sequence shared by several dealership guides. Follow it only where the visible construction of your fob agrees with the description.
- Release and remove the auxiliary key.
Locate the release mechanism and press or slide it while withdrawing the metal key. Depending on the fob, dealership guides describe a button, side tab, latch, or switch.
Some earlier Mazda-style fobs may instead have a release tab inside the key recess that is operated with a small flathead screwdriver. This alternate arrangement is described in Manchester Mazda’s guide to Mazda fob release mechanisms.
If the key does not slide free, make sure the release is fully engaged. Do not twist the metal key against the plastic recess.
- Inspect the exposed recess and housing perimeter.
With the key removed, look inside the exposed area and around the case. Depending on the design, you may find two side slots, a single notch, or a defined seam near the recess.
Confirm that the feature is an intended opening point. If none is visible, pause and consult model-specific documentation rather than choosing an arbitrary gap.
- Begin opening the housing at the intended point.
Insert a plastic pry tool or tape-wrapped flathead screwdriver only far enough to engage the slot or seam. Twist gently to release the nearby section of the case.
Move around the perimeter gradually instead of trying to separate the entire housing from one location. Keep the tool at the edge and away from the central electronics.
- Separate the housing halves slowly.
Once the case has loosened, use your fingers to lift the halves apart. Watch for a battery cover or other component that may rest against either side.
Place the housing pieces and any loose cover on the work surface in the order removed. Avoid rotating the internal assembly unnecessarily.
- Remove the battery cap if present, then document the battery.
Some Mazda fobs include a removable battery cap. Lift it carefully and place it beside the corresponding housing piece.
Before removing the cell:
- Read its complete battery code.
- Photograph its position.
- Note which face is upward.
- Observe how its edges sit beneath or against the contacts.
- Identify any rubber ring beneath or around it.
If the purchased replacement does not match the installed code, stop and obtain the correct cell.
- Remove the old battery carefully.
Lift or slide the battery according to the holder’s shape. Use the available clearance rather than bending an electrical contact out of the way.
Some designs include a small rubber ring beneath or around the battery. Avoid scratching, damaging, or displacing it while removing the cell.
- Install the exact replacement in the recorded orientation.
Check the replacement code again, then install the cell in the same orientation as the battery you removed. Reproduce how its edges sit beneath or against the contacts.
Several dealership procedures show the positive side facing upward in the Mazda fobs they cover. Team Mazda specifically shows a CR2025 installed positive-side up, but that does not establish the same code or orientation for every CX-5 fob. Team Mazda’s illustrated configuration applies to the design covered by its guide.
Copying the original battery’s orientation is safer than assuming that positive-side up is universal.
- Confirm seating and replace the battery cap where present.
The cell should sit flat and remain securely engaged with the holder. Confirm that the electrical contacts are positioned as they were before removal.
If the fob has a battery cap, replace it in its original position. Make sure any rubber ring remains where it was before the battery was removed.
- Rejoin the housing halves.
Align the case halves, button areas, clips, and key recess before applying pressure. Press around the perimeter until the clips close evenly.
If one side remains open, separate the housing again and inspect the battery, cap, and internal alignment. Do not use closing force to compensate for a battery or component that is out of position.
-
Reinstall the auxiliary key and inspect the case.
Slide the metal key back into its recess until secure. Check that the perimeter seam is uniformly closed and that each button moves and returns normally.
Correct the assembly before testing the fob with the vehicle.
Fob Variations and the Parts You Must Protect
Most dealership procedures share the same broad sequence: remove the mechanical key, open the housing, replace the coin cell, close the case, and test the fob. The details within that sequence can vary.
Release mechanisms
The auxiliary key may be retained by:
- A button on the back
- A side release tab
- A sliding switch
- A latch
- A recessed mechanism
- An internal tab accessible in the key recess
Use the mechanism visibly present on your fob. Instructions for a button-release design should not be used to justify prying the key from a fob with a sliding latch.
Opening points
One housing may expose two side slots after the key is removed. Another may have a single notch or a seam beginning near the key recess.
A suitable opening point should permit controlled twisting at the edge. If the case does not begin to separate gently, reassess whether you have found the intended location.
Battery caps and rubber rings
Some described Mazda fobs include a removable cap over the battery and a small rubber ring beneath or around it. Dealership guidance warns against damaging that ring and says a scratched or damaged ring should be replaced, but it does not provide a universal replacement or part number for every CX-5 fob.
If the ring is damaged or will not remain in its original position, stop and have the correct component identified for that specific fob. Koeppel Mazda’s procedure notes the cap and rubber-ring precautions.
Plastic clips and housing seams
Release the case gradually around its edge rather than levering the entire housing apart from one point.
During reassembly, the seam should close evenly. A remaining gap may indicate that a clip, cap, battery, or other internal piece is not aligned.
Battery contacts
The metal contacts must hold the cell securely and touch the intended battery surfaces.
If a contact bends or becomes loose, stop the replacement rather than continuing to press the cell or housing into position.
Button pads and internal electronics
Avoid moving them unless the fob’s design requires it.
Before reassembly, make sure the buttons and internal pieces remain in their original positions. If the observed layout differs from the procedure you expected, consult documentation for that fob instead of improvising.
Battery fit
The battery should fit naturally in the holder. The installed battery code, model-specific documentation, and physical fit should agree.
Do not force a different cell into the space simply because it appears similar. If the battery protrudes, moves loosely, or prevents the housing from closing evenly, verify the code and installation before proceeding.
Reassemble and Test Every Available Function
Before approaching the vehicle, check that:
- The case halves are aligned.
- The perimeter seam is evenly closed.
- The buttons move and return normally.
- The auxiliary key is fully seated.
- No loose part can be heard moving inside.
Begin testing close to the vehicle. This establishes whether the fob operates before you draw conclusions about restored range.
Test the available functions in this order:
- Lock: Confirm that the vehicle responds.
- Unlock: Check that the expected doors unlock.
- Panic: Test only where appropriate and cancel it promptly.
- Trunk or liftgate release: Test if the button is present.
- Passive or proximity entry: Use the normal entry method, where equipped.
- Starting recognition: Confirm that the CX-5 recognizes the fob through its normal starting process.
CX-5 dealership guidance specifically recommends testing lock, unlock, panic, and trunk release where those controls are available.
If close-range testing succeeds, move gradually farther away and compare performance with the symptoms you noticed before replacement. Use a similar location and test conditions when comparing range.
If a function fails, do not strike or sharply flex the housing. Reopen it through the intended point and inspect the battery’s code, orientation, seating, and the alignment of the internal pieces.
Successful operation confirms only that the tested functions work. Finish with another visual check of the case seam, buttons, and auxiliary key.
If the Key Fob Still Does Not Work After the Battery Change
Start with the simplest installation checks rather than assuming the fob needs programming or that the new battery is defective.
1. Confirm the replacement code
Compare the new cell with the old battery or your photograph. Check every character in the designation.
Do not accept one battery code as a substitute for another unless documentation for that exact fob supports the change. Also confirm that no retail packaging or insulating material remains on the replacement cell.
2. Recheck polarity
Compare the installed battery with the photograph taken before removal. Do not rely solely on memory or on an orientation instruction written for a different fob.
If the original position was not recorded, look for markings in the holder and consult documentation for the exact model year and fob.
3. Inspect seating
The battery should sit flat and contact the intended terminals. Check whether:
- One edge rests above a retaining lip.
- The cell is beside rather than beneath a contact.
- A contact moved out of position.
- The battery cap is not seated correctly.
- A rubber ring shifted beneath the cell.
- The battery prevents the housing from closing evenly.
Remove and reinstall the cell rather than pressing harder on the case.
4. Check for visible dirt or debris
Inspect the holder and contacts under good lighting. Remove only loose material that can be cleared without scraping or dismantling the electronics.
If residue or contamination cannot be addressed without disturbing the internal assembly, obtain qualified service rather than improvising a cleaning procedure.
5. Check internal alignment
Confirm that:
- The battery cap is correctly positioned.
- The button pad remains centered.
- No button is trapped in a depressed position.
- The electronics assembly is seated as it was originally.
- The rubber ring remains in place.
- The housing closes evenly.
If the case will not close correctly, reopen it and identify the displaced part instead of repeatedly squeezing the halves together.
6. Consider the replacement cell
If the code, polarity, seating, and contacts have all been verified, trying another replacement with the same confirmed specification is a reasonable next check.
In the unresolved owner-forum report, replacement CR2025 cells reportedly matched the original dimensions and produced a voltage reading, yet the cause of the failure was never established. That anecdote does not justify blaming a battery brand.
7. Compare the spare fob
If the spare works normally, further attention should focus on the fob that was opened. If neither fob is recognized, the issue may extend beyond one replacement battery.
This remains a comparison rather than a diagnosis. A spare fob can have its own battery or internal problem.
8. Treat programming or resynchronization as model-specific
The available CX-5 dealership evidence does not authoritatively establish that every fob will—or will not—require resynchronization after a routine battery replacement.
If a correctly specified and installed battery does not restore vehicle recognition, consult documentation for the exact CX-5 model year. Do not apply a generic reset sequence written for another Mazda model, year, or fob design.
9. Know when to stop
End the DIY attempt if:
- The housing is cracked.
- One or more clips are broken.
- A battery contact is bent, loose, or damaged.
- The rubber ring is damaged or will not remain seated.
- An internal component is loose.
- The verified battery does not fit naturally.
- The case cannot close evenly.
- Recognition still fails after code, polarity, seating, and alignment have been checked.
Continued failure may involve the cell, the fob’s contacts or electronics, or the vehicle’s recognition system. It cannot be diagnosed conclusively from the battery replacement alone.
Frequently Asked Questions
What battery does a Mazda CX-5 key fob use?
Mazda of Salem says CX-5 fobs typically use a CR2025 or CR2032, but it does not assign those batteries to specific model years or visible fob variants. The correct cell therefore needs to be verified for the exact fob. See Mazda of Salem’s qualified battery guidance.
Open the fob carefully, read the complete code stamped on the existing battery, and check the applicable vehicle documentation. Replace the cell with the same verified code rather than relying solely on a generic online compatibility listing.
Can I replace a CR2025 with a CR2032 in my CX-5 key fob?
Not without confirmation for the exact fob. The available dealership guidance identifies CR2025 and CR2032 as possible CX-5 batteries but does not state that they are interchangeable.
Use the code stamped on the installed battery unless documentation for that fob explicitly supports another cell. Do not force a replacement that does not sit naturally or prevents the case from closing evenly.
Which side of the new key-fob battery should face up?
Several dealership procedures show the positive side facing upward, but those instructions cover particular Mazda fob designs rather than every CX-5 variant. Manchester Mazda, for example, specifies positive-side up in the Mazda procedure it describes. See the orientation in Manchester Mazda’s guide.
Before removing the old battery, photograph its orientation. Install the verified replacement in the same position. If the original battery is missing or its orientation is uncertain, consult documentation for the exact model year and fob rather than guessing.
Does a Mazda CX-5 key fob need reprogramming after a battery replacement?
The available CX-5 dealership guidance does not establish one answer for every model year and fob. A battery replacement may restore operation immediately, but that does not prove resynchronization is never required.
Test the buttons, passive entry, and starting recognition after installation. If the correct battery code, polarity, seating, and reassembly do not restore recognition, consult model-specific Mazda documentation or qualified service. Do not use an unverified reset sequence intended for another vehicle.
Why is my Mazda key fob still not working with a new battery?
Check the following:
- The replacement code matches the removed cell.
- The battery is installed in the recorded orientation.
- The cell sits flat and securely against the contacts.
- No packaging or insulating material remains.
- The holder and visible contacts are free of loose debris.
- The battery cap, button pad, and housing are aligned.
- The rubber ring and other internal pieces remain in position.
- The case closes evenly without being forced.
Seacoast Mazda similarly recommends checking orientation, seating, casing alignment, contacts, dirt or debris, and disturbed internal components when a replacement does not restore operation. See Seacoast Mazda’s troubleshooting guidance.
A replacement cell may also be weak, but failure does not prove that conclusion. Compare the spare fob if available. If these checks do not restore operation—or if the case, clips, contacts, rubber ring, or electronics are damaged—stop repeatedly opening the fob and obtain model-specific assistance.
The safest Mazda CX-5 key fob battery replacement is a verification-first job. Do not buy or install a cell solely because CR2025 is commonly listed. Confirm the existing battery’s complete code, preserve its orientation, and open the housing only through its intended release and pry points.
Protect the clips, contacts, battery cap, rubber ring, button pad, and internal electronics throughout the procedure. After reassembly, test every available function at close range before evaluating operating distance. If correct battery selection, polarity, seating, and alignment do not restore operation, stop forcing the fob and consult documentation or qualified service for the exact CX-5 model year and fob design.