
Identify Your Wrangler Fob, Choose the Right Battery, and Replace It Carefully
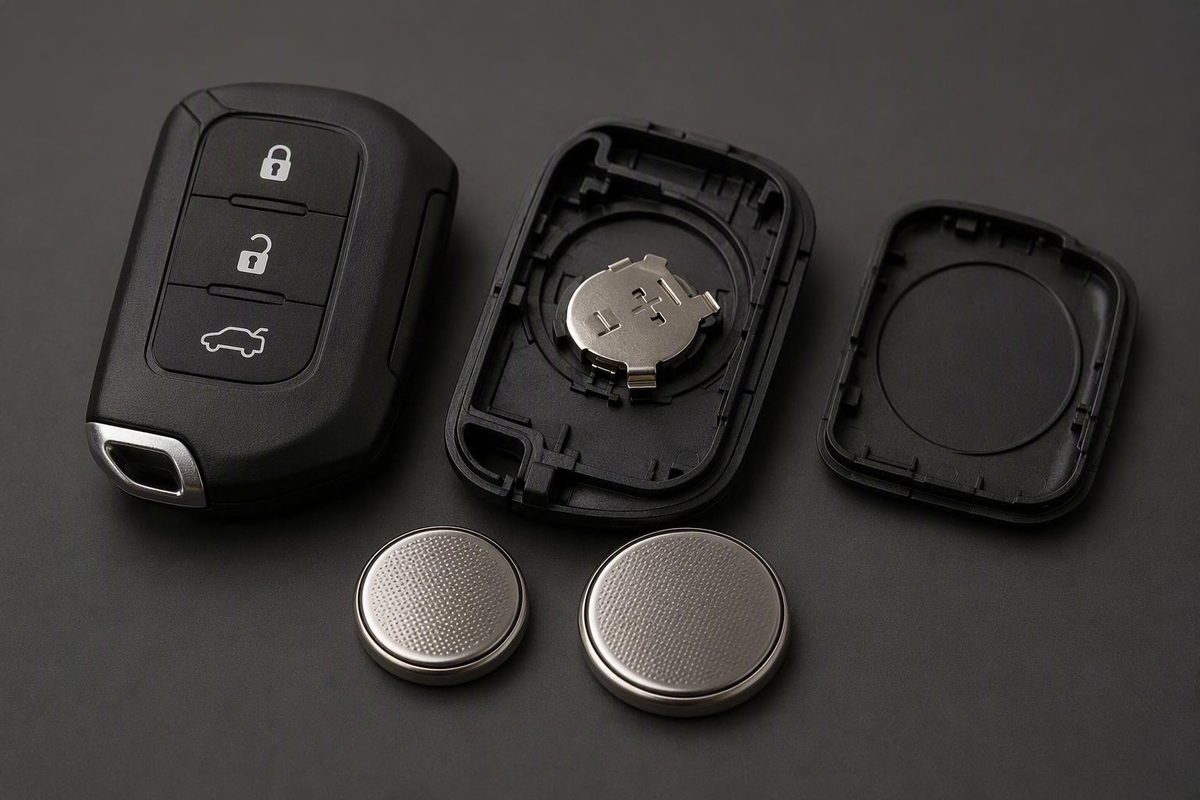
A Jeep Wrangler key fob battery replacement should begin with the fob itself—not merely the Jeep name or model year. Different Wrangler remote designs use different coin cells and open at different points. Buying a CR2032 because it is commonly associated with Jeep keys can leave you with the wrong battery if your remote matches a brick-style design demonstrated with a CR2450.
The reliable approach is to match the physical housing, open it only at the intended seam or notch, verify the code stamped on the old battery, and record its orientation before removal. This guide covers two narrowly documented examples:
- A Wrangler JK-style remote-head fob using a CR2032
- A brick-style fob demonstrated with a 2019 Wrangler using a CR2450
These are not universal specifications for every Wrangler remote.
Start Here: Identify the Fob Before Buying a Battery
Battery selection cannot be made confidently from the model year alone. Compare the shell, key arrangement, opening point, battery holder, and identifying labels before purchasing or installing a cell.
| Fob style | Identifying features | Documented battery | Scope and limitations |
|---|---|---|---|
| Wrangler JK-style remote-head fob | Key blade and remote form one unit; keyring mount at the end; two housing halves separate at a seam near the keyring | One CR2032, installed negative side down | Applies to the Wrangler JK-style fob documented by Quadratec; no universal model-year range is established |
| Brick-style fob matching the demonstrated 2019 Wrangler remote | Thick rectangular housing; cover opens from an indentation and nearby notch at the base | One 2450 battery | Third-party demonstration, not official Jeep fitment documentation |
The 2019 brick-style example is associated by uploader Key Fob Rob with part number 68416784AA and FCC ID OHT1130261. The uploader also claims compatibility with the 2018 new-body Wrangler and 2019–2021 Wranglers, but those details are not independently verified Jeep or Mopar fitment data. Treat them as comparison points, not proof that every remote from those years uses the same battery or shell.
Before buying or installing a battery, check as many of the following as possible:
- Physical shape: Does the remote match the JK-style remote-head shell or the demonstrated brick-style shell?
- Opening point: Is there a seam near the keyring mount, or an indentation or notch in a removable cover?
- Old battery code: Read the designation stamped on the removed coin cell.
- Polarity markings: Look for molded
+or−symbols in the battery compartment. - Owner’s manual: Check for instructions specific to your vehicle and remote.
- Part number and FCC ID: Compare labels on the fob with reliable documentation for that exact remote.
- Original orientation: Photograph the battery before removing it.
Do not stack cells, add improvised spacers, or force a battery into a holder. If the cell will not sit flat, stop and recheck the battery designation, holder, retaining contacts, and fob identity.
Use this decision path:
- The fob matches the documented JK-style shell: Verify the old cell, then follow the CR2032 procedure below.
- The fob matches the demonstrated 2019 brick-style shell: Verify the old cell, then follow the CR2450 procedure.
- The fob differs from both designs: Stop and obtain instructions for the exact remote rather than adapting either procedure.
Tools, Workspace, and Damage-Prevention Checks
Work on a clean, well-lit table where a battery or loose internal component cannot disappear into a vehicle seat, driveway, or cluttered counter.
You will need:
- The verified replacement battery
- A correctly sized small flathead screwdriver, or
- A thin non-marring pry tool that fits the designated opening
Optional protective items include:
- A soft cloth beneath the fob
- Gloves that still permit precise control
- A thin protective barrier between a metal tool and the plastic housing
- A phone or camera for recording the original assembly
Hollywood Chrysler Jeep’s general replacement guide recommends a small flathead screwdriver or plastic pry tool, a fresh battery, and optional gloves or a soft cloth. It also advises recording the old battery’s orientation and realigning displaced components before closure. Because that guidance is generic, use the design-specific opening method below rather than assuming every Jeep fob opens at the same seam.
Remove the fob from a crowded keychain if the attached keys obstruct your grip or the opening point. Before opening the case:
- Photograph the exterior and button layout.
- Locate the intended seam, notch, or indentation.
- Confirm that the tool fits without being forced.
- Hold the fob in a known orientation.
- Plan to photograph the battery code and installed position as soon as the cover opens.
The main damage risks include:
- Inserting the tool into the wrong seam
- Gouging the plastic with an undersized screwdriver
- Twisting inside a snap joint
- Prying inward toward the battery or circuit board
- Cracking retaining tabs
- Bending battery contacts, springs, or catches
- Displacing the circuit board or rubber keypad
- Trapping a component in the housing seam
- Moving or pinching a perimeter seal
The opening motion depends on the design. On the covered JK-style fob, press at the seam near the keyring rather than twisting the screwdriver. On a matching brick-style shell, lift the cover upward at its designated opening rather than pushing the tool inward toward the electronics.
Stop if the shell does not resemble either covered design, the suspected opening point does not release the cover, or the plastic begins flexing sharply. A tight case does not justify uncontrolled force.
Wrangler JK-Style Fob: CR2032 Replacement Steps
This procedure applies only to a Wrangler JK-style remote-head fob matching the Quadratec example.
1. Insert the screwdriver near the keyring mount.
Place a correctly sized small flathead screwdriver in the housing seam close to the keyring mount. Keep the tip shallow and aligned with the seam.
2. Press to separate the housing halves.
Press down carefully until the snap joint begins to release. Do not twist the screwdriver. Quadratec warns that twisting can damage the plastic housing.
Once a gap appears, separate the case gradually. Do not pull one end far apart while clips at the other end remain engaged.
3. Record the internal arrangement.
Before removing anything, note the position and order of:
- The battery
- The circuit board
- The rubber keypad
- The two housing halves
Take a photograph if the components are loose or likely to separate.
4. Remove and verify the old battery.
Lift the coin cell from its holder without bending the contacts. Confirm the code stamped on the cell. If it differs from the expected specification, pause and verify the exact fob instead of assuming either the old battery or the general instructions are correct.
5. Install the CR2032 with the negative side down.
For this documented JK-style procedure, install one CR2032 with the negative side facing down. That specification and polarity are specific to the covered shell and should not be transferred to another design (Quadratec’s illustrated JK procedure).
The battery should sit flat and remain secured by the intended contacts. If it rocks, stands above the holder, or requires force, remove it and inspect the battery type, holder, and contact position.
6. Reinstall the circuit board and keypad.
Place the circuit board into the rubber keypad, aligning the board with the button contacts. Return the keypad assembly to the correct housing half. Check that no rubber edge folds over the rim and no button is trapped beneath the plastic.
7. Close the housing progressively.
Align both halves before pressing them together. Start near the key and work toward the opposite end, engaging the clips in sequence.
Inspect the complete perimeter for:
- Uneven gaps
- Pinched keypad material
- Buttons sitting unusually high or low
- Corners that have not engaged
- A housing edge that moves under light pressure
- Internal material caught in the seam
If the halves will not close evenly, reopen the fob and inspect the battery, board, keypad, and contacts. Do not use a clamp or excessive squeezing force.
2019 Brick-Style Wrangler Fob: CR2450 Replacement Steps
This procedure is based on a third-party demonstration of a brick-style fob from a 2019 Jeep Wrangler. It is not an official guide for every JL, JLU, 4xe, Gladiator, newer Wrangler, or replacement remote.
Key Fob Rob identifies the demonstrated battery as a “2450.” A separate MikesCarInfo demonstration involving a similar Jeep shell gives the complete designation CR2450 and shows a spring, retaining catches, and a perimeter seal. Those internal details should be applied only if your opened fob matches that separate demonstration.
1. Remove obstructions and locate the intended opening.
Remove the keychain if it interferes with access. On a shell matching the 2019 demonstration, locate the base indentation and adjacent notch intended for cover removal.
Do not insert the screwdriver into a decorative groove or an arbitrary part of the perimeter seam.
2. Pry upward on the cover.
Insert a correctly sized flathead screwdriver into the designated opening. Direct the leverage upward against the cover—not inward toward the battery, holder, or electronics.
3. Release the cover gradually.
Work carefully as the clips release. Avoid uncontrolled twisting or lifting one side far above the other.
A separate MikesCarInfo demonstration of a similar Jeep fob shows a CR2450 retained by a spring and catches, with a seal around the cover. Use those details only if your fob has the same internal arrangement. Keep any seal correctly positioned and free of trapped debris.
4. Record the battery code and orientation.
Before touching the battery, photograph the compartment. Capture:
- The full battery designation
- Which printed face is visible
- The cell’s position under the retaining features
- The location of any spring
- Molded
+or−markings
Neither supplied brick-style demonstration explicitly establishes which polarity must face upward. Do not infer the answer from the JK-style procedure.
5. Release the old battery.
If the holder matches the separate spring-and-catches demonstration, move the cell as required by the holder geometry and release it from beneath the catches. Work from the edge of the battery where possible rather than inserting a metal tool deeply underneath it.
Do not bend the spring or pry the catches outward. They must retain the replacement cell and maintain electrical contact.
6. Install the replacement in the recorded orientation.
Install the verified replacement beneath the appropriate retaining features. If the holder uses a spring, compress it only as required to seat the cell.
Match the old battery’s orientation or follow clear molded polarity markings. If your photograph and the compartment markings appear to conflict, stop and obtain instructions for the exact fob. No universal positive-side-up or negative-side-up rule is supported for this brick-style example.
7. Verify seating.
The battery should be:
- Flat in the holder
- Beneath the intended catches, if present
- Secure against the retaining mechanism
- In contact with the terminals
- Free from rocking or sliding
If it will not sit correctly, recheck the battery designation and inspect the retaining parts for displacement or damage.
8. Replace and inspect the cover.
Align the cover without moving the seal. Press around the entire perimeter until every clip engages. The original 2019 demonstration instructs the user to squeeze the housing until it snaps closed, but pressure should remain gradual and controlled.
Inspect all sides for gaps. Confirm that the cover is level and that no seal or internal component is visible in the seam.
Reassemble and Test Every Equipped Function
A battery replacement is not complete after the first audible snap. Inspect the entire housing seam before testing.
Confirm that:
- Every edge is closed evenly.
- The shell does not rock, flex, or gape.
- Each button moves and returns normally.
- No keypad material protrudes through the seam.
- No board, contact, battery, or seal appears displaced.
- Any removed emergency or mechanical key fits normally.
Begin testing close to the Wrangler. Try lock and unlock first. If both respond consistently, test every other function fitted to your remote and vehicle:
- Panic alarm
- Parking-light or horn confirmation
- Remote start
- Tailgate or other dedicated release
- Passive entry
- Proximity recognition
- Vehicle starting
- Dashboard key-detection messages
Test only functions the Wrangler actually has. The absence of an unsupported feature does not indicate a failed battery replacement.
For a proximity-equipped system, do more than press the buttons. Approach the vehicle normally, test passive entry, and confirm that the vehicle recognizes the key where appropriate. Then verify starting through the normal procedure for that configuration.
Compare the operating range with the behavior that prompted the replacement. If declining range was the original symptom, the related guide on key-fob battery lifespan and warning signs provides additional general context, but it does not establish a Wrangler-specific battery type.
One successful lock command is not a complete test. Hollywood Chrysler Jeep’s general guidance also recommends checking lock, unlock, light or horn response, remote start when equipped, and operating range after reassembly.
If performance is intermittent, first confirm that the battery type is correct and the shell is fully seated. Reopen the fob only on a controlled workspace, then inspect the battery and internal alignment.
Does a Battery Change Require Reprogramming?
Replacing the coin cell in an existing, previously working fob is different from programming a new or replacement key.
Participants in one Wrangler Forum discussion reported that replacing the battery in a previously working JK fob should not normally require reprogramming solely because the cell was changed. That is user-generated discussion, not official Jeep service guidance. The same thread includes an isolated report of a fob later requiring dealer reprogramming, so the discussion does not establish a universal rule (Wrangler Forum battery and programming discussion).
Do not use a generic ignition-and-door-lock programming sequence merely because it appears on a dealership page. Such a sequence has not been validated here for every Wrangler generation or security system and may be irrelevant to a push-button-start vehicle.
Forum participants also distinguish between coin-cell-powered remote functions and the passive immobilizer transponder used in applicable keyed systems. Because that explanation is owner-reported and vehicle configurations differ, do not assume that every Wrangler will behave the same way with a depleted fob battery. Use the owner’s manual or model-specific instructions for emergency entry or starting.
Programming service should not be the first purchase after an unsuccessful battery swap. Check:
- Battery designation
- Battery orientation
- Replacement-cell condition
- Flat and secure seating
- Contact condition
- Circuit-board and keypad alignment
- Complete case closure
- The Wrangler’s main battery and other electrical systems
If those checks do not restore operation, seek model-specific diagnosis from a qualified automotive locksmith, Jeep dealer, or technician—especially if the vehicle shows a persistent detection warning, the fob has visible damage, or a replacement key has been introduced.
If the Fob Still Does Not Work: A Troubleshooting Decision Tree
A failed first test does not prove that the fob lost its programming. Work through these branches in order.
Branch 1: Is the replacement the wrong battery?
Compare the new cell’s code with:
- The removed battery
- Holder markings
- Documentation for the exact fob
- Verified part-number or FCC-ID information
Do not substitute a CR2032 for a CR2450 or vice versa. If the battery must be forced into place, sits above the holder, or moves loosely, remove it and recheck both the cell and the retaining components.
Branch 2: Is the battery orientation wrong?
For the covered JK-style procedure, confirm that the CR2032 is installed negative side down.
For the brick-style procedure, match the photograph of the original battery or follow clear molded polarity markings. The available brick-style demonstrations do not support borrowing the JK orientation.
If you did not record the original position and cannot find an internal marking, obtain exact documentation rather than repeatedly flipping the battery at random.
Branch 3: Is the replacement cell seated securely?
Remove and inspect the battery. Confirm that it:
- Has the verified designation
- Has no visible damage
- Sits flat
- Touches the required contacts
- Remains securely retained
- Has no packaging or insulating material attached
Trying another verified replacement cell is a reasonable diagnostic step. A newly opened package does not by itself confirm correct installation or seating.
Branch 4: Is there a contact or assembly problem?
Inspect the open fob under bright light for:
- Dirt or residue
- Corrosion
- A flattened or bent contact
- A displaced retaining spring
- Cracked catches
- An off-center circuit board
- A folded or inverted rubber keypad
- Loose buttons
- Material trapped in the seam
- A cover that has not fully engaged
Do not repeatedly bend contacts or aggressively scrape them. Visible corrosion, cracked circuitry, or broken retaining hardware warrants professional inspection.
Branch 5: Is the problem on the vehicle side?
Check whether the Wrangler’s other electrical systems operate normally. No interior electrical response, dim lighting, or other widespread symptoms may indicate a vehicle-battery problem rather than a fob problem.
In the cited forum case involving a 2017 Wrangler JK, the owner eventually measured the vehicle battery at 5 volts and concluded that the apparent fob problem was vehicle-side. That is a single anecdote, not a general diagnosis, but it shows why the main battery belongs in the troubleshooting sequence (the owner’s follow-up diagnosis).
Branch 6: Is the fob damaged, or is there a vehicle-side detection fault?
If the battery and assembly checks pass, continued failure may involve:
- Broken internal components
- Worn button contacts
- Liquid damage or corrosion
- A damaged battery holder
- A key-detection problem
- A receiver or antenna fault
- An unprogrammed replacement fob
- Another model-specific security-system issue
Consult a qualified automotive locksmith, Jeep dealer, or experienced technician when there is corrosion, visible component damage, a persistent “key not detected” warning, suspected receiver trouble, or no response after the supported checks. A coin-cell replacement cannot correct every remote-entry, proximity, starting, or key-detection fault.
Printable replacement and troubleshooting checklist
- [ ] Match the physical fob design.
- [ ] Verify the old battery’s code.
- [ ] Photograph the battery orientation.
- [ ] Check molded polarity markings.
- [ ] Open only at the designated seam or notch.
- [ ] Use a correctly sized tool.
- [ ] Avoid twisting or prying toward the electronics.
- [ ] Protect the contacts, board, keypad, catches, and seal.
- [ ] Confirm that the replacement sits flat and secure.
- [ ] Close and inspect every edge.
- [ ] Test every equipped function.
- [ ] Check the assembly and vehicle battery before assuming programming loss.
- [ ] Obtain professional diagnosis if damage or persistent failure remains.
Frequently Asked Questions
What battery does a Jeep Wrangler key fob take?
It depends on the physical fob design. The covered Wrangler JK-style remote-head fob uses one CR2032, while the demonstrated 2019 brick-style remote uses one 2450 battery. Do not select the battery from the model year alone; compare the housing and verify the code on the old cell.
Can I use a CR2032 instead of a CR2450 in a Wrangler key fob?
No. They are different physical sizes and are not interchangeable. Use the designation shown on the old cell, inside the holder, or in reliable documentation for the exact remote. Do not force a battery into place, stack cells, or improvise spacers.
Which way does the battery go in a Jeep Wrangler key fob?
For the JK-style fob matching the documented procedure, the CR2032 goes in with the negative side down.
For the demonstrated brick-style fob, record and match the original battery orientation or follow clear molded polarity markings. The available demonstrations do not establish a universal polarity direction for that design.
Does a Jeep Wrangler key fob need reprogramming after a battery change?
Do not assume so. A battery change in an existing fob is different from programming a replacement key. Before paying for programming, verify the battery type, orientation, seating, contacts, internal alignment, case closure, and vehicle battery. Obtain model-specific diagnosis if those checks do not restore operation.
What should I check if the key fob still does not work with a new battery?
Check the battery code and orientation first. Then inspect its seating, the contacts and retaining parts, circuit-board and keypad alignment, and complete housing closure. Also verify that the Wrangler’s main battery and other electrical systems work normally.
If the fob remains unresponsive, has visible corrosion or damage, or the vehicle continues to display a key-detection warning, consult a qualified automotive locksmith, Jeep dealer, or technician.
Identification remains the central rule: match the physical fob, verify the battery code and orientation, and use the opening method documented for that shell. Protect the contacts and internal components, close every edge, and test every equipped function. If a correctly installed battery does not restore operation, troubleshoot the assembly and vehicle battery before assuming that programming is required.