
How to Change a Jeep Key Fob Battery Without Damaging the Remote
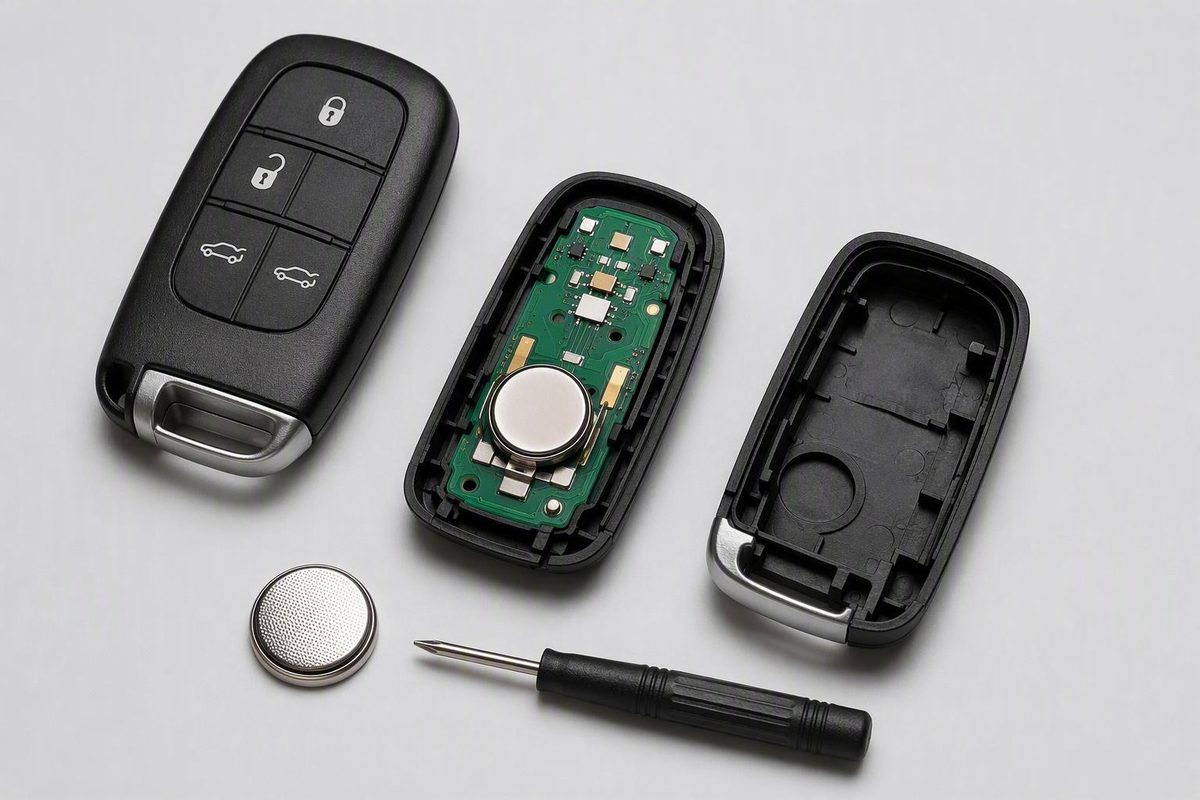
CR2032 is commonly reported, but third-party sources also identify CR2450, CR2025 and applications that use two CR2016 cells.
Replacing a Jeep key-fob battery is usually a manageable DIY job, but there is no single battery size, polarity, or opening method for every Jeep remote. Smart keys, Fobik-style keys, and integrated remotes can use different cells and housings, even across overlapping model years.
The safest method is inspection-led: identify the fob in your hand, open it only at its intended notch, record the installed battery’s complete code and orientation, preserve the position of every internal component, and test all fitted functions after reassembly.
The quick answer: verify before you pry
For most Jeep remotes, follow this general sequence:
- Identify the fob design. Determine whether it is a proximity smart key, a Fobik-style unit inserted into a dashboard slot, or an integrated remote with a metal blade.
- Remove the emergency key, if fitted. Release its latch and slide the key out before separating the housing.
- Check for a retaining screw. Remove it with the correct driver if the housing uses one.
- Find the intended opening point. Look for a notch or reinforced section of the seam, often near the emergency-key opening or keyring mount.
- Open the shell gently. Prefer a plastic electronics pry tool. Insert it shallowly and twist rather than levering deeply toward the electronics.
- Photograph the interior. Record the battery code and orientation, circuit-board position, button pad, polarity marks, and any loose inserts.
- Install an exact replacement. Match the complete battery code, quantity, and verified orientation.
- Reassemble evenly. Align the battery, electronics, button pad, shell tabs, and other components before engaging the clips.
- Test every fitted function. Check lock, unlock, range, passive entry, starting, remote start, panic, and liftgate controls as applicable.
There is no universal battery for every Jeep key fob. CR2032 is commonly reported, but the supplied third-party sources also identify CR2450, CR2025, and applications using two CR2016 cells. They also distinguish among smart keys, Fobik units, and integrated remotes, each of which may open differently (Jeep fob designs and battery overview).
Treat the complete code on the battery already inside the fob as the primary fitment clue. Confirm it against polarity or battery markings in the compartment and the owner documentation for your exact Jeep and fob. That is safer than buying a battery solely from a generic make-and-year search.
If the new battery does not sit flat and allow normal closure, stop rather than forcing the case around it.
Confirm that a weak fob battery is the likely problem
Possible symptoms include:
- Reduced operating range
- Lock or unlock requiring repeated presses
- Intermittent response
- Inconsistent or failed remote start
- Unreliable passive entry
- A relevant low-key-battery dashboard warning
- Some fob functions working while others fail
Reduced range, repeated presses, and intermittent operation are identified as possible weak-battery symptoms in dealership replacement guidance, but they do not conclusively diagnose the battery (Jeep key-fob symptoms and replacement guidance). Interference, poor contact, worn buttons, internal damage, or a vehicle-side problem can produce similar symptoms. For broader context, see these general key-fob battery warning signs.
Pay attention to the pattern:
- Gradually shrinking range or growing inconsistency supports trying a battery replacement first.
- Failure immediately after a drop, crushing, or liquid exposure raises concern about physical or electrical damage.
- No vehicle electrical response at all—including no lights, locks, alarm response, or other activity—may indicate a discharged vehicle battery rather than a fob problem.
- One failed feature while others still work suggests a partial fault that requires more careful diagnosis.
Remote buttons, passive entry, and vehicle authorization do not necessarily fail together. A Jeep may recognize the fob for starting while its lock buttons remain inoperative, or the buttons may work while the vehicle displays “Key Not Detected.” Partial operation is useful evidence, but it does not prove that the battery, fob, or vehicle is fully healthy.
If you have a second programmed fob, compare both under the same conditions. If the spare works normally, inspect the serviced fob and its battery first. If both perform poorly, consider shared causes such as interference, a weak vehicle battery, or a vehicle-side receiver or electrical issue.
When servicing two fobs, change one at a time and test it before opening the second. This preserves a known reference and helps distinguish a replacement problem from a vehicle-wide issue.
Identify the fob and buy the correct coin cell
Start with the remote itself, not the Jeep badge. Three broad fob designs appear in the supplied Jeep guidance:
- Proximity smart key: Normally stays in a pocket or bag while supporting passive entry and push-button starting. It often includes a removable emergency key.
- Fobik-style key: A rounded or trapezoidal electronic unit inserted into a dashboard ignition slot.
- Integrated remote key: A conventional metal blade attached to a plastic head containing remote buttons.
These are broad categories rather than universal engineering specifications. Shell shape, battery holder, release mechanism, opening point, and polarity can still vary within each category.
Use the installed battery as your primary fitment reference
Before buying a replacement:
- Open the fob cautiously enough to expose the battery.
- Copy the entire code, including all letters and digits—for example, CR2032 rather than only “2032.”
- Record how many cells are installed.
- Photograph the visible battery face.
- Check for
+or−marks in or beside the holder. - Compare your observations with the documentation for the exact Jeep and fob.
Do not substitute a battery merely because it has a similar diameter. The complete code matters to physical fit, and a battery that is too thick or too thin may prevent reliable contact or closure.
Provisional Jeep battery examples
The following examples come from a third-party retailer’s lookup database. They are not an official, complete, or current Jeep compatibility chart, and each entry must be verified against the installed cell or model-specific documentation (third-party key-fob battery finder).
| Jeep application listed by the retailer | Listed battery | Verification warning |
|---|---|---|
| Wrangler, 2007–2018 | CR2032 | Overlaps with a separate 2018 CR2450 entry |
| Wrangler, 2018–2021 | CR2450 | Inspect the actual 2018 fob before buying |
| Cherokee, 2014–2021 | CR2032 | Verify against the installed battery |
| Grand Cherokee, 2005–2021 | CR2032 | Broad range; do not treat it as universal |
| Grand Cherokee, 1999–2004 | Two CR2016 cells | Confirm count and stacking orientation |
| Compass, 2017–2021, push-to-start | CR2032 | Overlaps with the broader Compass entry |
| Compass, 2007–2021 | CR2032 | Model year alone may not identify the design |
| Renegade, 2015–2021 | CR2032 | Verify directly before purchase |
The overlapping 2018 Wrangler entries and overlapping Compass ranges show why model year alone may not settle fitment. The database also says it is continually expanding, so absence from the table does not establish that a particular battery is wrong.
A dealership guide names CR2025 as a possibility for some older Jeep fobs but does not connect it to a verified model and year. Treat CR2025 as something to confirm, not as a substitute for CR2032 or another installed cell (dealership Jeep battery guide).
If the old battery is missing, unreadable, or appears to have been installed incorrectly, consult documentation for the exact vehicle or have the fob identified by its part number. Do not let a broad compatibility table overrule reliable evidence from the actual remote.
Prepare the tools and open the housing carefully
A clean setup reduces the chance of losing a small part, contaminating the electronics, or damaging the shell.
Gather what you need
Prepare:
- The verified replacement coin cell or cells
- A small plastic electronics pry tool
- A small flathead screwdriver only if the design requires one
- The correct driver for any retaining screw
- A phone or camera
- A clean, dry, well-lit work area
- A soft, light-colored cloth or mat to keep parts visible
A plastic pry tool is preferable because a slipping metal screwdriver can scratch or gouge the housing. Jeep replacement guides do use small flathead screwdrivers, but they direct the user to work at the intended seam or notch and apply gentle pressure (opening and replacement guidance).
Remove anything securing the shell
Inspect the exterior before applying pressure.
If the fob has an emergency mechanical key:
- Find the release slider or button.
- Hold the release.
- Pull the key completely out.
- Inspect the opening for a reinforced pry slot or notch.
If the housing has a retaining screw, remove it with a correctly fitting driver and place it where it cannot roll away.
Do not assume that a visible seam is ready to open. An emergency key, screw, or latch may still be securing the case.
Find the intended opening point
Look near:
- The emergency-key opening
- The keyring mount
- A recessed notch
- A visibly widened or reinforced part of the perimeter seam
Insert the tool only far enough to engage that opening point. Twist gently until a small gap appears, then work around the perimeter with light pressure. Avoid pushing the tool deeply toward the circuit board or using one shell edge as a long lever.
Stop if the housing does not separate with light pressure. Recheck for:
- An emergency key that has not been removed
- A retaining screw
- A latch that remains engaged
- A different opening notch
- A cover designed to slide rather than lift
- Previous damage or adhesive
More force is not a substitute for finding the correct opening method.
Photograph the interior immediately
Before removing anything, take a clear photograph showing:
- The battery code and visible face
- Polarity markings
- Battery quantity and stacking order
- Circuit-board position
- Rubber button-pad orientation
- Spacers, seals, keyring parts, or loose inserts
- Shell tabs and locating features
This photograph becomes your reassembly map if a component shifts when the battery is removed.
Replace the battery and reassemble the fob
The safest replacement method is to preserve what you observed rather than relying on a universal internet rule.
Record code, count, and polarity
Before removing the old cell, record:
- Its complete code
- The number of batteries
- Which battery face is visible
- The position of the contacts
- Any
+or−marks in the compartment
Be precise when reading orientation instructions. “Positive side up” and “negative side down” describe the same orientation; they are not conflicting directions. However, polarity itself is not universal across Jeep fob designs. One commercial guide describes the positive face as generally upward in modern smart keys but downward in some Fobik-style units, so the installed battery and compartment markings should control the decision (polarity guidance by Jeep fob style).
Match the verified orientation of the original battery and follow the polarity marks inside the actual fob. Do not assume that every Jeep remote exposes the same battery face.
If the fob was already malfunctioning after previous work or the installed battery appears reversed, give the compartment markings and model-specific documentation greater weight than the old cell’s position.
Remove the old battery carefully
Use the battery holder’s accessible edge or release point.
Avoid:
- Prying against the circuit board
- Pulling or bending battery contacts
- Scraping small electronic components
- Displacing the rubber button pad
- Touching exposed circuitry unnecessarily
- Allowing liquid onto the open electronics
Commercial Jeep-fob guidance specifically recommends avoiding unnecessary circuit contact and keeping liquid away from exposed electronics. If the battery will not release easily, stop and inspect how its retainers work rather than increasing force.
Install the replacement
Confirm that the new cell has the exact code you recorded. Then:
- Hold it by the edges where practical.
- Match the photographed orientation and internal polarity marks.
- Slide it beneath any fixed retaining tab first.
- Press the opposite edge gently into place.
- Confirm that the battery sits flat.
- Check that the intended terminals contact the correct surfaces.
- If the fob uses two cells, reproduce their original order and orientation exactly.
The battery should not rattle, tilt, or force the housing outward. If it is loose, too thick, or prevents closure, remove it and verify the code.
Restore the internal components
Compare the open fob with your photograph. Confirm that:
- The circuit board rests on its locating pins or supports.
- The rubber button pad faces the correct direction.
- Each button aligns with its switch.
- Seals and spacers lie flat.
- The emergency-key mechanism remains correctly positioned.
- Nothing crosses or becomes trapped in the housing seam.
- Shell tabs align with their corresponding slots.
Bring the case halves together evenly and press around the perimeter until the clips engage. Do not force a visibly misaligned corner.
Inspect the entire seam. Reopen the housing and correct the alignment instead of squeezing harder.
Reinstall the retaining screw, if fitted, without overtightening it. Reinsert the emergency key and confirm that its release mechanism locks and releases normally.
Test every available function before declaring success
Test systematically while your tools and reference photograph remain available.
Start close to the Jeep
Near the driver’s door, test:
- Lock
- Unlock
- A second unlock press, if required for additional doors
- Panic, if fitted
- Liftgate release, if fitted
- Remote start, if fitted
Watch and listen for the expected response. Each button should press and return normally.
Next, test the remote at a normal usable distance. You do not need to measure maximum range; the goal is to confirm that the fob no longer needs to be unusually close to the Jeep.
Check proximity and starting functions separately
For a smart key, also test:
- Passive entry at supported doors
- Passive locking, if equipped
- Push-button starting
- Detection with the fob in its normal carrying position
- Whether low-battery or “Key Not Detected” messages remain
One successful feature does not validate every system. Remote-button communication and passive vehicle authorization can behave differently, so test both.
Finally, inspect the housing again. The perimeter should remain fully closed, the emergency key should be secure, and all buttons should return after being pressed.
Does the fob need programming?
Owner reports involving several Grand Cherokee fobs indicate that an ordinary battery replacement generally did not require a reset or reprogramming. That is useful general guidance, but it is not universal official Jeep policy for every model, year, or remote (Grand Cherokee owner reports after battery replacement).
Programming should therefore not be the first response when a previously working fob fails immediately after a battery change. Reopen it and check, in this order:
- Battery code
- Battery quantity
- Polarity
- Seating beneath the retainers
- Contact with the terminals
- Circuit-board position
- Button-pad alignment
- Complete case closure
Do not use a generic ignition-and-lock-button sequence unless it is explicitly documented for your Jeep. Some published sequences assume a physical ignition key and may not apply to push-button-start vehicles.
Troubleshoot a Jeep fob that still does not work
Change one variable at a time and begin with the least invasive checks.
1. Verify the battery code
Remove the replacement and compare its complete code with the original cell, your photograph, and any compartment marking. Similar-looking batteries are not automatically interchangeable.
If the original is unavailable, use model-specific documentation or identify the fob by part number rather than relying only on model year.
2. Confirm polarity
Compare the new battery’s visible face with your photograph and the compartment’s + or − symbols. Reversed polarity is a straightforward explanation for complete failure immediately after replacement.
3. Check seating and contact
Make sure the battery is:
- Flat in its holder
- Beneath the correct retaining tabs
- Touching the intended terminals
- Not sitting on top of a contact intended to touch its edge
- Secure when a button is pressed
Do not bend the contacts as routine troubleshooting. Visible contact damage is a reason to seek professional repair.
4. Try another fresh battery
A newly purchased battery can still fail to restore the fob, so try another reputable replacement with the exact same code before assuming that programming has been lost.
In one owner discussion, a replacement battery measured 3.2 volts while the fob remained inoperative, but the cause was never established. The anecdote shows only that the voltage reading did not identify the fault in that case—not that the battery was proven defective under load.
5. Inspect for debris, residue, or corrosion
Look around the battery holder and contacts for contamination, discoloration, corrosion, or evidence of liquid exposure.
Do not pour cleaner into the remote. If corrosion is extensive, the fob has been wet, or you are uncertain how to work around delicate electronics, stop and arrange professional inspection.
6. Realign the board and button pad
Compare the interior with your opening photograph. A rotated, folded, or trapped rubber pad can disable one or more buttons.
Use the fob’s locating features to restore each component. The housing should close without crushing or bowing around the board or pad.
7. Close the case completely
Confirm that all clips are engaged and that no gaps remain.
If the case will not close, do not tape or clamp it over an obstruction. Reopen it and find the misaligned component.
Use partial operation as diagnostic evidence
If lock and unlock work but push-button start produces “Key Not Detected,” the powered remote path may be functioning while passive authorization is not. The reverse is also possible: the vehicle may authorize starting while the remote buttons remain dead.
Possible causes include:
- Interference
- Poor battery contact
- Corrosion or contamination
- Internal impact damage
- A cracked electrical connection
- A damaged button or switch
- A vehicle-side antenna, receiver, Body Control Module, or RF Hub problem
These are possibilities rather than diagnoses. A commercial Q&A concerning one 2016 Cherokee discussed interference, corrosion, loose contacts, cracked connections, and RF Hub faults when the buttons worked but the vehicle did not detect the fob for starting (2016 Cherokee detection discussion).
Compare a second programmed fob
A second fob can help narrow the problem:
- The second fob works normally: Reinspect the serviced fob, its replacement battery, and its internal assembly.
- Both fail in one location: Move away from possible interference and test again.
- Both fail everywhere: Include the Jeep’s vehicle battery and vehicle-side systems among the possibilities.
- The same single feature fails on both: Give the shared vehicle function closer attention.
This comparison is evidence, not a definitive diagnosis. The second fob may have its own weak battery or unrelated fault.
Do not overlook the vehicle battery
If the Jeep has no electrical response at all, investigate the vehicle rather than repeatedly reopening the remote. In one reported 2017 Wrangler JK case, the owner initially suspected the fob but later measured the vehicle battery at 5 volts and reported a short as the underlying problem (2017 Wrangler owner discussion).
That case is an example, not a universal explanation. It shows why complete vehicle inactivity should not automatically be attributed to the coin cell merely because the symptoms appeared around the same time.
Avoid disconnecting the Jeep battery, repeatedly attempting unsupported resets, or using generic programming procedures as routine next steps. Such actions do not correct an incorrect, reversed, poorly seated, or defective coin cell and may complicate diagnosis.
Emergency access and the point to seek professional help
A dead fob battery does not necessarily make the emergency mechanical key unusable. If the fob contains one, release it and consult the model-specific owner’s manual for the manual unlocking procedure. Lock-cylinder location and alarm behavior can vary, so do not assume another Jeep’s instructions apply.
For some push-button-start Jeeps, owner reports and a 2016 Cherokee diagnostic exchange describe a backup method in which the fob is held directly against the Start/Stop button while the button is operated. This is model-dependent, not a promise that every Jeep will start this way (Grand Cherokee owner discussion).
Some vehicles may instead use a designated backup-fob pocket, but the supplied evidence does not establish which Jeep models have one or where it is located. Consult the owner’s manual before relying on either method.
Stop DIY troubleshooting when damage is visible
Seek help from a Jeep dealer or qualified automotive locksmith if you find:
- Corrosion or liquid damage
- Broken clips that prevent secure closure
- Bent, broken, or displaced battery contacts
- A cracked circuit board or loose component
- Missing internal parts
- A damaged emergency-key mechanism
- Continuing “Key Not Detected” warnings after basic checks
- Repeated failure with the verified battery and orientation
- Failure of both programmed fobs
- Complete vehicle inactivity
- Suspected BCM, RF Hub, antenna, receiver, vehicle-battery, or broader electrical trouble
A professional may be able to test whether the fob transmits, inspect the circuit board, check vehicle fault codes, identify the correct replacement remote, or perform model-specific programming.
Frequently asked questions
What battery does a Jeep key fob take?
There is no universal Jeep key-fob battery. Third-party sources commonly report CR2032, but they also identify CR2450, CR2025, and applications using two CR2016 cells. Verify the complete code, battery count, and polarity in the exact fob rather than selecting by model year alone.
Which side of a Jeep key-fob battery faces up?
It depends on the fob. Photograph the original battery and follow the polarity symbols in the compartment. Remember that “positive side up” and “negative side down” describe the same orientation; a genuine opposite instruction would place the positive face down.
Do I need to reprogram my Jeep key fob after changing the battery?
Usually, a straightforward battery replacement should not erase the programming of a previously working fob, according to the supplied guides and owner reports. This is general guidance rather than universal official Jeep policy.
Before considering programming, verify the code, polarity, seating, contacts, circuit-board position, button-pad alignment, and case closure. Avoid generic programming sequences not documented for your exact Jeep.
Why does my Jeep key fob still not work with a new battery?
Common possibilities include:
- Incorrect battery code
- Reversed polarity
- Incomplete seating
- A weak replacement cell
- Poor battery contact
- Debris or corrosion
- A displaced board or button pad
- Incomplete case closure
- Internal impact or liquid damage
- Radio interference
- A vehicle-side receiver, antenna, module, or battery problem
Try another fresh battery with the exact code and compare the result with a second programmed fob if available. Seek professional diagnosis if damage is visible or detection errors persist.
Can I start my Jeep when the key-fob battery is dead?
Some push-button-start Jeeps reportedly support backup starting by placing the fob against the Start/Stop button. A fob with an emergency mechanical key may also permit manual door access.
Neither procedure is universal. Check the owner’s manual for the exact Jeep’s manual-unlock method, backup-start position, and possible alarm behavior. If the documented method fails or the Jeep shows no electrical activity, include the vehicle battery and vehicle-side systems in the diagnosis.
Final success checklist
Before putting your tools away, confirm that you have:
- Matched the complete battery code
- Preserved the verified polarity and battery count
- Opened the fob only at its intended notch or seam
- Seated the cell securely beneath the proper retainers
- Aligned the circuit board, button pad, tabs, and other components
- Closed the housing without gaps
- Reinstalled the retaining screw and emergency key, where fitted
- Tested all available remote, passive-entry, and starting functions
A battery swap will often restore a fob that has gradually lost range or consistency without requiring programming. Persistent failure—especially corrosion, physical damage, complete vehicle inactivity, or continuing “Key Not Detected” messages—calls for model-specific documentation and qualified diagnosis rather than repeated generic reset attempts.