
How to Identify Your RAV4 Fob, Change Its Battery, and Fix Common Problems
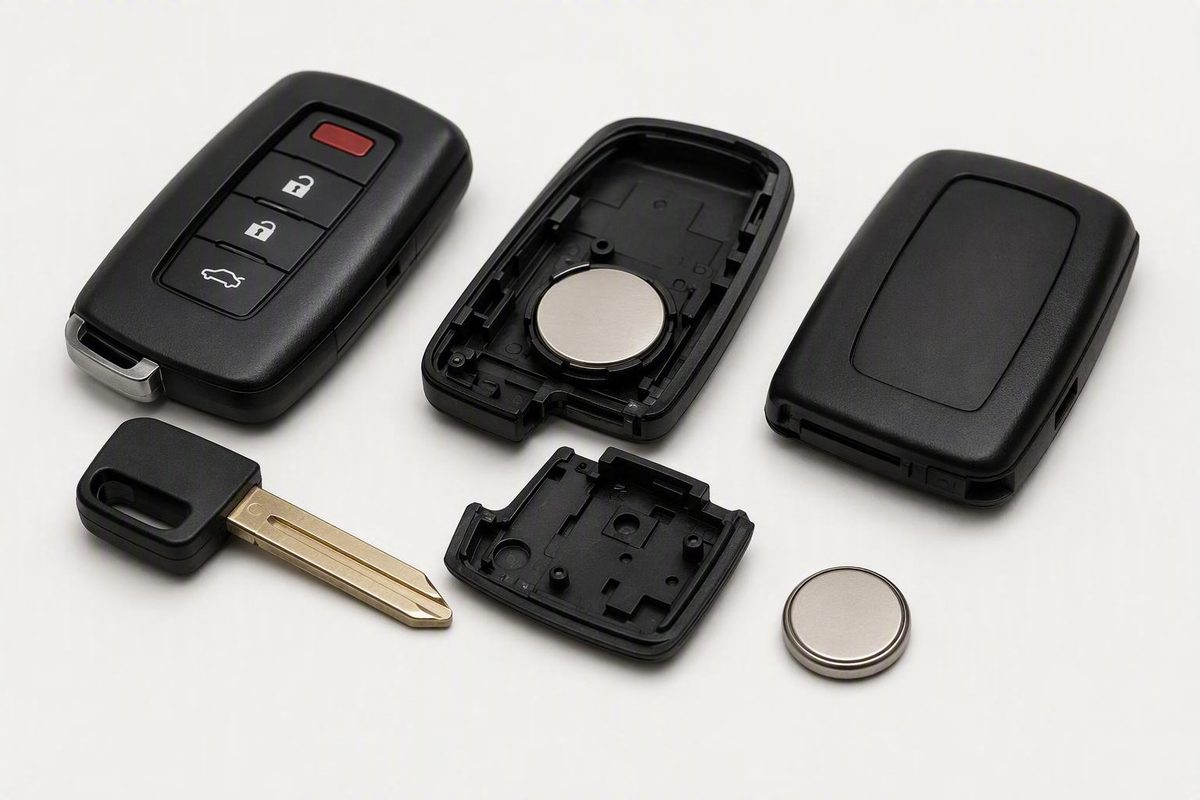
Start Here: Do Not Assume Every RAV4 Fob Uses the Same Battery
The available evidence does not support one universal battery size for every Toyota RAV4, RAV4 Hybrid, and RAV4 Prime key fob. It also does not provide an authoritative Toyota fitment table organized by model year, powertrain, fob part number, and physical design.
Accordingly, this guide is best used as an identification and troubleshooting advisory—not as a substitute for documentation covering your exact vehicle and fob.
The safest identification sequence is:
- Identify the fob by its physical construction.
- Open it only at the intended slot or notch.
- Photograph the installed battery before removing it.
- Read the complete designation printed on the cell.
- Check any molded polarity markings inside the fob.
- Install a replacement with the same complete designation.
- Stop and seek design-specific guidance if the old battery, internal markings, and available documentation conflict.
Generic Toyota dealership guidance describes CR2032 as a battery usually found in Toyota fobs, but that is not a RAV4 model-year specification. The same guidance tells owners to inspect the existing battery type and position before replacement, which is the more dependable instruction. Santa Cruz Toyota’s general guide describes CR2032 as usual rather than universal.
The strongest RAV4-specific example in the available evidence is a commercial JustAnswer exchange concerning a smart key described by the customer as belonging to a 2022 RAV4. The mechanic specified a CR2032 installed with the positive side facing up. The exchange also reports that the vehicle could still start while displaying a low-key-battery warning. Because this is third-party advice rather than Toyota documentation—and the platform says messages may be edited—it should be treated only as a worked example for the design described. See the third-party 2022 RAV4 smart-key exchange and its CR2032, positive-side-up instructions.
Evidence for other fobs is weaker and inconsistent. A tutorial published by Key Fobs And More identifies a CR2016 for the particular 2013–2014 RAV4 remote it depicts, but it does not establish that every factory fob from those years uses that cell. The supplied version of the source also returned an access error, further limiting its usefulness. The tutorial’s title and description identify its pictured 2013–2014 remote as a CR2016 design.
Do not treat seller fitment claims as Toyota specifications. One commercial listing assigns CR2032 to certain standard RAV4 and Hybrid smart keys while directing certain Prime or plug-in-hybrid applications to CR2450. It also shows overlapping battery and year ranges, so it is not a dependable compatibility chart. The seller’s listing contains inconsistent and overlapping fitment claims.
Do not substitute another coin cell merely because it looks similar. Match the complete printed designation, not just the diameter or part of the code.
If the old battery is missing, unreadable, badly corroded, or suspected to be incorrect, this evidence pack cannot reliably identify the replacement from the RAV4’s model year alone. Check the owner’s documentation for the exact vehicle, look for an identifiable fob part number, or ask a qualified automotive locksmith or Toyota service provider to verify the fob and battery before purchasing anything.
Identify the Fob Design and Prepare to Open It
Choose the opening method from the fob’s physical design rather than its model year alone. The available generic Toyota guidance describes two broad patterns, but it does not catalog every RAV4 fob.
Smart-key pattern
- The housing has a release switch or latch.
- Operating the release allows a metal emergency key to slide out.
- The empty key channel contains a slot used to separate the case.
- The emergency-key tip or a small flat tool fits that opening point.
External-notch remote pattern
- The fob does not use the removable-key arrangement described above.
- A noticeable notch appears along the outside edge of the case.
- A thin object engages the notch and case seam.
Toyota of Brookhaven’s generic guide describes newer Toyota fobs opened through a slot exposed by removing the hidden key and older cases opened at an external notch. It also says some designs require the circuit board to be lifted gently to expose the battery. These are general Toyota patterns, not verified instructions for every RAV4 fob. Compare the dealership guide’s newer-key-channel and older-external-notch methods.
Before applying pressure, inspect:
- Both faces of the housing
- Every outside edge
- The seam between the case halves
- The release switch, if present
- The emergency-key channel, if present
- Any deliberate external notch
- Any polarity symbols visible through or inside the case
- Any readable fob identifier or part number
Do not assume that every gap is an opening point. If the construction does not match the instructions you are following, stop and identify the design before proceeding.
What to prepare
Use only an opening tool consistent with the available guidance:
- The removable emergency key
- A small flat tool
- Another thin object that fits the intended notch
Work on a stable, well-lit surface. Keep the parts together and liquids away from the open housing.
Once the case is open, photograph the battery before moving it. The photograph should show:
- The complete battery designation
- The visible face of the cell
- Any positive or negative marking
- The cell’s position against the contacts
- The placement of the circuit board or any internal frame
Use this evidence hierarchy when deciding orientation:
- Design-specific authoritative instructions, if available
- Molded polarity markings inside the fob
- The old battery’s position as a corroborating record
The old battery’s position should not override reliable polarity markings because a previous installer may have fitted it incorrectly. If the indicators conflict, do not guess.
At the intended slot or notch, use a shallow, controlled twisting movement. Generic Toyota instructions and the third-party smart-key example support opening the case at the designated point rather than forcing an arbitrary section. Keep the opening tool away from the circuit board and battery contacts.
2022 RAV4 Smart-Key Example: CR2032 Replacement Steps
This section is limited to the smart-key design described in a third-party 2022 RAV4 exchange. It is not an official Toyota procedure and does not establish the battery or polarity for every RAV4, Hybrid, or Prime fob. The underlying exchange identifies a CR2032 installed positive side up for the smart key discussed.
The customer in that exchange reported a low-key-battery warning even though the vehicle could still start. In that particular case, continued starting did not rule out a weak fob battery.
1. Remove the emergency key
Find the release switch on the fob. Slide and hold the switch while pulling the metal emergency key out of the housing.
If the key does not move freely, confirm that the release is fully engaged. Do not treat resistance as proof that the key should be pulled harder.
2. Find the opening slot
Look inside the channel from which the emergency key was removed. Identify the slot intended to separate the housing.
This is different from an arbitrary gap around the buttons or decorative trim. If the empty channel does not contain an opening point matching this description, stop: your fob may use a different construction.
3. Separate the case
Place the emergency-key tip or a small, appropriately sized flat tool into the slot. Twist gently to start separating the case halves.
Use only enough pressure to release the housing. Once it begins to open, support both halves and continue carefully rather than driving the tool farther inside.
4. Record the installed battery
Before removing the cell, photograph its complete designation and orientation. Also check for polarity symbols molded into the holder.
The worked example specifies one battery, but the cell already fitted to your fob remains an important cross-check. If its designation or the internal markings conflict with the example, do not force the example battery into the holder. Verify the fob through exact-vehicle documentation or qualified help.
5. Remove and replace the cell
Remove the old battery without using the circuit board as a leverage point.
For the smart-key design described in the cited exchange, install a CR2032 with the positive side facing up. This is third-party guidance for that specific example, not a universal RAV4 polarity rule.
6. Check seating and contact
Before closing the case, confirm that the battery:
- Lies flat in its holder
- Occupies the same position as the removed cell
- Is held securely
- Touches the intended terminals
- Does not displace a nearby internal component
If the replacement does not fit as the original did, compare the full battery designations again.
7. Close the housing
Align the case halves and check that the circuit board, buttons, and any internal frame remain in position. Press around the perimeter until the housing closes evenly.
If a section will not close, reopen the case and check the alignment instead of overcoming the gap with extra force. Reinsert the emergency key only after the housing is fully closed.
8. Test the fob
Stand near the RAV4 and test:
- Lock
- Unlock
- Any other normal remote buttons
- The vehicle-start function applicable to the fob
Repeat the main functions rather than relying on one successful button press. If operation is intermittent, reopen the housing and inspect the battery’s position and contact points.
Older RAV4 Remote Fobs: Use the Case Notch and Verify the Cell
An older-style remote without the removable emergency-key arrangement may open at a visible notch along the outside of the case. This is a generic Toyota pattern, not a model-year guarantee.
Use the following sequence only if the fob matches that construction:
- Locate the intended notch. Inspect the entire perimeter and distinguish the deliberate opening point from a molding line or damaged area.
- Insert a thin tool shallowly. Engage the seam without reaching toward the electronics.
- Apply gentle leverage. Use only enough movement to begin separating the housing.
- Lift the case apart carefully. Keep the internal arrangement visible as the halves separate.
- Check how the battery is accessed. Some generic Toyota designs require the circuit board to be lifted gently.
- Record the cell. Photograph the complete designation, orientation, holder, and polarity markings.
- Install the identical designation. Follow reliable internal polarity markings and use the old battery’s position only as corroboration.
- Close and test the fob. Confirm that the housing closes completely before testing it near the vehicle.
If the circuit board must be lifted, move it only as needed to expose the battery. Do not place the opening tool under electronic components.
The unofficial tutorial discussed earlier identifies a CR2016 for the particular 2013–2014 RAV4 remote shown. That report is not Toyota documentation and does not establish coverage of every fob configuration supplied during those model years.
Do not transfer the positive-side-up instruction from the smart-key example to this older pattern. Use authoritative instructions or internal polarity markings for the exact fob. If those are unavailable and the old cell’s position is uncertain, stop and seek verification.
A housing that lacks the expected external notch should not be opened with this method. Reinspect the fob for a release switch, removable key, different designated opening point, or identifying number.
Reassemble and Test the Fob
Before closing any fob, complete four checks:
- Designation: Does the full code on the new cell match the verified battery?
- Polarity: Does its orientation agree with authoritative design-specific instructions or the fob’s internal markings?
- Seating: Is the cell flat, centered, and retained?
- Contact: Are the terminals touching the correct battery surfaces?
If you recorded the old battery’s position, use the photograph as a cross-check—not as the sole authority when it conflicts with clear polarity markings.
Look around the battery holder and circuit board for anything moved during replacement. If a contact is visibly out of position, do not make aggressive adjustments. Damaged or loose contacts are a reason to seek qualified repair.
Align the case halves and close the perimeter evenly. The housing should not trap or displace the circuit board, button membrane, or internal frame. If the seam remains open in one area, reopen the case and inspect the alignment.
Reinsert the mechanical emergency key when the design uses one, then test the fob near the vehicle:
- Press lock and observe the vehicle’s response.
- Press unlock and repeat the check.
- Test any other buttons normally used.
- Test the applicable vehicle-start function.
- Repeat the main functions to check for intermittent operation.
Generic Toyota dealership guidance recommends testing lock, unlock, and starting after replacement. It also suggests repositioning the battery if proper electrical contact is not being made. Toyota of Brookhaven outlines these general post-replacement checks.
A failed first test does not automatically mean that the fob requires programming or replacement. Start by reopening it and checking the work just completed: polarity, battery designation, seating, contact, and internal alignment.
A new battery cannot be guaranteed to restore every fob. Physical or water damage, failed electronics, interference, loss of synchronization, or a vehicle-side fault can produce similar symptoms.
If the RAV4 Key Fob Still Does Not Work
Troubleshoot in order, starting with the replacement itself.
1. Check battery polarity
A reversed battery will not power the fob correctly. Compare the installation with:
- Design-specific authoritative instructions
- Positive or negative markings inside the fob
- Your pre-removal photograph
Do not assume that the printed positive face always points upward. That placement applies only to the bounded smart-key example described earlier.
2. Confirm the complete battery designation
Remove the new cell and compare its full code with the verified original designation. Matching only its general appearance or diameter is not sufficient.
Check whether the cell is:
- Flat in the holder
- Beneath the intended retaining points
- Firmly positioned
- Touching the required terminals
If it does not occupy the holder as expected, verify the designation rather than forcing it into place.
3. Inspect the contacts
Look for:
- Dust or debris
- Corrosion or discoloration
- A contact bent away from the battery
- A terminal trapped beneath the cell
- Visible damage near the battery holder
- A cell that is not retained securely
Haynes recommends checking polarity and electrical contact after a Toyota fob battery change. For dirty contacts, it suggests a small brush or a cotton swab lightly moistened with rubbing alcohol; it also lists interference, synchronization loss, fob failure, and a vehicle receiver fault as possibilities rather than RAV4-specific diagnoses. See the Haynes generic Toyota troubleshooting guidance.
If cleaning is necessary, use only a small amount of alcohol and allow the area to dry before reinstalling the battery. Stop if the contacts are loose, broken, or require more than minor repositioning.
4. Check the housing and internal alignment
Confirm that the case is completely closed. If necessary, reopen it and check whether:
- The circuit board is seated as it was before
- The button membrane is aligned
- The battery holder appears intact
- No visible component has moved
- The case halves meet without obstruction
If a component is loose or visibly damaged, further opening and closing may not solve the problem.
5. Retest away from possible interference
Move away from phones, Wi-Fi routers, other car keys, and nearby electronics before testing again. This does not prove that interference caused the original fault; it simply removes one possible variable.
Begin close to the RAV4. If the fob works there, repeat the test from farther away and in another location.
For broader context on symptoms such as reduced range and warning messages, see this general guide to key-fob battery warning signs. It is not Toyota- or RAV4-specific and should not be used to select a battery.
6. Inspect for physical or water damage
Check the shell, buttons, battery area, and visible electronics for:
- Cracks or impact damage
- Sticky, damaged, or collapsed buttons
- Moisture marks
- Corrosion
- Loose internal pieces
- A case that no longer closes securely
Severe physical or water damage may require fob repair or replacement rather than another coin cell.
7. Compare another compatible fob
If another working fob is already registered to the same vehicle, test it under the same conditions.
- If the second fob works normally, the serviced fob is more likely to have an installation, contact, synchronization, or electronic problem.
- If neither fob works, interference or a vehicle receiver problem becomes more plausible.
- If both fail only in one location, local interference deserves consideration.
This is a diagnostic clue, not proof. The second fob could have its own weak battery or damage.
8. Consider faults beyond the battery
After verifying designation, polarity, seating, contacts, housing alignment, and test location, the remaining possibilities include:
- Loss of synchronization between the existing fob and vehicle
- Failure in the fob’s electronics
- Damaged buttons or internal components
- A vehicle receiver or related vehicle-side problem
These possibilities require diagnosis. Replacing the battery repeatedly will not correct damaged electronics or a vehicle-side fault.
Reprogramming, Replacement, and When to Seek Help
The available evidence does not establish a universal RAV4 rule saying reprogramming is always required—or never required—after an ordinary battery change.
Three procedures are often confused:
- Battery replacement changes the coin cell in an existing fob.
- Resynchronization restores communication between an existing fob and the vehicle.
- Replacement-fob programming registers a different fob to the vehicle. A replacement that includes a mechanical key may also require key cutting.
Do not use a random button sequence published for another Toyota model, fob, or RAV4 generation. No universal RAV4 reset sequence is supported by the available evidence.
Haynes says some Toyota models may lose synchronization after a battery change and advises consulting the applicable owner’s manual for model-specific instructions. That is generic Toyota guidance, not confirmation that every RAV4—or any particular RAV4 covered here—requires resynchronization. Haynes distinguishes synchronization and other post-replacement causes in its generic troubleshooting article.
Seek qualified help when:
- The old battery is missing, unreadable, or suspected to be incorrect.
- The fob cannot be identified confidently.
- The case does not open with gentle pressure at an identifiable opening point.
- Internal polarity markings conflict with the previous battery position.
- The battery contacts are bent, loose, or broken.
- The circuit board or another component appears damaged.
- Water has entered the housing.
- Correct battery installation does not restore reliable operation.
- Another compatible fob also fails near the vehicle.
- The existing fob appears to have lost synchronization.
- A lost or irreparably damaged fob must be replaced.
A lost or replacement fob introduces requirements separate from routine battery replacement. Generic dealership guidance notes that a replacement mechanical key may need cutting and a replacement fob may need programming to the vehicle.
A dealership is not automatically the only option. Depending on the problem, consult the owner’s manual for the exact vehicle, a qualified automotive locksmith familiar with Toyota fobs, or a Toyota service provider. If two compatible fobs fail under the same conditions, professional vehicle-side diagnosis becomes more reasonable.
The practical decision path is straightforward: identify the fob from its physical design, open it only at the intended slot or notch, verify the complete battery code and polarity, reassemble it carefully, and test every normal function. If it still fails, check installation and contacts before considering interference, synchronization, fob damage, or a vehicle receiver problem. The model-specific worked example in this article is bounded third-party guidance, not a universal RAV4 specification.
What battery does a Toyota RAV4 key fob use?
There is no adequately supported single answer for every RAV4 key fob. Generic dealership material describes one cell as common in Toyota fobs, while weaker third-party sources report different cells for particular RAV4 remotes and configurations.
Open the exact fob carefully and verify the complete designation printed on the installed battery. If the cell is missing, unreadable, or potentially incorrect, use exact-vehicle documentation, an identifiable fob part number, or qualified professional verification rather than choosing by model year alone.
How do I open a RAV4 key fob without damaging it?
First identify the intended opening point. A smart key may have a release switch, removable emergency key, and opening slot inside the empty key channel. Another remote may instead have a visible notch along the outside edge.
Use the emergency-key tip or a suitable thin tool only at that designated point. Keep the tool shallow and separate the case gently. If the fob lacks the slot or notch described by the instructions, stop rather than applying the wrong procedure.
Which way does the battery go in a Toyota RAV4 key fob?
Follow design-specific authoritative instructions first and molded polarity markings inside the fob second. Photograph the original battery before removal and use its position as a corroborating record.
For the worked smart-key example in this article, the third-party source gives a positive-side-up instruction. Do not generalize that orientation to other RAV4 fobs. If the old position and internal markings conflict, stop and verify the design.
Does a RAV4 key fob need reprogramming after a battery change?
Not necessarily, but the available evidence also does not support a universal claim that no RAV4 ever needs resynchronization. Replacing a battery, resynchronizing an existing fob, and programming a replacement fob are separate tasks.
If a correctly installed battery does not restore operation, check polarity, seating, contacts, and case alignment first. Then consult the owner’s manual for the exact vehicle or seek qualified assistance. Avoid reset sequences written for unspecified Toyota models.
Why is my RAV4 key fob still not working with a new battery?
Check the most direct causes first:
- The battery is reversed.
- Its complete designation does not match the verified original.
- The cell is loose, tilted, or incorrectly seated.
- A dirty, corroded, bent, or displaced contact is not touching it.
- An internal component moved while the case was open.
- The housing is not fully closed.
- Nearby electronics are interfering with the signal.
- The fob has physical, water, or electronic damage.
- The existing fob may have lost synchronization.
- The vehicle receiver or another vehicle-side component may have a fault.
If available, test another compatible fob under the same conditions. One working fob points more strongly toward a problem with the serviced fob; failure of both makes interference or a vehicle-side issue more plausible. If battery fitment is confirmed but operation remains unreliable, consult exact-model documentation, a qualified automotive locksmith, or a Toyota service provider.