
How to Identify Your Civic Fob, Change Its Battery, and Test the Result
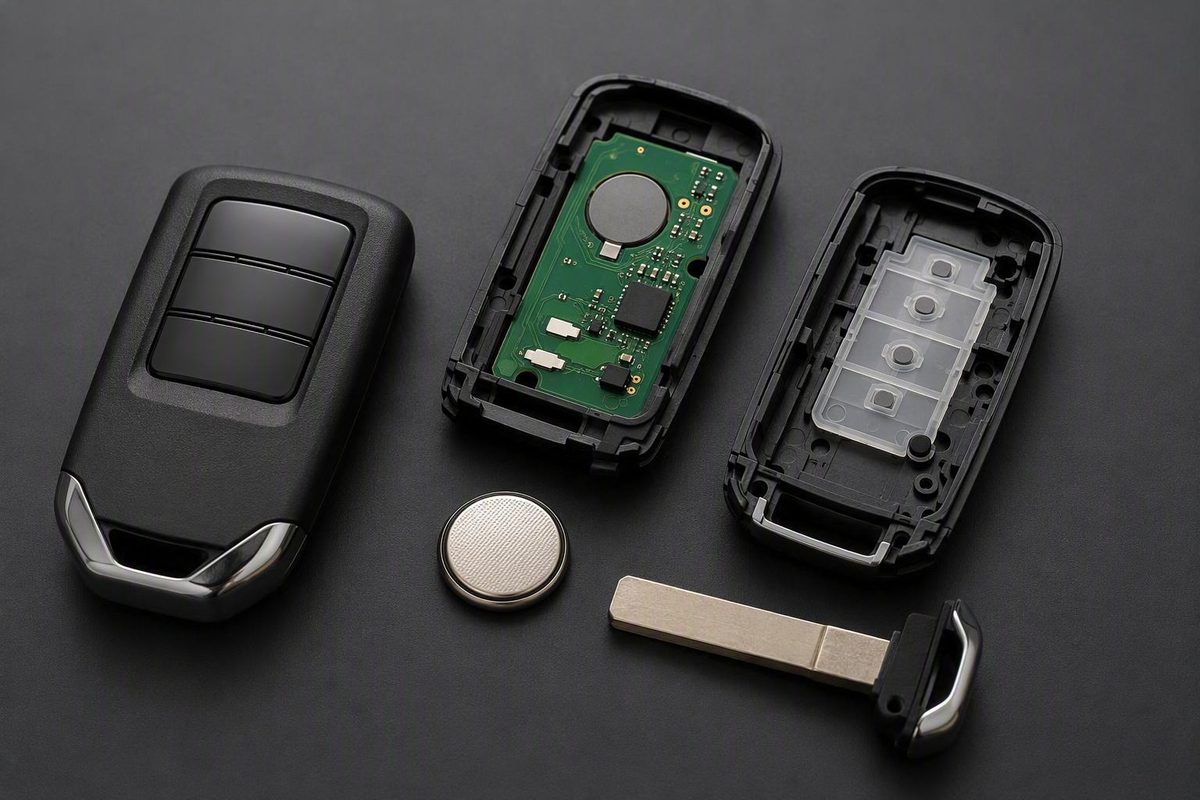
There is no single battery specification established for every Honda Civic key fob. Battery type and opening method vary with the physical remote design, and available third-party listings do not map every year, trim, market, and housing to one definitive coin cell.
The safest Honda Civic key fob battery replacement process is therefore:
- Identify the physical fob design.
- Open it using the method intended for that housing.
- Read the complete code on the installed battery.
- Record the battery’s polarity before removal.
- Install a verified, exact-code replacement.
- Reassemble the housing fully.
- Test every remote function.
- Recheck fit and contacts before assuming the fob needs programming.
Start Here: Identify the Fob and Battery Before Buying
Do not buy a battery based only on your Civic’s model year. First inspect the remote and, if necessary, open it carefully enough to identify the existing coin cell.
Check these four references:
- The complete battery code printed on the existing cell
- Any battery designation printed on the fob
- Positive (
+) and negative (–) marks inside the housing - Owner documentation applicable to your Civic’s year, market, and key design
Photograph the old battery before removing it. Make sure the image shows both the printed code and the way the cell sits in the holder. If the existing battery previously operated the remote correctly, it is a useful fitment reference. Verified documentation for the exact fob should take priority if it specifies something different.
Identify the housing style
The physical construction determines which opening instructions apply:
- Smart-key housing with a removable emergency key: A slider releases a separate metal key. Removing it may expose an opening slot.
- Integrated-key housing: The metal ignition key and remote housing form one assembly. The case may be retained by clips or a screw.
- Screw-secured housing: A visible screw must be removed before the housing halves can be separated.
Do not assume that two similar-looking Honda remotes use the same battery. A coin cell that looks approximately right is not a verified substitute for the specified code.
Qualified Honda Civic battery compatibility guide
This table is a starting point, not an official Honda fitment chart:
| Civic year or design | Provisionally listed battery | How to interpret the listing |
|---|---|---|
| Smart-key design described by a third-party demonstration as covering 2016–2021 Civics | CR2032 | Applies to the removable-emergency-key housing shown in the demonstration; the creator’s year coverage is not official confirmation for every trim, market, or fob |
| Retailer listings for different Civic key configurations | CR1616 for some 2006–2013 entries; CR1620 or CR2032 for separate 2014–2020 entries | Provisional retail data; the overlapping 2014–2020 listings do not clearly identify which exact housing uses CR1620 rather than CR2032 |
The ambiguity in the retailer data is important. A model year alone does not resolve which of the overlapping listings applies. Match the existing battery when it is known to have worked, check the housing markings, and consult documentation for the exact fob where available.
Best practice: Open first, photograph the old cell’s code and orientation, and buy second.
Signs the Battery May Be Weak—and What They Do Not Prove
Reduced operating range and slower button response are reasons to inspect the battery. If the Civic once unlocked from farther away but now requires you to stand close to the vehicle, or if a button needs repeated presses, a weakening cell is possible. DCH Kay Honda identifies slower operation and reduced range as possible weak-battery symptoms.
Those symptoms do not conclusively diagnose the battery. Similar behavior may result from:
- A correctly specified battery that is poorly seated
- Weak or dirty terminal contact
- Worn buttons
- Contamination inside the case
- Impact or moisture damage
- A shifted internal module
- Another internal fob fault
- A vehicle-side receiver problem
Partial operation is particularly informative. The battery and its contacts still deserve inspection, but so do the nonworking button, internal alignment, and possible damage.
Some fobs have an indicator light that flashes when a button is pressed. It does not prove that the remote is transmitting correctly, remains associated with the Civic, or is being received by the vehicle.
If you have a spare remote, compare both under the same conditions:
- If the spare works normally, focus on the first remote and its battery installation.
- If both have similarly poor range or fail in the same way, a vehicle-side issue becomes more relevant.
- If the questionable fob works only when the housing is squeezed, inspect battery seating, terminal contact, module position, and case condition.
This comparison is not a complete diagnosis, but it can help separate a remote-specific problem from a possible vehicle-side fault.
Tools, Setup, and Damage-Prevention Checks
Work on a clean, well-lit surface. Place a light-colored cloth or shallow tray beneath the fob so a screw, button insert, or other loose piece is easier to see and retain. Keep liquids away from the open housing.
The required tools depend on the case:
- The removable emergency key, if the housing is designed to use it for opening
- A small, non-marring pry tool that fits the intended slot
- An appropriately sized jeweler’s flathead screwdriver for a screw-secured housing
- A phone or camera
- The verified replacement battery
For a screw-secured fob, keep the driver straight and use only enough pressure to turn the screw. A poorly fitting tool can slip or strip the screw; dealership guidance likewise calls for gentle use of a jeweler’s flathead screwdriver.
For a slotted housing, apply controlled leverage only at the intended opening point. Do not force a screwdriver into an arbitrary part of the seam. Careless tool use may scratch the case, break a clip, disturb a contact, or dislodge internal parts.
As the halves begin to separate, support the button side and internal module with your fingers. Do not immediately turn the open housing upside down.
Pre-removal checklist
Before lifting out the old battery:
- [ ] Read and record the complete battery code.
- [ ] Photograph the code while the battery is installed.
- [ ] Photograph the battery’s orientation.
- [ ] Locate any internal
+and–marks. - [ ] Observe whether an edge sits beneath retaining tabs.
- [ ] Note where the contacts touch the battery.
- [ ] Confirm how the internal module sits in the housing.
- [ ] Place the emergency key or retaining screw somewhere secure.
If the printed code is obscured, remove the cell carefully and inspect both faces. Do not choose a replacement from appearance alone.
2016–2021 Demonstrated Smart-Key Procedure: CR2032
This walkthrough applies only to the smart-key housing shown in a third-party demonstration described as covering 2016–2021 Civics. That housing has a removable emergency key, an opening slot exposed after the key is removed, and two battery-retaining tabs. The demonstration specifies a CR2032 installed positive-side up, but it does not establish compatibility for every Civic fob used during those years.
1. Remove the emergency key
Find the release slider on the rear of the fob. Slide and hold the release, then pull the metal emergency key from the housing.
Suggested close-up: Show the slider in its normal and released positions, with an arrow indicating the key’s removal direction.
2. Orient the fob as demonstrated
Hold the remote with:
- The button side facing down
- The Honda-logo side facing up
- The empty emergency-key opening accessible
Keeping the button side supported helps prevent internal pieces from shifting as the case opens.
Suggested close-up: Show the button-side-down and logo-side-up orientation before leverage is applied.
3. Open the housing at the exposed slot
Place the opening tool in the slot exposed by removal of the emergency key. Apply gentle, controlled leverage until the cover starts to separate.
Suggested close-up: Identify the intended slot, the tool position, and the direction of leverage.
4. Inspect the old cell and module
Before moving anything, inspect and photograph:
- The battery code
- The battery’s polarity
- The two retaining tabs
- The contact positions
- The placement of the internal module
Lift the old battery from its accessible corner without disturbing nearby components.
Suggested close-up: Mark the battery corner used for removal and show the surrounding module and contacts.
5. Install the CR2032 positive-side up
For this demonstrated housing, install a CR2032 with the broad positive face—the side marked with a plus sign—facing up.
This battery specification and orientation apply only to the design shown. Do not transfer them to an unverified Civic fob.
Suggested close-up: Show the CR2032 marking and the + symbol before the battery is installed.
6. Engage the two retaining tabs
Slide one edge of the new battery beneath the two retaining tabs. After that edge is captured, press the opposite edge into the holder.
Do not simply place the battery on top of the tabs and force it downward.
Suggested close-up: Show both retaining tabs and the path the battery follows beneath them.
7. Check the battery and module seating
Confirm that the battery is:
- Flat
- Centered
- Secure beneath the tabs
- Touching the intended contacts
- Not rocking or sliding in the holder
Check the internal module around its edges. It should sit evenly in its original position rather than standing above the housing.
Suggested close-up: Compare a correctly seated module and battery with a raised or misaligned installation.
8. Close the case and reinstall the key
Align the housing halves without shifting the module. Press around the entire perimeter until the clips engage and the seam is even on every side.
Inspect each edge, then reinstall the emergency key until it locks into place.
Suggested close-up: Show the case clips, an even closed seam, and the fully reinserted emergency key.
How to Handle Other Civic Key-Fob Designs
If your fob does not match the demonstrated smart key, stop and identify its construction before proceeding. Do not automatically use the same battery, polarity, or opening technique.
Your primary references should be:
- The existing battery’s code and orientation, particularly if it previously worked correctly
- The construction and polarity markings inside the housing
- Documentation for the exact fob, where available
Removable-key housings
Release and remove the emergency key. Inspect the exposed area for a purpose-made slot or notch. If one is present, use controlled leverage at that point while supporting the other half of the case.
Not every removable-key housing contains the same battery holder. Once the case is open, photograph the battery and internal layout before moving anything.
Screw-fastened housings
If a screw secures the case, remove it before trying to separate the halves. Use a correctly sized jeweler’s screwdriver, keep it square to the screw head, and store the screw in a tray.
The perimeter may still be retained by clips after the screw is removed, so separate the halves gradually. Honda of Watertown’s general guide distinguishes removable-key and screw-fastened housings and advises installing the replacement in the old battery’s orientation using the internal polarity marks.
Match the verified code and polarity
Install the replacement in the same orientation as the known-working battery unless reliable documentation for the exact fob specifies otherwise. Follow the internal positive and negative marks where present.
Do not assume that the positive side always faces up. That orientation is established here only for the demonstrated smart-key housing.
Many Honda fobs use a flat, circular 3-volt battery, but that general description is not specific enough to select the required code. Honda of Watertown gives the flat, circular 3-volt description as general Honda guidance, not as a Civic-specific fitment specification.
A similarly shaped coin cell is not automatically interchangeable. Use the complete verified battery code rather than choosing by appearance.
If internal parts fall out
Stop rather than guessing at their placement. Keep each piece in the orientation in which you found it when possible, then:
- Compare the arrangement with an unopened spare of the same design.
- Consult documentation for that exact housing.
- Ask a Honda parts or service department or a qualified automotive-key specialist for assistance.
Buttons, seals, contacts, and the internal module need to return to their proper positions before the housing is closed.
Reassemble and Test Every Function
Before closing the case, complete one final inspection:
- Does the replacement battery code match the verified requirement?
- Does its orientation match the original and the internal polarity marks?
- Is the battery flat and secure?
- Is it beneath the retaining tabs, where applicable?
- Are the contacts aligned with the battery?
- Is the internal module seated evenly?
- Are the buttons and other internal pieces in their original positions?
- Has all packaging been removed from the replacement cell?
Bring the housing halves together without shifting the module or buttons. Press around the full perimeter until all clips engage. The seam should appear even, with no raised corner. Reinstall the screw or emergency key as appropriate.
Stand near the Civic and test every available function separately:
- Lock
- Unlock
- Trunk release
- Panic
- Any other equipped remote control
One successful Lock command does not establish that every button is functioning. Partial operation may reveal a problem associated with a particular button or its internal contact.
If the fob has an indicator light, observe it during each button press. A flash suggests that power is reaching part of the remote and that the input is being detected, but it does not confirm successful communication with the vehicle. Frank Leta Honda likewise notes that a flashing fob light can occur when the vehicle does not respond.
Once each function works near the car, test operation from progressively farther away in a suitable location. Look for consistent response rather than relying on a single successful press.
What to Check If the Fob Still Does Not Work
Do not jump directly to programming. Use the symptom to guide the next check.
No indicator light and no remote response
Reopen the housing and inspect these items in order:
- Battery code: Confirm the complete code rather than relying on the battery’s shape.
- Polarity: Compare the installation with your photograph and the internal marks.
- Seating: Make sure the cell is flat and beneath all applicable retaining tabs.
- Contact: Check that the intended terminals meet the battery.
- Battery covering: Confirm that no packaging film or sticker remains on the cell.
- Fit: The battery should sit securely rather than moving in the holder.
- Module position: Confirm that the internal module is seated in its original position.
- Case closure: Make sure the housing is completely and evenly closed.
If a contact is visibly bent, detached, or corroded, stop and obtain qualified assistance rather than attempting an uncertain repair.
A newly purchased battery can also be the variable. Where practical, try another known-good battery of the verified code. If you have two matching fobs, comparing them with the same compatible battery can help show whether the problem follows the battery or remains with one remote.
Indicator light flashes, but the Civic does not respond
Supported possibilities include:
- A remote-to-vehicle communication or relearning issue
- Internal fob damage
- A button or transmitter fault
- A vehicle-side receiver problem
Compare a spare remote from the same position. If the spare works, focus on the first fob. If both fail in the same way, model-specific vehicle diagnosis becomes more relevant.
The fob works only at short range
First confirm that the battery code is correct, the polarity matches, and the cell is securely seated against the contacts. If those checks pass, short range may indicate:
- Weak or intermittent contact
- A questionable replacement battery
- Internal fob damage
- A fault beyond the battery
Use a known-good compatible cell where practical before concluding that the fob or vehicle requires repair.
Only some buttons work
Partial operation does not automatically point to a battery problem. Check for:
- Worn buttons
- Dirt or residue
- Internal damage
- A displaced button membrane
- Impact or moisture damage
- Poor module alignment
If the housing or internal switches appear damaged, professional inspection is more appropriate than repeated disassembly.
Treat forum fixes as anecdotes
Owners have reported unusual behavior after battery changes, including remotes beginning to work after repeated Lock presses. They have also proposed explanations involving battery voltage, capacitor charging, temperature, and electronic resets. A Civic owner forum thread records these reports, but it does not validate them as general repair methods.
They are not a substitute for checking the verified battery code, polarity, seating, contacts, module position, and case closure.
When to seek qualified diagnosis
Professional assistance is appropriate when:
- Contacts are bent, detached, or corroded.
- Housing clips are broken.
- Internal pieces have shifted or fallen out.
- The fob has been dropped, crushed, or wet.
- The module will not sit correctly.
- The indicator flashes but the car never responds.
- Only some functions work after careful reassembly.
- Both remotes fail in the same way.
- A verified, correctly installed battery does not restore operation.
A Honda service department or qualified automotive-key specialist can help distinguish a fob fault, a communication issue, and a vehicle-side problem.
Does Battery Replacement Require Reprogramming?
Routine installation checks should come before reprogramming.
Frank Leta Honda says most Honda key fobs do not require reprogramming after a battery replacement. By contrast, Shottenkirk Honda Huntsville publishes generic programming instructions after replacement. These dealership pages conflict, and neither establishes a universal rule for every Civic year, market, or fob design.
It helps to distinguish three separate tasks:
- Battery replacement: Restores electrical power to the existing remote.
- Remote relearning or resynchronization: Uses a model-specific process to restore remote communication.
A failed battery change does not, by itself, prove that programming was erased.
Before considering relearning, confirm:
- The battery is the verified code.
- Its polarity is correct.
- It sits securely against the contacts.
- The internal module is properly aligned.
- The housing is fully closed.
- Every button has been tested.
- A spare remote has been compared, if available.
Do not use a generic ignition-and-button sequence from an unrelated Civic generation.
If the battery installation is correct but the vehicle still does not respond, consult the owner documentation for that exact Civic or seek qualified Honda or automotive-key assistance. Professional diagnosis is especially appropriate when the indicator light flashes without vehicle response, only some functions operate, or physical damage is visible.
Honda Civic Key-Fob Battery Replacement FAQ
What battery does a Honda Civic key fob take?
There is no universal battery specification established for every Honda Civic key fob. The demonstrated smart-key housing uses the battery shown in the cited compatibility table, while the retailer data lists several possibilities for other year and key configurations.
Open the fob carefully and verify the complete code on the existing battery, its original orientation, the housing markings, and any applicable owner documentation before purchasing a replacement.
Which side of the Honda Civic key-fob battery faces up?
For the demonstrated smart-key design in the procedure above, the positive face is installed upward. Do not generalize that orientation to another Civic remote.
For any other design, photograph the old battery before removal, preserve its orientation if it was known to work, and follow the positive and negative marks inside the housing.
Can I replace a Honda Civic key-fob battery myself?
Many owners can replace the battery with careful handling. First determine whether the housing opens at an emergency-key slot, uses perimeter clips, or is secured by a screw. Record the old battery’s code and orientation, support the internal parts as the case opens, and install a verified replacement.
Stop if the case requires excessive force, the screw begins to strip, a contact is damaged, or internal pieces fall out and their correct positions are unclear.
Does a Honda Civic key fob need reprogramming after a battery change?
The available dealership guidance conflicts, so there is no supported universal answer for every Civic. Check the battery code, polarity, seating, contacts, internal alignment, and case closure before assuming the remote lost its association with the vehicle.
If those items are correct and the Civic still does not respond, use documentation for the exact model and key system or obtain qualified assistance rather than trying an unverified universal sequence.
Why does the key-fob light flash when the Civic still does not respond?
The light suggests that power is reaching at least part of the fob and that the button press is being detected. It does not prove that the transmitter is functioning correctly, that the vehicle recognizes the remote, or that the vehicle-side receiver is responding.
Compare a spare fob if available. If only one remote fails, focus on that fob and its installation. If both fail in the same way, seek model-specific diagnosis of the remote-to-vehicle connection or vehicle-side system.
The reliable decision path is straightforward: identify the physical fob, verify the existing battery’s complete code, preserve its orientation, open the correct housing gently, seat the replacement securely, and test every function. As shown in the cited compatibility table and procedure, the demonstrated smart-key housing uses a CR2032 positive-side up; other Civic fobs require independent battery and polarity verification. If correct installation does not restore operation, compare a spare remote where possible and seek model-specific diagnosis instead of trying a universal programming sequence.