
How to Change Your Rogue’s Key-Fob Battery Without Damaging the Remote
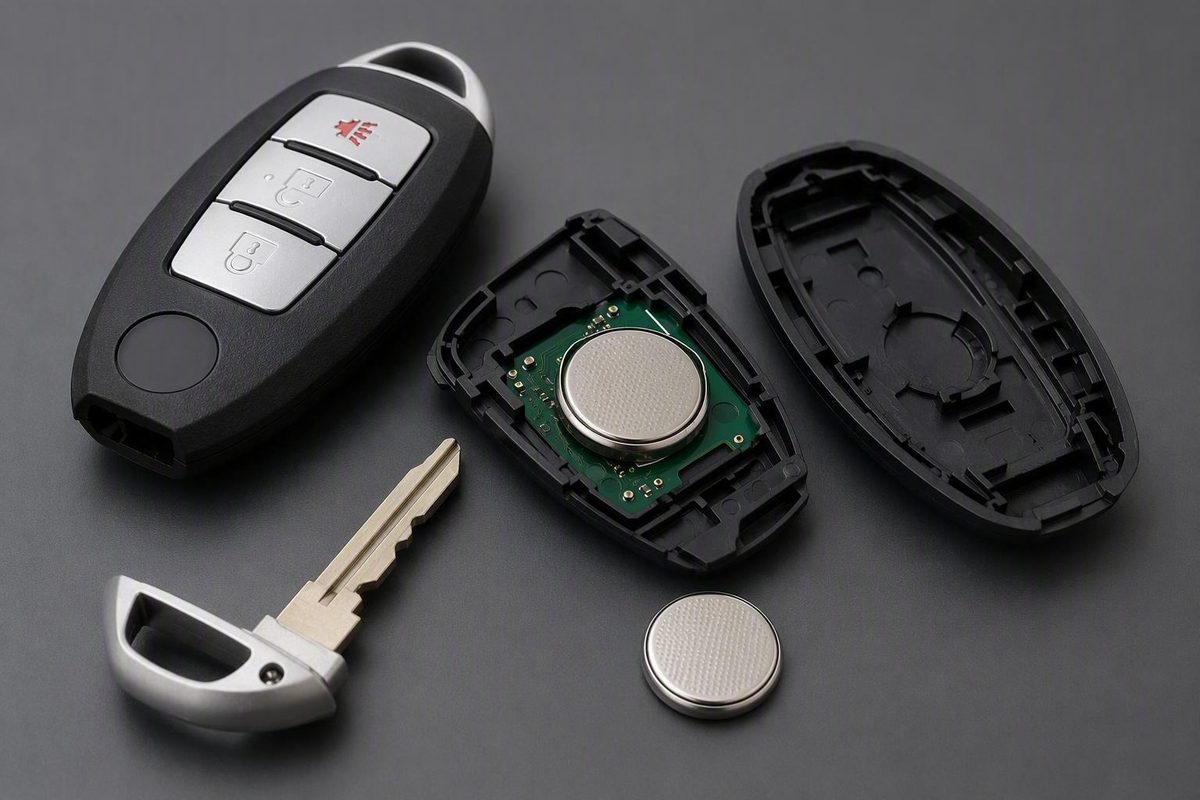
A Nissan Rogue key fob battery replacement is usually manageable at home: remove the mechanical key, open the housing carefully, record the installed coin cell and its orientation, fit an exact replacement, close the case, and test the remote.
However, Rogue key fobs vary. The battery, opening point, polarity, and emergency-start procedure cannot be assigned reliably from the vehicle name alone. This guide covers the common Nissan Intelligent Key design with a removable mechanical key and a case-opening slot near the exposed key channel. It is a verification-first guide—not a model-year compatibility chart.
Before proceeding, compare your remote with the design-specific identification aid below.
COMMON COVERED FOB DESIGN — FOR A MATCHING FOB SHAPE ONLY

      Front: buttons                 Back: release control
    ┌─────────────────┐            ┌─────────────────┐
    │   LOCK/UNLOCK   │            │                 │
    │  and optional   │            │  [release tab]  │
    │ other buttons   │            │          ↓      │
    └────────┬────────┘            └────────┬────────┘
             │ case seam                    │ case seam
             └──────────────┬───────────────┘
                            │
                    mechanical-key end
                            │
              ┌─────────────┴─────────────┐
              │ Remove hidden key first  │
              │ Opening slot is near the │
              │ exposed key channel      │
              └─────────────┬─────────────┘
                            ↑
                Insert only the edge of a
                cloth-covered flat tool;
                twist gently, not inward
Proceed only if you can identify the release tab, removable key, key channel, case seam, and intended opening slot on your own fob. Button count alone does not establish that two housings open the same way.
Related: How to Replace a Nissan Key Fob Battery Safely.
First, confirm that a weak battery is the likely problem
Common signs of a weakening key-fob battery include:
- Reduced operating range
- Intermittent lock or unlock response
- Buttons that require repeated presses
- Complete loss of button response
- A dashboard low-key-battery warning
Nissan’s parts guidance identifies repeated button presses, no response, and a “Key Battery Low” message as possible battery symptoms. It also lists “Key ID Incorrect” as a warning that can sometimes accompany a discharged battery, while noting that the message has other possible causes (Nissan key-fob battery guidance).
A weak fob battery is one possibility, but interference, physical damage, a detection-system fault, or a weak vehicle battery can produce similar behavior.
For a broader overview of how reduced range and repeated button presses can develop, see this guide to key-fob battery warning signs.
Compare the fob with your spare
If you have a second programmed fob, test it from the same location:
- Only one fob fails: Focus first on that remote’s battery, buttons, contacts, and housing.
- Both fobs fail in one location: Move away from nearby electronics or other possible interference and retest.
- Both fobs fail everywhere: Consider a vehicle-side issue, such as the receiver, sensors, wiring, software, or the vehicle’s 12-volt battery.
This comparison is not a definitive diagnosis. It simply helps distinguish a fault isolated to one remote from a broader vehicle or environmental problem.
Inspect the fob before opening it
Check for:
- Cracked or separated housing
- Buttons that stick, feel collapsed, or no longer click normally
- Evidence of liquid exposure
- Missing case sections
- A seam that will not remain closed
- Corrosion, contamination, or visibly damaged contacts
Battery replacement is a reasonable first diagnostic step when the remote still works only at close range or after repeated presses. If both remotes fail and other vehicle electronics also behave abnormally, do not assume that two fob batteries failed at the same time.
Which battery does a Nissan Rogue key fob use?
CR2032 is commonly associated with Rogue-style key fobs, and the Rogue demonstrations used for this procedure show CR2032 cells. That does not establish CR2032 as correct for every Rogue year, trim, or remote design.
Broader Nissan guidance says Nissan fobs often use either CR2025 or CR2032, depending on the design. The complete battery code should therefore be confirmed from the old cell, fob markings, or exact vehicle documentation before purchase (Nissan of Olathe’s battery-size overview).
Short answer: CR2032 is common, but verify the old cell or the manual before buying.
Use this verification order:
- Check the owner’s manual or service guide for your exact Rogue model year.
- Look for a battery designation on or inside the fob.
- Open the fob and read the complete code stamped on the installed battery.
- Check for markings molded or printed beside the battery holder.
Match the complete code. Do not assume that CR2032 and CR2025 are interchangeable merely because both are coin cells. Nissan dealership guidance notes that the required size depends on the fob design and that even a small size difference can affect operation.
A retail listing associates a CR2032 with certain 2014–2022 Rogue fobs but also tells customers to confirm the vehicle year and match the remote to the pictured design. That range is a seller’s fitment claim, not an official or comprehensive Nissan compatibility chart (seller’s Rogue fitment listing).
Before removing the old battery, take a clear photograph showing:
- The complete battery code
- The face currently visible
- Its position under the retaining tab or spring
- Any
+or−markings beside the holder
That photograph gives you a direct reference for both battery selection and installation orientation.
Tools and precautions before opening the fob
Gather:
- A replacement coin cell with a verified full code
- A small flathead screwdriver or similar small, flat tool
- A clean, soft cloth
- A clean, stable work surface
Work over a table rather than a vehicle seat, pavement, or sink. Set aside a clear place for the mechanical key and the separated case half. Good lighting will make the battery code, polarity marks, clips, and retaining features easier to inspect.
Nissan’s parts guidance recommends a replacement battery, clean cloth, and small screwdriver for most Intelligent Keys. It suggests wrapping the screwdriver with the cloth to limit cosmetic scratching, warns against touching the circuit or terminals, and advises handling the new battery by its edges (Nissan replacement and handling guidance).
Find the correct opening point
On the common design covered here, removing the mechanical key exposes a key channel at one end of the housing. The opening slot is at or near that end, beside the case seam.
Confirm all of these features before inserting a tool:
- A release switch on the back
- A removable mechanical key
- An exposed key channel after the key is removed
- A visible seam around the housing
- A deliberate slot or notch at the key-channel end
Some housings have two designated slots; others have one. Do not treat a random seam gap as an opening point, and do not copy a two-slot method onto a housing without those features.
At the correct slot:
- Cover the screwdriver tip with the cloth.
- Insert only the edge of the tool.
- Keep the tool shallow.
- Rotate or twist gently to start separating the halves.
- Move along the seam only if necessary.
Do not drive the screwdriver toward the circuit board or increase force when the housing remains locked. A Rogue-style demonstration specifically cautions against inserting the tool deeply because that can reach the electronics (design-specific opening demonstration).
If the case does not begin separating with gentle pressure, stop and verify the opening point. Once open, avoid unnecessary contact with the circuit board and battery terminals. If you find liquid, corrosion, or visible component damage, a battery-only repair may not be sufficient.
Step-by-step Nissan Rogue key-fob battery replacement
These steps apply to the common Intelligent Key identified above: a remote with a back-mounted release tab, removable mechanical key, exposed key channel, and designated opening slot near that channel.
If your fob lacks those features, stop and use the instructions for its exact housing.
1. Remove the mechanical key
Turn the fob over and find the small release switch or tab on the back. Operate the release while pulling the hidden mechanical key straight out.
Place the key somewhere secure. Removing it exposes the end of the housing and, on the covered design, the intended case-opening area.
2. Start opening the case
Find the designated slot near the exposed key channel. Wrap the end of the small flathead screwdriver in a clean cloth, place only its edge in the slot, and twist gently.
The objective is to spread the housing enough to release the first clip. Do not pry inward toward the electronics. If your matching housing has two designated slots, release them gently in turn.
3. Separate the housing slowly
Once the first section releases, use your fingers to work around the seam where possible. Continue with the tool only where necessary.
Keep the housing level and open it slowly. If one area remains attached, find the unreleased clip rather than bending the case. Note how the button membrane, circuit assembly, and any seal sit before moving anything.
4. Record the old battery
Before touching the cell:
- Read its full stamped code.
- Photograph the visible face.
- Note whether the
+symbol is visible. - Check for polarity symbols beside the holder.
- Observe which edge sits beneath a tab or spring.
If the installed code differs from the replacement you purchased, stop and obtain the exact type.
5. Remove the old cell
Lift the battery gently at its accessible edge. If it sits beneath a spring or retaining tab, note the direction in which it slides out.
Do not lever against the circuit board or bend the holder contacts. Use only enough pressure to release the battery.
6. Install the verified replacement
Hold the new battery by its edges. Slide it beneath the appropriate retaining feature and press it into the holder until it lies flat and is fully seated.
Install it in the same orientation as the old battery, provided that orientation agrees with the holder’s polarity marks.
Polarity guidance is design-specific. The two supplied Rogue-style demonstrations install a CR2032 with its positive face down on the pictured fobs (matching-fob CR2032 demonstration). By contrast, other Nissan dealership guidance describes positive-side-up installation for a different generalized arrangement (alternative Nissan fob guidance). Neither direction is universal. Copying the old battery and following the holder markings is safer than applying one “positive side up” or “positive side down” rule to every Rogue remote.
If the battery rocks, rests on top of a tab, or springs out, it is not seated correctly. Remove it and reposition it without forcing the contact.
7. Close the housing
Before joining the case halves, confirm that the battery is flat and the internal pieces remain in their original positions.
Align the housing halves and press around the perimeter until the clips engage. The seam should be even, without a bowed section or unexplained gap.
If the case will not close with light, even pressure, reopen it. Check for:
- A battery sitting above its retainer
- A shifted button membrane
- A displaced circuit assembly
- A folded or misaligned seal
- A clip that is not lined up
Do not force the housing closed around an obstruction.
8. Reinstall the mechanical key
Slide the mechanical key back into its channel until it locks securely.
Press every button and confirm that each moves normally. A button that binds or remains depressed may indicate that the cover or membrane is misaligned.
Visual checkpoint before testing
You should now be able to identify and verify:
- The back-mounted release tab
- The removable mechanical key
- The intended opening slot
- The shallow tool position
- The complete battery code
- The old cell’s orientation
- The battery holder or spring
- An evenly aligned case seam
If any of these remains uncertain, inspect the fob again before relying on it.
Test the fob and check your work
Stand near the Rogue and test lock and unlock first. Then test the other functions fitted to the remote, such as the liftgate or panic button. Check passive or proximity entry if equipped.
Inspect the assembled fob as well:
- The mechanical key is fully reinserted.
- The housing seam is evenly closed.
- No button is trapped beneath the case edge.
- The case remains closed under normal hand pressure.
- Nothing appears loose inside.
If the fob does not respond, reopen it and verify:
- The replacement’s complete battery code matches the old cell.
- Its orientation matches the original installation and holder markings.
- The cell is flat and fully beneath the retaining tabs or spring.
- The contacts reach the cell and are not visibly damaged or contaminated.
- The internal pieces and housing halves are aligned.
For intermittent operation, confirm that the replacement is fresh and undamaged. Check for dirt around the button membrane, visible contact damage, or a cracked housing that no longer secures the internal assembly.
After normal use, see whether the original low-battery warning clears. Persistent “No Key Detected” or “Key ID Incorrect” messages need broader troubleshooting because possible causes include interference, fob damage, vehicle sensors, wiring, software, or the vehicle’s 12-volt battery (Nissan key-detection troubleshooting overview).
It may restore the remote, but it does not prove that every remaining detection problem is inside the fob.
Does the Rogue key fob need reprogramming afterward?
A routine battery-only replacement normally should not require reprogramming. Nissan of Olathe states that a fob should work after its battery is changed, although that general dealership guidance does not establish the result for every Rogue model year and fob design (battery replacement and programming guidance).
Before considering programming, confirm:
- Correct complete battery code
- Correct orientation
- Full seating in the holder
- Clean, intact contacts
- Even case alignment
- Normal button movement
- Operation of the spare fob
If the spare works and the repaired fob does not, focus on the original remote. If neither fob works, investigate environmental or vehicle-side causes before paying to program or replace both.
If the fob remains unrecognized after the basic checks, consult the owner’s manual for the exact Rogue or obtain diagnosis from a qualified automotive locksmith, Nissan service department, or repair professional. Do not use an unsupported generic internet reprogramming sequence; the evidence here does not establish one procedure for every Rogue.
How to unlock and start the Rogue with a dead fob battery
To enter the vehicle:
- Find the release tab on the back of the fob.
- Operate the tab and remove the hidden mechanical key.
- Use the key in the vehicle’s mechanical door lock.
The backup-start method depends on the vehicle’s equipment. General Nissan guidance describes two arrangements:
- On a vehicle without a dedicated fob port, press the brake or clutch, hold the fob against the START/STOP button, and press the button.
- On a vehicle with a dedicated fob port, insert the fob into the port before pressing the brake or clutch and START/STOP.
The available evidence does not map those arrangements to specific Rogue years or equipment packages. Follow the procedure in the owner’s manual for your exact vehicle rather than assuming that every Rogue uses the same method (Nissan dead-fob access and starting guidance).
They do not resolve an unrelated vehicle-side no-start condition.
If the key fob still does not work after battery replacement
Use a methodical diagnostic sequence before buying a complete remote or paying for programming.
1. Verify the battery
Reopen the housing and compare the complete battery code with the original cell, fob marking, or owner’s manual.
Then check that:
- The polarity matches the original installation and holder marks.
- The cell is flat and fully seated.
- It is beneath the correct retaining feature.
- The contacts reach the battery surfaces.
- No packaging or protective sticker remains on the replacement.
2. Inspect the installation
Look for a contact pushed away from the battery, a displaced button membrane, debris near a switch, or a case half pinching an internal part.
Reassemble the housing evenly and retest near the vehicle. If changing pressure on the case changes the fob’s behavior, something may not be maintaining consistent contact or alignment. Treat that as a clue, not a definitive diagnosis.
3. Compare a spare fob
Test the spare under the same conditions:
- Spare works normally: Focus on the original fob’s battery connection, buttons, electronics, or housing.
- Both fobs fail: Move away from possible interference, then consider the vehicle receiver, antennas or sensors, wiring, software, or 12-volt battery.
- Both work only very close to the vehicle: Interference or a reception problem becomes more plausible, although weak batteries in both remotes remain possible.
Using a spare can help distinguish a single-fob problem from a vehicle-receiver issue (Nissan key-fob troubleshooting guidance).
4. Consider fob-side damage
Possible fob-side causes include:
- Worn, dirty, or displaced button components
- Bent, contaminated, or damaged battery contacts
- Moisture or corrosion
- Internal electronic damage following impact or tool insertion
- A cracked housing that no longer holds the battery securely
- Broken clips that prevent the case from closing evenly
These are possible causes rather than diagnoses. Avoid scraping contacts, bending components, or applying cleaners without the correct repair procedure and tools.
5. Consider vehicle-side and environmental causes
If a verified fresh battery is installed correctly, persistent failure may involve:
- Radio-frequency interference
- Receiver, antenna, or key-detection sensor trouble
- Vehicle software or wiring problems
- A weak vehicle 12-volt battery
- A recognition or programming problem requiring diagnosis
Use the dashboard wording as a troubleshooting clue, not a final diagnosis.
Seek professional diagnosis when the fresh battery and basic checks do not restore operation—especially when the housing is broken, corrosion is present, contacts appear damaged, or neither programmed fob works. Persistent failure does not automatically mean the complete remote needs replacement or reprogramming.
Final verification-first checklist
Before considering the job complete—or concluding that the fob has failed—confirm that you have:
- Identified the exact battery from the old cell, fob markings, or owner’s manual
- Recorded and copied the old cell’s orientation
- Removed and reinstalled the mechanical key correctly
- Confirmed that your housing matches the design covered here
- Opened only at the intended slot
- Kept the tool shallow and away from the electronics
- Handled the replacement by its edges
- Seated the battery fully against the holder contacts
- Closed the housing with an even seam
- Tested lock, unlock, other buttons, and proximity entry near the Rogue
- Compared a spare fob if the problem remains
CR2032 is common in Rogue-style remotes, but it is not universal. When battery type, polarity, housing design, or emergency starting remains uncertain, follow the owner’s manual for the exact Rogue.
Nissan Rogue key-fob battery replacement FAQs
What battery does a Nissan Rogue key fob take?
Many Rogue-style key fobs use a CR2032, but Nissan fobs may use CR2032 or CR2025, depending on their design. Verify the complete code on the installed cell, markings inside the fob, or the exact model-year owner’s manual before purchasing.
Which side of the Nissan Rogue key-fob battery faces up?
There is no safe universal answer for every Rogue fob. Matching Rogue-style demonstrations show a CR2032 with the positive face down, while other generalized Nissan instructions describe positive-side-up arrangements. Photograph the old cell before removing it and follow that orientation together with the holder’s + or − markings.
Do I have to reprogram my Nissan Rogue key fob after changing the battery?
Normally, a battery-only replacement should not require reprogramming. If the fob remains unresponsive, check the battery code, orientation, seating, contacts, housing alignment, and spare-fob operation before concluding that its programming was lost.
How do I start a Nissan Rogue when the key-fob battery is dead?
Use the hidden mechanical key for door entry. Depending on the vehicle’s equipment, the backup starting method may involve holding the fob against the START/STOP button while pressing the brake, or inserting it into a dedicated fob port. Follow the owner’s manual for the exact Rogue rather than assuming one method applies to every model.
Why does my Rogue still say “No Key Detected” after I replaced the battery?
The replacement may be the wrong type, reversed, incompletely seated, or not touching the holder contacts. If those checks pass, possible causes include fob damage, worn or dirty buttons, interference, a receiver or sensor fault, wiring or software trouble, or a weak vehicle 12-volt battery. Compare a spare fob and obtain qualified diagnosis if the warning persists.