
How to Change Your Accord Key-Fob Battery Without Guessing the Size
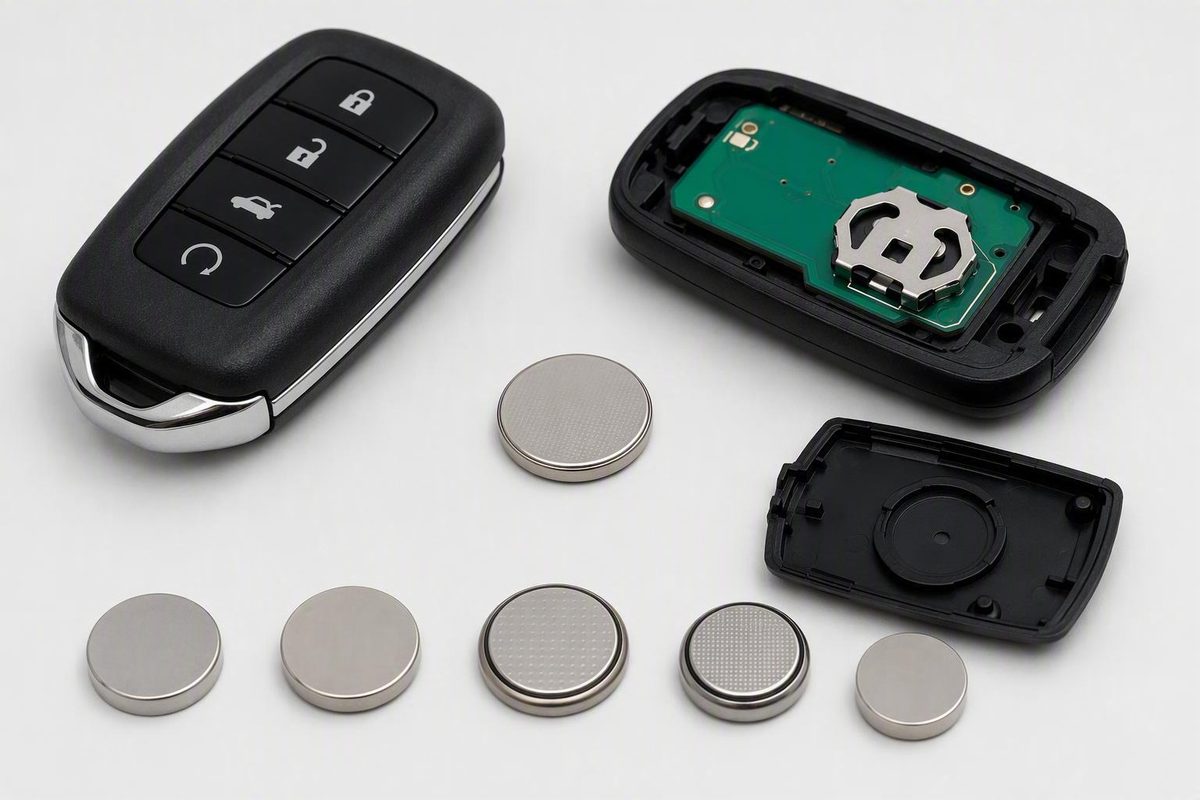
Quick answer: verify the fob before buying a battery
A CR2032 is used in demonstrations of a common Honda Accord-style smart fob, but it is not the correct battery for every Accord key. One third-party Honda smart-fob demonstration shows a removable emergency key, a snap-together housing, and a CR2032 cell. That demonstration applies only to fobs with matching construction.
The safest way to replace a car key battery in a Honda Accord is to open the key carefully, read the complete code printed on the installed coin cell, and buy an exact match. Documentation for the exact Accord year, trim, market, and key design can also be used. Either source should override a generic online chart.
Honda Accord keys can take several forms:
- A smart proximity fob with a removable emergency key and snap-together housing
- A remote-head key with buttons integrated into a key that has a visible blade
- A screw-fastened remote held together by a small case screw
The basic workflow is:
- Identify the physical style of your key or fob.
- Open it at its intended notch, seam, or screw.
- Record the complete battery code and polarity before removing the old cell.
- Obtain a fresh battery with exactly the same code.
- Install it in the same orientation without bending the contacts.
- Reassemble the housing so it closes flush.
- Reinsert the emergency key or blade, if applicable.
- Test every function your vehicle actually has.
Do not assume CR2025 and CR2032 are interchangeable. They have the same nominal voltage and diameter but different thicknesses. A cell that appears to fit may still make poor contact or place excessive pressure on the case and internal components.
Coin-cell handling precaution: Keep loose old and replacement cells away from children and pets. Do not crush, puncture, heat, or short-circuit them. Retain the original packaging and follow its emergency instructions if a cell is swallowed or inserted into the body. Store and dispose of used cells according to the package directions and applicable local rules.
The guidance below draws on third-party demonstrations, dealer articles, a retailer fitment table, and locksmith material rather than official, model-year-specific Honda instructions. That makes inspection of your own key more reliable than a broad claim that all Honda fobs use one battery.
Identify your Accord key style and confirm the battery code
Model year can narrow the possibilities, but it does not reliably identify the battery by itself. Begin with what is physically in your hand.
If the fob has a removable emergency key: Look for a release slider or push switch on the back or side. Operating it should allow a small metal key to slide out. Inspect the exposed cavity for an opening notch or slot, then look around the perimeter for a seam. This commonly indicates a snap-together smart proximity fob.
If the housing has a small screw: Treat it as a screw-fastened remote. Do not twist a coin or screwdriver into an arbitrary section of the seam. Use a correctly sized jeweler’s screwdriver so that you do not strip the screw head or damage the case. DCH Kay Honda’s generic Honda battery guide likewise distinguishes screw-fastened housings and advises preserving the old cell’s orientation.
If a conventional key blade is permanently visible: You likely have a traditional remote-head key. The buttons and electronics are integrated into or attached to the key head. It may use a different battery and opening procedure from a proximity fob, even when both keys operate Accords from a similar period.
Use this identification flow:
-
Look for a removable emergency key. - If present, inspect its cavity for the intended opening notch. - If absent, do not assume the case opens like a smart fob.
-
Look for a case screw. - If present, remove it with a correctly fitting screwdriver. - If absent, look for a molded notch or a section of the seam intended to accept a tool.
-
Determine how the blade is configured. - A fixed visible blade commonly indicates a remote-head key. - A removable emergency blade is common in smart proximity fobs. - A folding blade or replacement shell may require another procedure.
-
Compare construction rather than button layout. - Similar lock, unlock, trunk, and panic buttons do not prove that two fobs use the same cell, retainer, seal, or polarity arrangement.
Once the case is open, stop before removing anything. Take a clear photograph showing the battery’s complete code and the face that is visible. If you cannot take a photograph, write down both details—for example, “CR2032, positive face visible.” Do not record only “2032”; the complete designation matters.
Inspect the holder and case interior for + and − markings. If they are clear, they can confirm the intended orientation. If they are difficult to read, preserve the old battery’s position and use your photograph during installation.
Also note how the cell is retained:
- Does one edge sit beneath fixed hooks?
- Does the other edge press against a flexible or spring-loaded contact?
- Are there plastic retaining tabs?
- Is a rubber seal fitted around the housing?
- Are the button membrane or other loose pieces resting in one case half?
These details determine the correct removal and installation motion. Pulling straight upward may be wrong if the battery must first slide away from a fixed hook. Pressing a replacement straight down can also damage a tab if one edge is supposed to be inserted first.
Do not infer the battery from exterior resemblance alone. The old cell’s marking remains the most direct check, provided the previous battery was correctly fitted.
Honda Accord key-battery chart: a qualified reference
The table below is a third-party retailer reference, not an official Honda specification or a definitive shopping guide. Its geographic market coverage is not established. Use it only to understand why Accord model year and device type must be considered together; inspect the battery before buying.
| Accord model years in the retailer’s listing | Device label | Listed battery |
|---|---|---|
| 2003–2012 | Key | CR1616 |
| 2013–2017 | Key | CR1620 |
| 2013–2020 | Fob | CR2032 |
Microbattery’s key-fob battery finder lists CR1616 for 2003–2012 Accord keys, CR1620 for 2013–2017 Accord keys, and CR2032 for 2013–2020 entries specifically labeled as fobs.
The overlap from 2013 through 2017 likely reflects different key and smart-fob designs. It explains why a search for a phrase such as “2015 Honda Accord key battery” can produce conflicting answers intended for different physical devices.
Do not extend the table to 2021 or newer Accords. The cited lookup supports its Accord entries only through 2020. It therefore does not establish the battery used in later fobs. Owners outside the lookup’s undocumented market—or anyone with a newer, repaired, or replacement key—should rely on the installed cell, exact key documentation, or local Honda guidance.
General Honda guides also disagree. A Honda Universe dealership article broadly recommends CR2025 and describes removing a stored key, opening the housing at its notch, preserving battery orientation, and testing the remote. However, its Honda key-fob battery guide does not identify an Accord model year or exact fob design. That broad CR2025 recommendation should not override a different code printed inside your key.
Why CR2025 and CR2032 should not be substituted casually
| Battery | Nominal voltage | Diameter | Thickness |
|---|---|---|---|
| CR2025 | 3 volts | 20 mm | 2.5 mm |
| CR2032 | 3 volts | 20 mm | 3.2 mm |
CR2025 and CR2032 are both nominally 3-volt, 20 mm cells, but CR2032 is thicker. A coin-cell size comparison states that a thinner cell may make poor electrical contact, while a thicker one may stress the circuit board or crack the case.
Do not try to compensate for the wrong thickness by forcing the housing closed or aggressively reshaping the contacts. If the case does not close normally, check the battery code and the placement of the internal parts.
Use the table in this order:
- Identify whether you have a remote-head key, screw-fastened remote, or smart fob.
- Open the housing by its intended method.
- Read the old battery’s complete code.
- Compare it with exact vehicle or key documentation, if available.
- Buy the same code.
- Treat any conflicting chart as a reason to investigate—not as permission to substitute.
Replace the battery in a snap-together Accord smart fob
Follow this procedure only if your fob matches the demonstrated snap-together design with a removable emergency key, release switch, and intended opening notch.
Work on a clean, well-lit surface. Keep the buttons facing upward, or keep the case halves controlled as they separate, so that a button membrane or other loose part does not fall out unnoticed.
-
Release the emergency key. Find the switch or sliding tab, hold it in the release position, and pull out the metal key.
-
Locate the intended opening point. Inspect the cavity left by the emergency key and the surrounding seam. Use the molded notch or slot rather than inserting a tool into the middle of the case seam.
-
Insert a suitable tool. Depending on the notch, the emergency key, a coin, or another tool that fits securely may work. Keep it shallow so that it engages the housing rather than reaching toward the circuit board.
-
Twist gently. Rotate the tool only enough to begin separating the case. Once a gap appears, use your fingers to continue opening it in a controlled way.
-
Lift the halves apart carefully. Watch for a rubber perimeter seal, button membrane, or other loose component. Note how each part sits before moving it.
-
Record the old battery. Read the complete code and note which face is visible. Check for polarity symbols in the holder. If the code differs from the battery you purchased, stop and obtain an exact replacement.
-
Study the retainer. In the demonstrated CR2032 design, one edge of the cell sits beneath fixed hooks while the other rests against a spring-loaded edge and retaining tabs.
-
Remove the old cell using the holder’s intended movement. For that design, push the battery toward the spring-loaded side to free it from the fixed hooks, then lift it out. Do not pry forcefully against the plastic tabs.
-
Install the exact replacement. Slide one edge beneath the fixed hooks first. Press the opposite edge down until the retaining tabs secure it. The cell should sit level rather than resting on top of a hook or contact.
-
Confirm polarity. In this demonstrated CR2032 smart fob, the positive face marked
+points upward. The same Honda fob demonstration shows the fixed hooks, spring-loaded edge, installation sequence, and positive-side-up orientation. Follow your own holder markings and original battery position if they differ. -
Inspect the interior. Confirm that the battery is fully retained and that the contacts, rubber seal, and button membrane are in their intended positions.
-
Close the housing. Align the halves before pressing. Apply even finger pressure around the perimeter until the entire case is flush. If one corner will not close, reopen the housing and find the obstruction instead of squeezing harder.
-
Reinsert the emergency key. Slide it into its cavity until it locks, then confirm that the release switch returns normally.
Stop if substantial force is required at any stage. Excessive force can damage the tabs, contacts, or housing.
Replace the battery in a screw-fastened or remote-head key
Stop following the smart-fob procedure if your key has a retaining screw, a fixed visible blade, or substantially different construction. Its opening point, battery type, and polarity may differ.
For a screw-fastened remote:
- Select a jeweler’s screwdriver that fits the screw head closely.
- Support the key on a stable surface.
- Apply controlled pressure while loosening the screw.
- Put the screw in a small container so it cannot roll away.
- Separate the housing only at its intended seam.
- Photograph the battery code, visible face, and surrounding pieces.
- Note the positions of the buttons, membrane, electronics, and seal.
- Remove the cell without bending its contacts.
- Install the exact replacement according to the holder markings or original orientation.
- Align the case and reinstall the screw without overtightening it.
- Confirm that the housing closes evenly and every button moves normally.
Excessive pressure can also damage the housing. If the screw is already stripped or corroded, forcing it may turn a battery replacement into a case repair.
For a traditional remote-head key:
- Release, fold, or remove the blade only if the design provides a mechanism for doing so.
- Find the screw, molded notch, or intended opening seam.
- Open the case gradually while keeping the button side controlled.
- Photograph the battery and internal components.
- Read the complete cell code.
- Remove the cell in the direction allowed by its holder.
- Install an exact match in the same orientation.
- Reseat the button membrane and any other displaced pieces.
- Close the housing completely.
- Restore the blade if it was removed.
- Test the remote.
Follow the construction of the key in your hand, not an image associated only with the vehicle’s model year.
Do not apply the positive-side-up rule from the demonstrated smart fob to every remote-head key. Use the internal polarity symbols and the removed cell’s orientation. A locksmith’s Honda battery replacement overview also separates remote-head keys from smart proximity fobs and advises checking the installed battery and its orientation.
Avoid bending contacts to make a questionable cell fit. If the case will not close normally, verify the battery code and internal part placement rather than forcing it.
Reassemble and test the key before assuming it needs programming
A battery replacement is not complete when the case closes. Test the key methodically so that you can distinguish an installation problem from a separate remote or vehicle fault.
Use this post-installation checklist:
- The complete battery code matches the old cell.
- The positive and negative faces are correctly oriented.
- The cell sits flat beneath the intended hooks or tabs.
- Spring contacts touch the correct battery surfaces.
- No packaging, sticker, or insulating film remains on the cell.
- The seal, button pad, and other internal pieces are seated correctly.
- The housing is flush around its entire perimeter.
- Any retaining screw is secure but not overtightened.
- The emergency key or removable blade has been reinserted.
- Every exterior button moves and releases normally.
Begin close to the vehicle. Test only the functions present on your particular fob and Accord, which may include:
- Lock
- Unlock
- Trunk release
- Panic alarm
- Remote start
- Passive or proximity entry
- Push-button-start key detection
Check each function separately. A working lock button does not establish that the trunk release, passive-entry system, or every other feature is operating.
After the close-range test, move farther away and compare the operating range with the behavior that prompted the replacement. If operation remains intermittent, continue with installation checks rather than repeatedly pressing the buttons.
If the remote does not respond:
- Reopen the housing.
- Verify the complete battery code.
- Compare polarity with your photograph and the holder markings.
- Confirm that the cell is beneath—not on top of—the retainers.
- Check whether the spring contacts touch the battery.
- Reseat any displaced internal pieces.
- Close the case completely and test again.
- If the cell’s condition is uncertain, try another fresh battery with exactly the same code.
The available evidence does not establish that an ordinary Accord key-battery replacement normally erases the remote’s programming. Some generic dealer articles put battery replacement and ignition-cycle programming on the same page, but that does not show that changing the battery caused programming loss. Such sequences may also assume a keyed ignition and may not apply to a push-button-start Accord.
Do not jump directly to a generic reset sequence. Eliminate the reversible installation issues first: wrong cell, reversed polarity, poor contact, displaced internal parts, or a partly open case. If synchronization is eventually needed, use instructions documented for the exact Accord year and key system.
Troubleshoot an Accord key that still does not work
Reduced range, delayed response, intermittent operation, repeated button presses, or a dashboard low-key-battery warning can be consistent with a weak battery. They do not prove that the battery is the only fault. DCH Kay Honda identifies slower response and reduced range as possible weak-battery symptoms while also advising owners to verify battery type, polarity, closure, and operation in its Honda fob guide.
Start with the most reversible checks.
1. Verify the replacement cell
Read the complete code directly from the battery. Do not rely on packaging if several battery types were opened together. Confirm that it is not merely the same diameter as the old cell but the same complete code.
Check the visible face against your photograph or the polarity symbols in the holder. Make sure no sticker, clear film, or packaging remains over a terminal.
2. Check electrical contact
The cell should sit flat and remain secure. Look for:
- A spring contact trapped beneath the battery
- A contact that no longer presses against the cell
- A battery resting on top of a retaining hook
- Visible residue at a contact point
- A broken plastic tab that allows the battery to move
- A cell that shifts when the housing is handled
Do not attempt unsupported circuit-board repairs or reshape contacts aggressively. A visibly broken, detached, or badly deformed contact warrants professional assessment.
3. Inspect the case and internal pieces
Inspect the entire perimeter, not just the opening notch.
If necessary, reopen the key and look for:
- A rubber seal outside its channel
- A loose or rotated button pad
- A button trapped beneath the case edge
- A cracked housing
- Broken retaining clips
- Visible moisture or impact damage
- A cracked or displaced circuit board
Reseat only components whose original positions are clear. A battery replacement may not correct extensive physical or liquid damage.
4. Try a known-fresh exact replacement
If the installation looks correct but the fob remains unresponsive, try another fresh cell with exactly the same code. Do not substitute a different thickness as a diagnostic shortcut.
5. Compare the spare fob
A spare can help separate a fault in one remote from a possible vehicle-side problem:
-
If both fobs fail similarly: A shared vehicle-side receiver, antenna, power, or related control issue becomes more plausible.
-
If the buttons fail but the car recognizes the key for starting: Keep remote-entry operation separate from immobilizer or smart-key authorization.
The locksmith troubleshooting overview identifies contacts, buttons, synchronization, circuit-board damage, and vehicle-side receiver components as possibilities after a verified battery replacement. Its Honda fob troubleshooting guidance also recommends model-specific professional diagnosis when multiple fobs fail.
6. Separate synchronization from programming
These terms are often used interchangeably, but they can describe different issues:
- Remote synchronization concerns lock, unlock, trunk, and similar radio commands.
-
Immobilizer or transponder programming concerns whether the vehicle recognizes a key as authorized to start it.
-
A no-start condition may involve a vehicle-side fault unrelated to the replaceable coin cell.
Do not use a generic ignition on/off sequence unless it is documented for your exact keyed-ignition Accord and the specific function being restored. A procedure intended for an older remote-entry system may be irrelevant to a push-button-start model.
7. Escalate with useful information
If an exact, known-fresh battery is installed correctly and the key still fails, consult the owner’s manual or a qualified technician familiar with the Accord’s year and key system. Record:
- The Accord’s model year and trim
- Whether it has keyed ignition or push-button start
- The key’s physical style
- The installed battery code
- Which polarity face is visible
- Which functions work and which fail
- Whether the spare fob works
- Whether the vehicle starts
- Whether a dashboard warning appears
- Whether the key was dropped, wet, repaired, or replaced
This information helps distinguish battery fit and contact problems from damaged buttons, synchronization issues, smart-key registration, or vehicle-side faults.
The safest overall approach remains identification first: match the physical key design, read the installed battery code, preserve polarity, and apply gentle pressure only at the intended opening point. CR2032 is used in the demonstrated smart fob, but it is not universal. If a known-fresh exact battery does not restore operation, compare the spare and seek model-specific diagnosis rather than assuming the key must be reprogrammed.
Frequently asked questions
Does every Honda Accord key fob use a CR2032 battery?
No. A CR2032 appears in demonstrations of a common snap-together smart fob, but Accord keys are not all alike. A third-party retailer lists CR1616 for 2003–2012 Accord keys, CR1620 for 2013–2017 keys, and CR2032 for 2013–2020 entries labeled as fobs in its vehicle battery lookup.
Those overlapping listings illustrate why physical key design matters. Read the complete code on the installed battery or use documentation for the exact key. Do not extrapolate that retailer table beyond 2020.
Can I use a CR2025 instead of a CR2032 in an Accord key fob?
Not simply because both belong to the same coin-cell family. CR2025 and CR2032 are nominally 3 volts and 20 mm in diameter, but CR2025 is 2.5 mm thick and CR2032 is 3.2 mm thick. A thinner cell may make poor contact, while a thicker one may stress the board or case, according to the cited coin-cell fitment guide.
Install the exact code shown on the removed cell or supported by documentation for the exact key.
Which side of the new Honda Accord key-fob battery faces up?
On the demonstrated snap-together CR2032 smart fob, the positive side marked + faces upward. The demonstration of that specific holder should not be generalized to every Accord key.
Photograph the old battery before removal and check the holder for polarity markings. Follow your own fob if its arrangement differs.
Does changing an Accord key-fob battery require reprogramming?
The available evidence does not establish routine battery replacement as something that normally erases an Accord fob’s programming. If the remote fails immediately afterward, first verify the battery code, polarity, contact, internal-part placement, and housing closure.
Do not use a generic ignition-cycle procedure unless it is documented for your exact Accord and key system. Instructions written for keyed-ignition Hondas may not apply to push-button-start vehicles.
Why is my Honda Accord key fob still not working after a new battery?
First check for the wrong battery code, reversed polarity, poor contact, packaging left on the cell, a displaced seal or button pad, or an incompletely closed case. Then try a known-fresh cell with exactly the same code.
If the installation is correct, compare a spare fob. A working spare points toward a fault in the first remote. Two fobs failing in the same way make a vehicle-side receiver, antenna, power, or related control problem more plausible. Seek diagnosis specific to the Accord’s year and key system rather than assuming reprogramming is automatically required.