
How to Change Your Jetta Fob Battery Without Guessing the Size
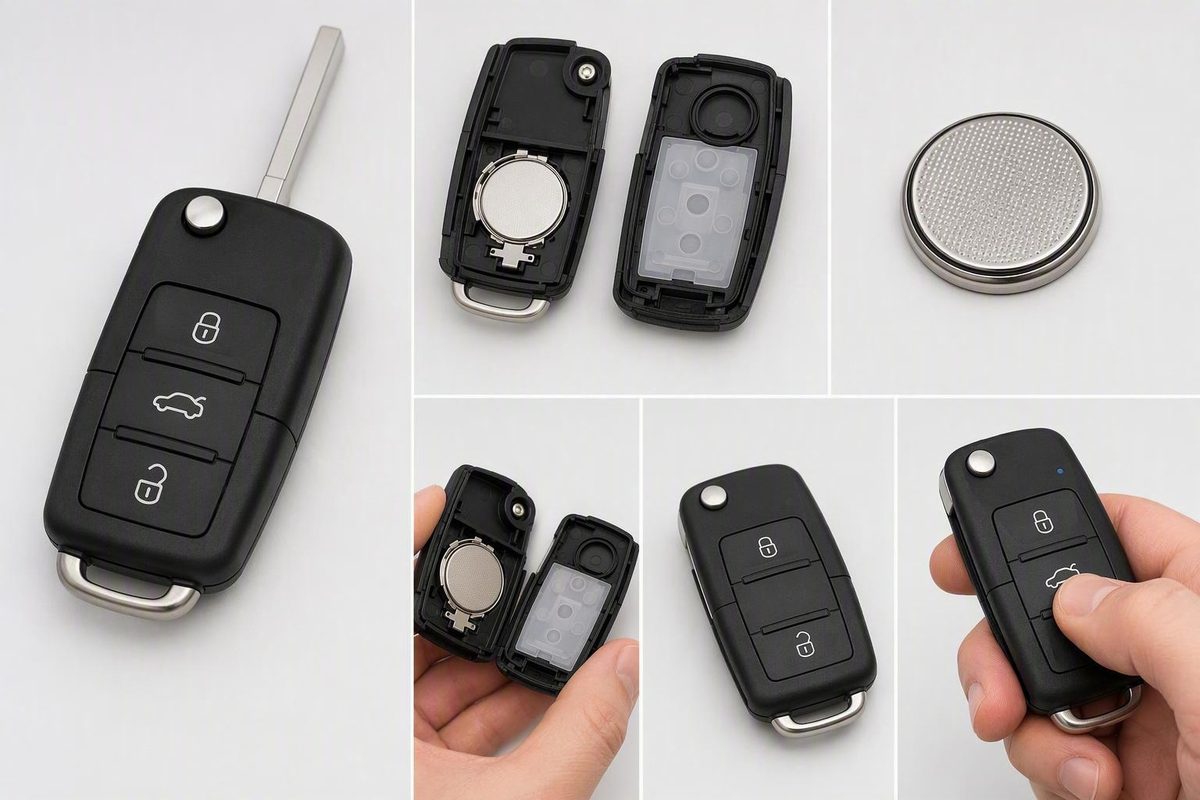
Match the complete battery code, preserve its orientation, open only at the intended seam and test every button after reassembly.
For a safe VW Jetta key fob battery replacement, first identify the full code stamped on the installed coin cell and record which side faces up. Replace it with the same battery type in the same orientation, opening the housing only at its intended seam or notch. Do not assume every Jetta fob uses a CR2032 or opens the same way.
Quick answer: identify the battery before opening the package
Battery size and case design can vary by Jetta model year and fob type. Carefully open the fob and read the battery number before buying a replacement—or at least before unsealing its package.
The iFixit guide for the 2009 Volkswagen Jetta fob shown specifies a CR2032 3-volt battery. That supports the battery choice for the pictured design, not every 2009 fob variant or every Volkswagen Jetta.
| Your situation | Battery choice | What to do |
|---|---|---|
| Fob matches the documented 2009 design | CR2032 3V | Compare the replacement with the removed cell |
| Any other year or unidentified fob | Not established by year alone | Read the installed battery code or consult the applicable owner’s manual |
| Battery code cannot be identified | Unknown | Do not guess; find model-specific documentation or qualified help |
Commercial guidance does not provide a dependable year-by-year fitment chart. AutohausAZ says most newer Jetta fobs use CR2032 cells while some older versions use CR2025, but it also advises checking the number inside the fob or in the vehicle manual.
A separate Capitol Volkswagen guide says older, simple key-style Volkswagen fobs are most likely to use CR1632, while many pod-style retractable-key fobs are most likely to use CR2032. Because that guidance covers Volkswagen fobs generally and uses qualified language, it should not be treated as Jetta-specific fitment information.
The practical rule is simple: follow the complete code stamped on the old battery.
Check whether a weak battery is the likely problem
Before opening the case, test every remote function available on your fob:
- Lock
- Unlock
- Trunk release
- Panic
- Remote start or other equipped functions
Note which buttons work, whether they require repeated presses and how close you must stand to the car. This gives you a useful before-and-after comparison.
AutohausAZ lists reduced operating range, intermittent response, a weak or inactive fob indicator and a key-not-detected warning as possible signs of a fading battery. These symptoms make battery replacement a reasonable first step, but they do not prove the cell is the only fault.
For the specific 2009 fob covered by the iFixit guide, the red indicator provides a preliminary check. The guide says it flashes when the battery still has power and suggests replacement when no red light appears.
If you have a spare fob, test it from the same location under the same conditions. Neither comparison provides a definitive diagnosis by itself.
Gather the battery and a case-safe pry tool
Prepare the following before opening the fob:
- An exact like-for-like replacement coin cell
- A small flat-head screwdriver or another tool that fits the intended notch
- A small piece of tape for a metal screwdriver
- A phone camera
Capitol Volkswagen recommends a small flat-head screwdriver and suggests covering it with tape to reduce scratching. Whatever tool you use, it should fit the opening point without being driven deeply into the housing.
Work on a clean, stable and well-lit surface where the battery and case pieces are easy to see. Before prying, inspect the full edge of the housing and the area around the mechanical key so that you do not mistake a decorative joint for the opening seam.
Stop if the housing flexes heavily, a clip starts to crack or substantial force is required.
Replace the Jetta key-fob battery step by step
Because release points differ among fob designs, treat these steps as a cautious framework. Do not force an unfamiliar housing to match a guide for another key.
-
Release or remove the mechanical key if required. On a flip-key design, press the release button so the blade opens.
-
Find the intended seam or notch. Inspect the perimeter and the area exposed by the mechanical key. For the 2009 Jetta fob documented by iFixit, the flat-head screwdriver enters the notch where the key separates into two parts. Do not transfer that opening point to a different housing unless the design matches.
-
Separate the housing gently. Insert only enough of the tool to engage the notch, then twist carefully to begin separating the case. If necessary, work gradually along the intended seam. Avoid pushing the tool toward the electronics or levering hard against internal components.
-
Photograph the installed battery. Before moving the cell, take a clear photograph showing its orientation. Capture the stamped code if it is visible. If the code faces down, note which side is currently facing up before lifting the battery.
-
Remove the old cell. Lift it from the designated edge without bending the retaining contacts. Avoid unnecessary contact with the circuit board, button pad or other internal parts.
-
Compare the old and new batteries. Confirm that the full stamped code matches. If the removed cell says CR2032, use CR2032; do not substitute a CR2025 or CR1632 based on appearance alone.
-
Install the replacement in the recorded orientation. Use your photograph or model-specific documentation. Capitol Volkswagen specifies positive-side down for the CR2032 installation illustrated in its general guide, but that direction is not established for every Jetta fob.
-
Confirm that the cell is seated correctly. It should lie flat, remain firmly held and visibly touch the intended contacts. Do not bend, reshape or attempt to repair the contacts.
-
Close the housing without forcing it. Align the case halves and press around the perimeter until the clips engage. If the housing will not close normally, reopen it and check the battery type, orientation and internal alignment.
-
Test every remote function. Check lock, unlock, trunk release, panic and any other equipped controls. Compare the response and range with your observations before the replacement.
Programming and resynchronization are not the same thing
The AutohausAZ Jetta guidance says battery replacement usually does not require reprogramming. That is broad retailer guidance, however, rather than a guarantee for every Jetta year, fob design or underlying fault.
Programming establishes the key’s relationship with the vehicle. Resynchronization attempts to restore remote communication when that relationship already exists but operation has been disrupted. A battery change does not automatically mean that the key has lost its programming.
Before investigating either process, verify that:
- The replacement battery code exactly matches the removed cell
- Its orientation matches the original installation
- The battery lies flat and is held firmly
- It visibly meets the intended contacts without the contacts being altered
- The case is aligned and completely closed
Do not treat a generic sequence involving the door lock and button presses as an official procedure for every Volkswagen. If a correctly assembled fob remains unresponsive, consult the owner’s manual for the exact Jetta year and key design before attempting resynchronization.
Some unresolved cases may require diagnosis or programming by a Volkswagen dealer or qualified automotive locksmith. That possibility does not mean professional programming should be the first response to a failed battery change.
If the new battery does not fix the fob
Work through the installation checks before assuming the key must be programmed or replaced.
| Observation | First check | Next step |
|---|---|---|
| No response at all | Confirm battery code, orientation, seating and complete case closure; verify that the cell is firmly held against the intended contacts without bending them | Consult the exact owner’s manual for applicable resynchronization guidance |
| Operation is intermittent | Check whether the battery is loose or a contact is visibly displaced | Stop if a contact or internal component appears damaged |
| Some buttons work but others fail | Compare each button with the test performed before replacement | Consider worn buttons or internal fob damage rather than assuming the new battery is defective |
| Main fob fails but spare works | Retest both from the same location | An isolated main-fob problem is plausible; seek diagnosis if installation is correct |
| Both fobs fail | Check vehicle behavior and model-specific documentation | Investigate a possible vehicle-side problem without assuming a particular component has failed |
| Case will not close | Check battery code, thickness, orientation and internal alignment | Do not force it; confirm the correct battery and opening procedure |
Do not reshape contacts or attempt circuit-board repairs without the appropriate expertise.
Stop DIY work if the housing will not open normally, clips are broken or you find corrosion, liquid residue or visible electronic damage. Qualified help is also appropriate when a confirmed correct battery, properly installed in the original orientation, does not restore operation.
The verification-first approach avoids most preventable mistakes: match the complete battery code, preserve its orientation, open the housing only at the intended seam and test every button after reassembly. If those checks fail, use the owner’s manual for the exact Jetta or seek qualified help instead of forcing the case, guessing at a resynchronization sequence or immediately paying for programming that may not be necessary.