
Change Your Santa Fe Key-Fob Battery Without Damaging the Case
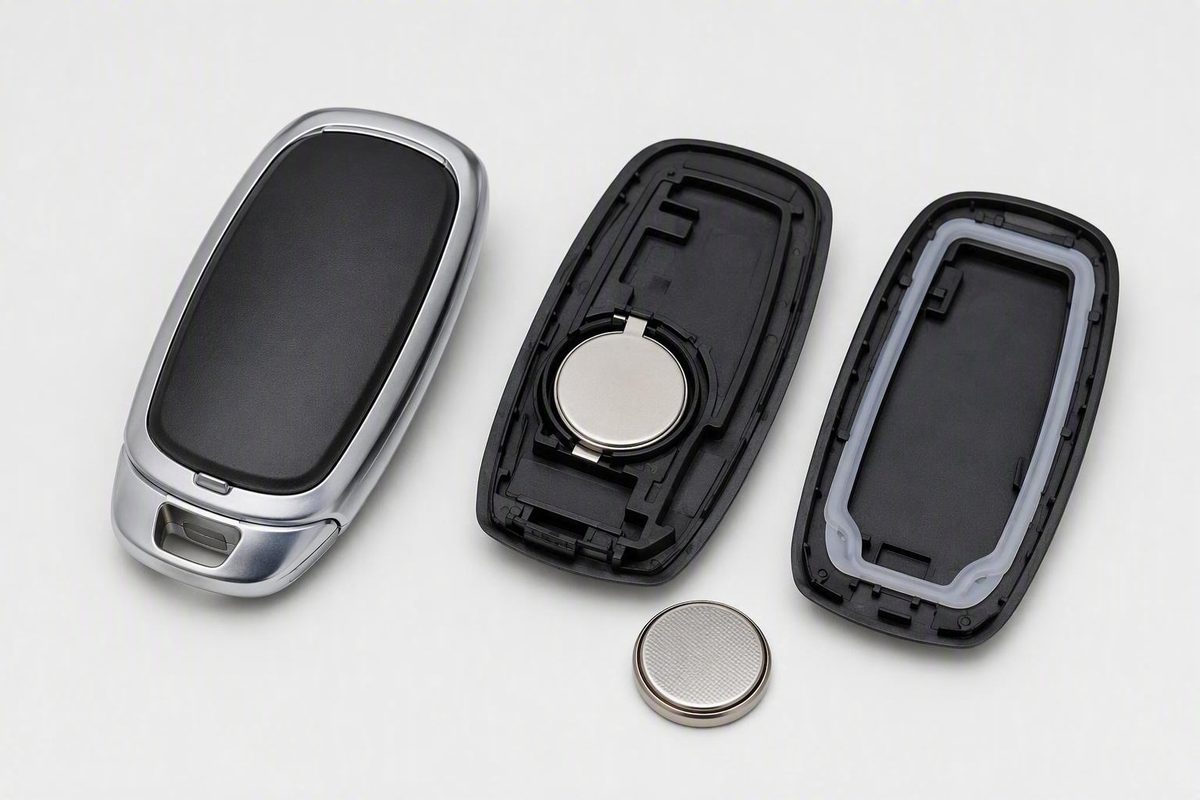
Match the housing before opening it. The documented 2021–2023 push-button fob uses a CR2032, installed with the positive side up.
A Hyundai Santa Fe key fob battery replacement starts with identifying the fob—not merely the vehicle’s model year.
The complete procedure in this guide applies to the specific push-button-start fob demonstrated for 2021–2023 Santa Fe models. It has a removable emergency key, a release button on the rear, and a rear cover opened from inside the vacated key slot. Other Santa Fe fobs may require a different battery or opening method.
Before buying a battery or using a tool:
- Match your fob to the physical descriptions below.
- Verify the code printed on the installed battery.
- Record the battery’s original orientation.
- Use only the intended opening point.
- Stop if the housing does not release with gentle pressure.
Follow all handling, emergency, and disposal instructions printed on the battery packaging.
Start by matching the model year and physical key-fob design
Do not select instructions from the model year alone.
Place the fob on a well-lit surface and inspect the complete housing.
The documented 2021–2023 push-button-start design has:
- A mechanical emergency key stored in the bottom of the housing
- A release button on the rear
- A removable rear cover rather than two equal case halves
- A cover-opening point inside the slot exposed when the emergency key is removed
A third-party PYR Automotive demonstration identifies the shown fob as a 2021–2023 Santa Fe push-button-start design. It removes the emergency key and uses the end of that key inside the vacated slot to release the cover. The demonstrated fob contains a CR2032 installed with its positive side facing up. These details apply to the fob shown, not necessarily every remote supplied with vehicles from those model years. Watch the model-specific Santa Fe demonstration.
An older-style Hyundai housing may instead have:
- A defined notch along one side
-
Two housing sections that separate at that notch
-
A design intended to be opened with a coin or small flat-blade screwdriver
This is generic Hyundai guidance rather than confirmation that every older Santa Fe uses such a housing. A Hyundai dealership guide describes removable-key and side-notch designs while noting that fobs differ between vehicles. Compare the generic Hyundai opening methods.
A separate Santa Fe tutorial is labeled for 2012–2015 models. Its supplied page calls the task beginner-level, estimates approximately five minutes, and lists a flat-head screwdriver. However, the written material does not identify the battery, polarity, or complete procedure. It cannot establish that all 2012–2015 fobs share one specification. Review the limited 2012–2015 tutorial description.
Use this selector before proceeding:
- Rear release button, removable emergency key, and opening point inside the key slot: Compare the housing with the documented push-button-start procedure below.
- Clearly molded side notch: Use only the conservative side-notch guidance in this article.
- Neither design matches: Stop and consult the owner’s manual for the vehicle’s model year and market, or ask a Hyundai service provider to identify the remote.
- Case is cracked, distorted, previously glued, or already separating: Do not treat it as an ordinary battery replacement.
When seeking help, provide the vehicle’s model year, market, ignition type, and photographs of both sides of the fob. Record any part number or identifying text visible on the exterior, but do not force the housing open merely to look for one.
A seam is not automatically a tool-engagement point. If the fob does not match either described design, do not insert a screwdriver or key into an arbitrary gap.
Confirm the battery before buying or removing anything
The fob covered by the model-specific procedure uses a CR2032. Generic dealership guidance says most Hyundai key fobs use CR2032 batteries, but “most” does not mean every Santa Fe remote. The installed cell and applicable vehicle documentation should still be checked. Huffines Hyundai Plano outlines the generic battery-identification and orientation checks.
Treat the code stamped on the installed battery as a useful reference, not infallible proof. Cross-check the code with model-specific documentation if the battery fits poorly, the case will not close naturally, or there is evidence of an earlier replacement.
Do not substitute a different coin-cell model merely because it appears to have the same diameter. Install only the verified specification.
Before removing the old battery, take a clear photograph showing:
- The complete stamped battery code
- The side facing outward
- The location of the
+marking - How the cell fits into its holder
- The positions of the retaining contacts or tabs
This reference is especially useful if the cell turns over during removal.
For any fob not covered by the demonstrated procedure, match the old battery’s orientation or follow documentation for the exact design. Do not transfer a polarity instruction from one housing to another.
Prepare:
- A verified replacement coin cell
- A clean, stable work surface
- Bright lighting
- A small tray or clear area for the emergency key and old cell
- A phone or camera
- A coin or appropriately sized flat-blade screwdriver only for a confirmed side-notch design
Work over a table so the emergency key, battery, and cover remain controlled. Keep both coin cells in secure packaging or a closed container whenever they are not being installed, and follow the battery manufacturer’s handling and disposal directions.
Replace the battery in the documented 2021–2023 push-button-start fob
This procedure applies only to the specific push-button-start design described above. Before proceeding, confirm that the fob has:
- A release button on the back
- An emergency key that pulls out from the bottom
- A rear cover-opening point inside the slot left by the key
If any of those features differ, do not adapt these steps by guessing.
-
Locate the rear release button. Hold the fob securely and find the button that retains the mechanical emergency key.
-
Press the release and remove the emergency key. Keep the release depressed while pulling the key straight out from the bottom of the housing.
-
Insert only the end of the emergency key into the vacated slot. Use the intended opening point inside that slot. Do not push the key deeply into the housing.
-
Apply gentle upward leverage. Lift only until the rear cover starts to release. Once a small gap appears, remove the key and finish lifting the cover by hand. Do not continue twisting after the cover has started to separate.
-
Record the battery position, then slide out the old cell. In the demonstrated housing, the battery is directly accessible; the procedure does not call for lifting the circuit board. Note how the cell sits in its holder and slide it out without disturbing the contacts.
-
Install a verified CR2032 with the positive side up. In this demonstrated fob, the face marked with the
+symbol points upward. Slide the battery fully into its holder and check that it sits flat and at the same depth as the original. The battery type, polarity, and direct-access procedure are shown in the PYR Automotive replacement sequence. -
Replace the rear cover and emergency key. Align the cover before pressing it into place. Apply even pressure around the perimeter, then slide the emergency key back into its storage position until it is retained.
During the procedure:
- Do not insert the emergency key farther than needed to engage the opening point.
- Do not twist aggressively.
- Do not pry elsewhere along the exterior seam.
- Do not lift the circuit board; that is not part of the demonstrated procedure.
- Do not bend or repeatedly adjust the battery contacts.
- Do not force the cover closed if the battery or cover appears misaligned.
Before closing the housing, confirm that the battery is level, fully seated, and retained in the same position as the old cell.
Open an older side-notch fob carefully
The following is generic Hyundai guidance for a side-notch housing. It is not a confirmed procedure for every older Santa Fe and does not establish the correct battery or polarity for a particular model year.
First, find a clearly molded notch intended to accept a tool. Examine the entire edge under good lighting. Do not choose a random point along the seam.
Once the notch is positively identified:
- Place the edge of a coin or the tip of a small, properly fitting flat-blade screwdriver in the notch.
- Keep the tool centered rather than dragging it along the seam.
- Twist gently to begin separating the housing sections.
- Reduce pressure as soon as a gap appears.
- Work the housing apart slowly.
- Stop if modest pressure does not release it.
Generic Hyundai dealership guidance describes a coin or flat-blade screwdriver as suitable for some side-notch fobs while also warning that the procedure varies by year and model. See the side-notch guidance from Hyundai of Milledgeville.
If the case flexes without releasing, reassess whether you have identified the correct opening point. Do not increase force simply because the housing has not opened.
Once it is open, leave the battery in place long enough to:
- Photograph its installed position
- Record the complete stamped code
- Note which face points outward
- Identify how it sits against the terminals
- Check whether a tab, clip, or sliding holder retains it
Remove the battery only through the access provided by the housing. Install a matching replacement in the same orientation and confirm that it is flat and in contact with the intended terminals.
Some generic Hyundai instructions mention lifting the circuit board to reach the battery, but that is not a universal step. If the battery is already accessible, leave the board in place. If access appears to require moving electronics and you cannot verify that procedure for the exact fob, stop and obtain design-specific guidance.
Do not infer a battery code or polarity from the existence of the 2012–2015 tutorial. Its available written description provides a tool, time estimate, and difficulty rating, but not enough procedural information to establish either specification.
To close a side-notch fob, align both housing sections before pressing around the perimeter. If the seam does not meet evenly, reopen the case and inspect the battery, buttons, membrane, and clips rather than applying more pressure.
Reassemble the fob and test every equipped function
Before closing either housing style, verify:
- Battery code: The replacement matches the verified specification.
- Polarity: It follows the documented orientation for that housing or matches the original cell.
- Seating: The battery lies flat and is fully inserted.
- Contact: It meets the terminals without an obviously displaced contact.
Align the cover or case halves in their natural position. Engage any fixed tabs first, then press around the perimeter in stages. Do not rely on one hard squeeze in the center.
If the fob includes a mechanical emergency key, reinstall it and confirm that the release mechanism retains it. Check the perimeter for an uneven seam, then press each button once.
Test the fob methodically:
- Stand a few feet from the Santa Fe.
- Test lock.
- Test unlock.
- Test the panic button, if equipped and safe to do so.
- Test the liftgate release, if equipped.
- Check proximity entry, if equipped.
- Confirm the normal vehicle-start function, if equipped.
Generic dealership guidance recommends beginning the post-replacement test from a few feet away. See the post-installation testing guidance.
Once the fob works nearby, increase the distance gradually. Surroundings and interference can affect operation, so do not use an assumed maximum range as the only pass-or-fail standard.
If every function works except one button, the battery may not be the only issue. The individual button, internal switch, membrane, or fob circuitry may need diagnosis.
If the case will not close:
- Reopen it rather than clamping or striking it.
- Verify that the battery is fully seated.
- Check whether a contact has moved.
- Inspect the button membrane and emergency-key components.
- Realign the clips.
- Press around the perimeter evenly.
Do not assume the fob needs reprogramming
The reviewed evidence does not establish a universal requirement to reprogram a previously paired Santa Fe fob after an ordinary battery replacement.
Generic dealership sources conflict. Suntrup Hyundai South broadly says a fob must be programmed after battery replacement, but its instructions are generic and are not tied to a particular Santa Fe year or push-button-start design.
Hyundai of Milledgeville makes a similarly broad programming statement and gives an ACC-ignition sequence, while also acknowledging that replacement procedures vary by model and year. That sequence should not be treated as universal Santa Fe guidance because its applicability to push-button-start systems and individual configurations is not established.
By contrast, Huffines Hyundai Plano says only some fobs may need resetting. These sources do not establish one rule for every Santa Fe.
Keep the tasks distinct:
- Battery replacement restores power to a fob already associated with the vehicle.
- Programming or pairing associates a new, replacement, or previously unpaired fob with the vehicle.
- Resetting or resynchronization may apply in some circumstances, but the correct procedure depends on the vehicle and fob.
This guide covers battery replacement in a previously working fob. It does not provide instructions for pairing a new remote.
If the fob stops responding immediately after the battery change, check the installation first:
- Confirm the battery code.
- Verify polarity.
- Check that the battery is fully seated.
- Inspect its contact with the terminals.
- Close the housing completely.
- Test from nearby in another location.
- If the replacement’s condition is uncertain, try another fresh battery of the exact verified type.
Only after those checks should synchronization become a leading possibility. If the installation is correct but the fob remains unresponsive, consult the applicable owner’s manual or a Hyundai service provider for model-specific diagnosis.
Troubleshoot a fob that still does not work
A new battery does not prove that the cell is installed correctly, and an unresponsive fob does not automatically mean its programming has been erased. Work through the visible installation issues first.
1. Confirm the battery code
Compare the replacement’s complete code with the photograph of the original. If the old battery was discarded or appeared to fit poorly, check documentation for the exact vehicle and fob rather than selecting a similar-looking cell.
2. Confirm polarity
Compare the new cell with the original photograph or the documented procedure for that exact housing. A cell can appear properly seated even when its orientation is wrong.
3. Check that the battery is fully seated
View the cell from the side. It should lie level rather than resting above a retaining edge. If it slides into a holder, make sure it reaches the same position as the original.
4. Inspect terminal contact
Without removing the electronics, look for a contact that is visibly bent, flattened, displaced, or caught beneath the wrong edge of the battery. Do not repeatedly bend a contact. If correction requires electronic disassembly, seek professional help.
5. Verify complete case closure
Check for a consistent seam around the housing. If the case resists closure, reopen it and correct the battery or internal alignment instead of forcing it shut.
6. Try another verified fresh battery
If the condition of the replacement is uncertain, test another cell of the exact verified type. Do not switch to a different model number as a troubleshooting shortcut.
7. Inspect the fob’s condition
Look for:
- A cracked or distorted housing
- Moisture or residue
- Corrosion or discoloration
- A loose battery holder
- Bent contacts
- Worn, stuck, soft, or “mushy” buttons
- Visible circuit damage
- Evidence of impact or crushing
Do not attempt invasive circuit-board repair based on visual suspicion alone.
8. Move away from possible interference
Test the fob in another location, away from nearby electronic equipment. Generic Hyundai troubleshooting guidance identifies interference, worn buttons, circuit damage, lost synchronization, and vehicle-receiver trouble as possible causes of continued failure. These are possibilities rather than a diagnosis of a particular Santa Fe. Review the overview of non-battery fob faults.
9. Compare a spare paired fob
If another remote is already paired with the same Santa Fe, test it under the same conditions.
- If the spare works, the first fob deserves closer inspection.
- If both fail, vehicle-side diagnosis may be appropriate.
- If both work inconsistently only in one location, interference becomes more plausible.
This comparison helps narrow the problem but does not identify the failed component by itself.
10. Escalate when the basic checks are exhausted
Lost synchronization and a vehicle receiver fault remain possible, but neither should be assumed before checking the battery installation. Seek model-specific diagnosis when:
- A verified, correctly installed battery does not restore operation.
- The fob has physical or moisture damage.
- A contact or battery holder appears damaged.
- Multiple paired fobs fail.
- Accessing the battery would require unverified electronic disassembly.
On designs with a hidden mechanical key, that key may provide manual door access. Consult the applicable Santa Fe owner’s manual for the correct lock-cylinder access and emergency-start procedure. Do not assume that a generic emergency-start method applies to every Santa Fe.
The safe replacement rule
Use three rules for any Santa Fe key fob:
- Match the instructions to the physical housing.
- Verify and record the old battery’s code and orientation.
- Use gentle leverage only at the intended opening point.
For the push-button-start housing covered by the model-specific procedure, follow the documented CR2032 installation and polarity in Step 6. For any different housing, preserve the installed cell’s details and obtain design-specific guidance. If correct installation does not restore operation, troubleshoot systematically rather than assuming that reprogramming is automatically required.
Frequently asked questions
What battery does a Hyundai Santa Fe key fob take?
It depends on the physical fob. The push-button-start design covered by this guide uses a CR2032, but generic Hyundai sources describe CR2032 as the battery used by most—not all—Hyundai fobs.
Check the code printed on the installed battery and, where necessary, cross-check it against documentation for the exact fob. Do not rely only on the Santa Fe model year or the apparent diameter of the cell.
Which side of the CR2032 faces up in a 2021–2023 Santa Fe key fob?
In the specific push-button-start fob demonstrated in this guide, the CR2032 is installed with the positive (+) side facing up.
That orientation should not be transferred to a differently shaped fob. Photograph the original battery before removal and follow design-specific documentation whenever the housing differs.
Can I open a Santa Fe key fob with a screwdriver or coin?
Only use a screwdriver or coin if the housing has a clearly defined side notch intended for that method. Place the tool in the notch and twist gently.
Do not insert a screwdriver into an arbitrary point along the seam. The push-button-start design covered above is opened with the end of its removed emergency key at an opening point inside the vacated key slot.
If modest pressure does not release the case, stop and verify the design.
Will changing the battery erase my Santa Fe key-fob programming?
The available evidence does not establish that routine battery replacement universally erases the programming of a previously paired Santa Fe fob. Generic dealership guidance conflicts, and none of it provides one rule for every Santa Fe year, market, ignition type, and fob design.
Before treating the problem as a programming issue, verify the battery type, polarity, seating, terminal contact, and case closure. If the fob remains unresponsive, use the applicable owner’s manual or a Hyundai service provider for model-specific synchronization or diagnosis.
What should I check if the key fob still does not work after replacement?
Check, in order:
- The replacement battery code matches the verified specification.
- The cell is installed in the correct orientation.
- The battery lies flat and is fully seated.
- The terminals make contact.
- The housing is completely closed.
- Another fresh battery of the exact same type produces the same result.
- The case, buttons, contacts, and visible electronics are not damaged or wet.
- The fob still fails away from possible interference.
- A spare paired fob either works or fails under the same conditions.
A working spare points toward a problem in the first fob. Failure of multiple paired fobs may justify vehicle-side diagnosis. If the basic checks do not restore operation—particularly when the fob is damaged or both remotes fail—seek model-specific professional diagnosis.